Radiator Simple WiFi Authentication User Guide
Table of Contents
- General information
1.1 Checklist for getting started - Overview
- NAS Clients
3.1 Viewing NAS clients
3.2 Adding NAS clients
3.3 Removing NAS clients
3.4 Modifying NAS clients
3.5 Error: Missing NAS clients? - Users
4.1 Viewing users
4.2 Adding users one-by-one
4.3 Adding users with csv
4.4 Removing users
4.5 Modifying users
4.6 Exporting users to csv - Activity log
5.1 Viewing changes in activity log
5.2 Viewing errors in activity log
5.3 Description of errors in activity log - Alerts
6.1 Viewing and responding to alerts
6.2 Description of default alerts - Metrics
- Radiator logs and graphs
8.1 Accessing Radiator logs and graphs
8.2 Premade queries
8.3 Known issue: Accepts per authentication requests chart includes percentage
General information
- If you are looking for instructions to deploy Radiator Simple WiFi authentication from Azure Marketplace, please see the deployment guide.
- To use the managed application, you need both Managed Application Contributor and Monitor Reader roles in your Azure subscription.
- The application enforces a restriction on the number of users you can add, based on the offering you deployed. These restrictions are:
- Starter: 50 User IDs.
- Basic: 100 User IDs.
- Pro: 500 User IDs.
- Premium: 1000 User IDs.
- Radiator Cloud internal licence is tied to Ubuntu operating system’s long-term support schedule. Once support for the operating system the managed application runs on expires, you will need to export users from the application and re-deploy with the newer operating system. For the initial releases of Radiator Simple WiFi Authentication, this date is 06/2027.
- If you’ve purchased the Premium plan for Radiator Simple WiFi Authentication, your plan includes deployment assistance and direct support access. The contact e-mail address for inquiries will be shown at the top of the overview window.
- If you have added NAS clients, buts the ‘NAS Clients’ view shows no results and a red error box at the top of the view, see instructions at Error: Missing NAS clients?.
Checklist
- Deploy the Radiator Cloud Simple Wifi Authentication managed application from Azure marketplace.
- Add one or more NAS clients (See Adding NAS clients for instructions). The NAS client IP address you enter here must match your NAS client IP.
- Access your network device configuration by logging into your NAS client.
- Add an AAA server or RADIUS server. The menus and name might differ for different device vendors. The following example pictures are from Cisco WLC.
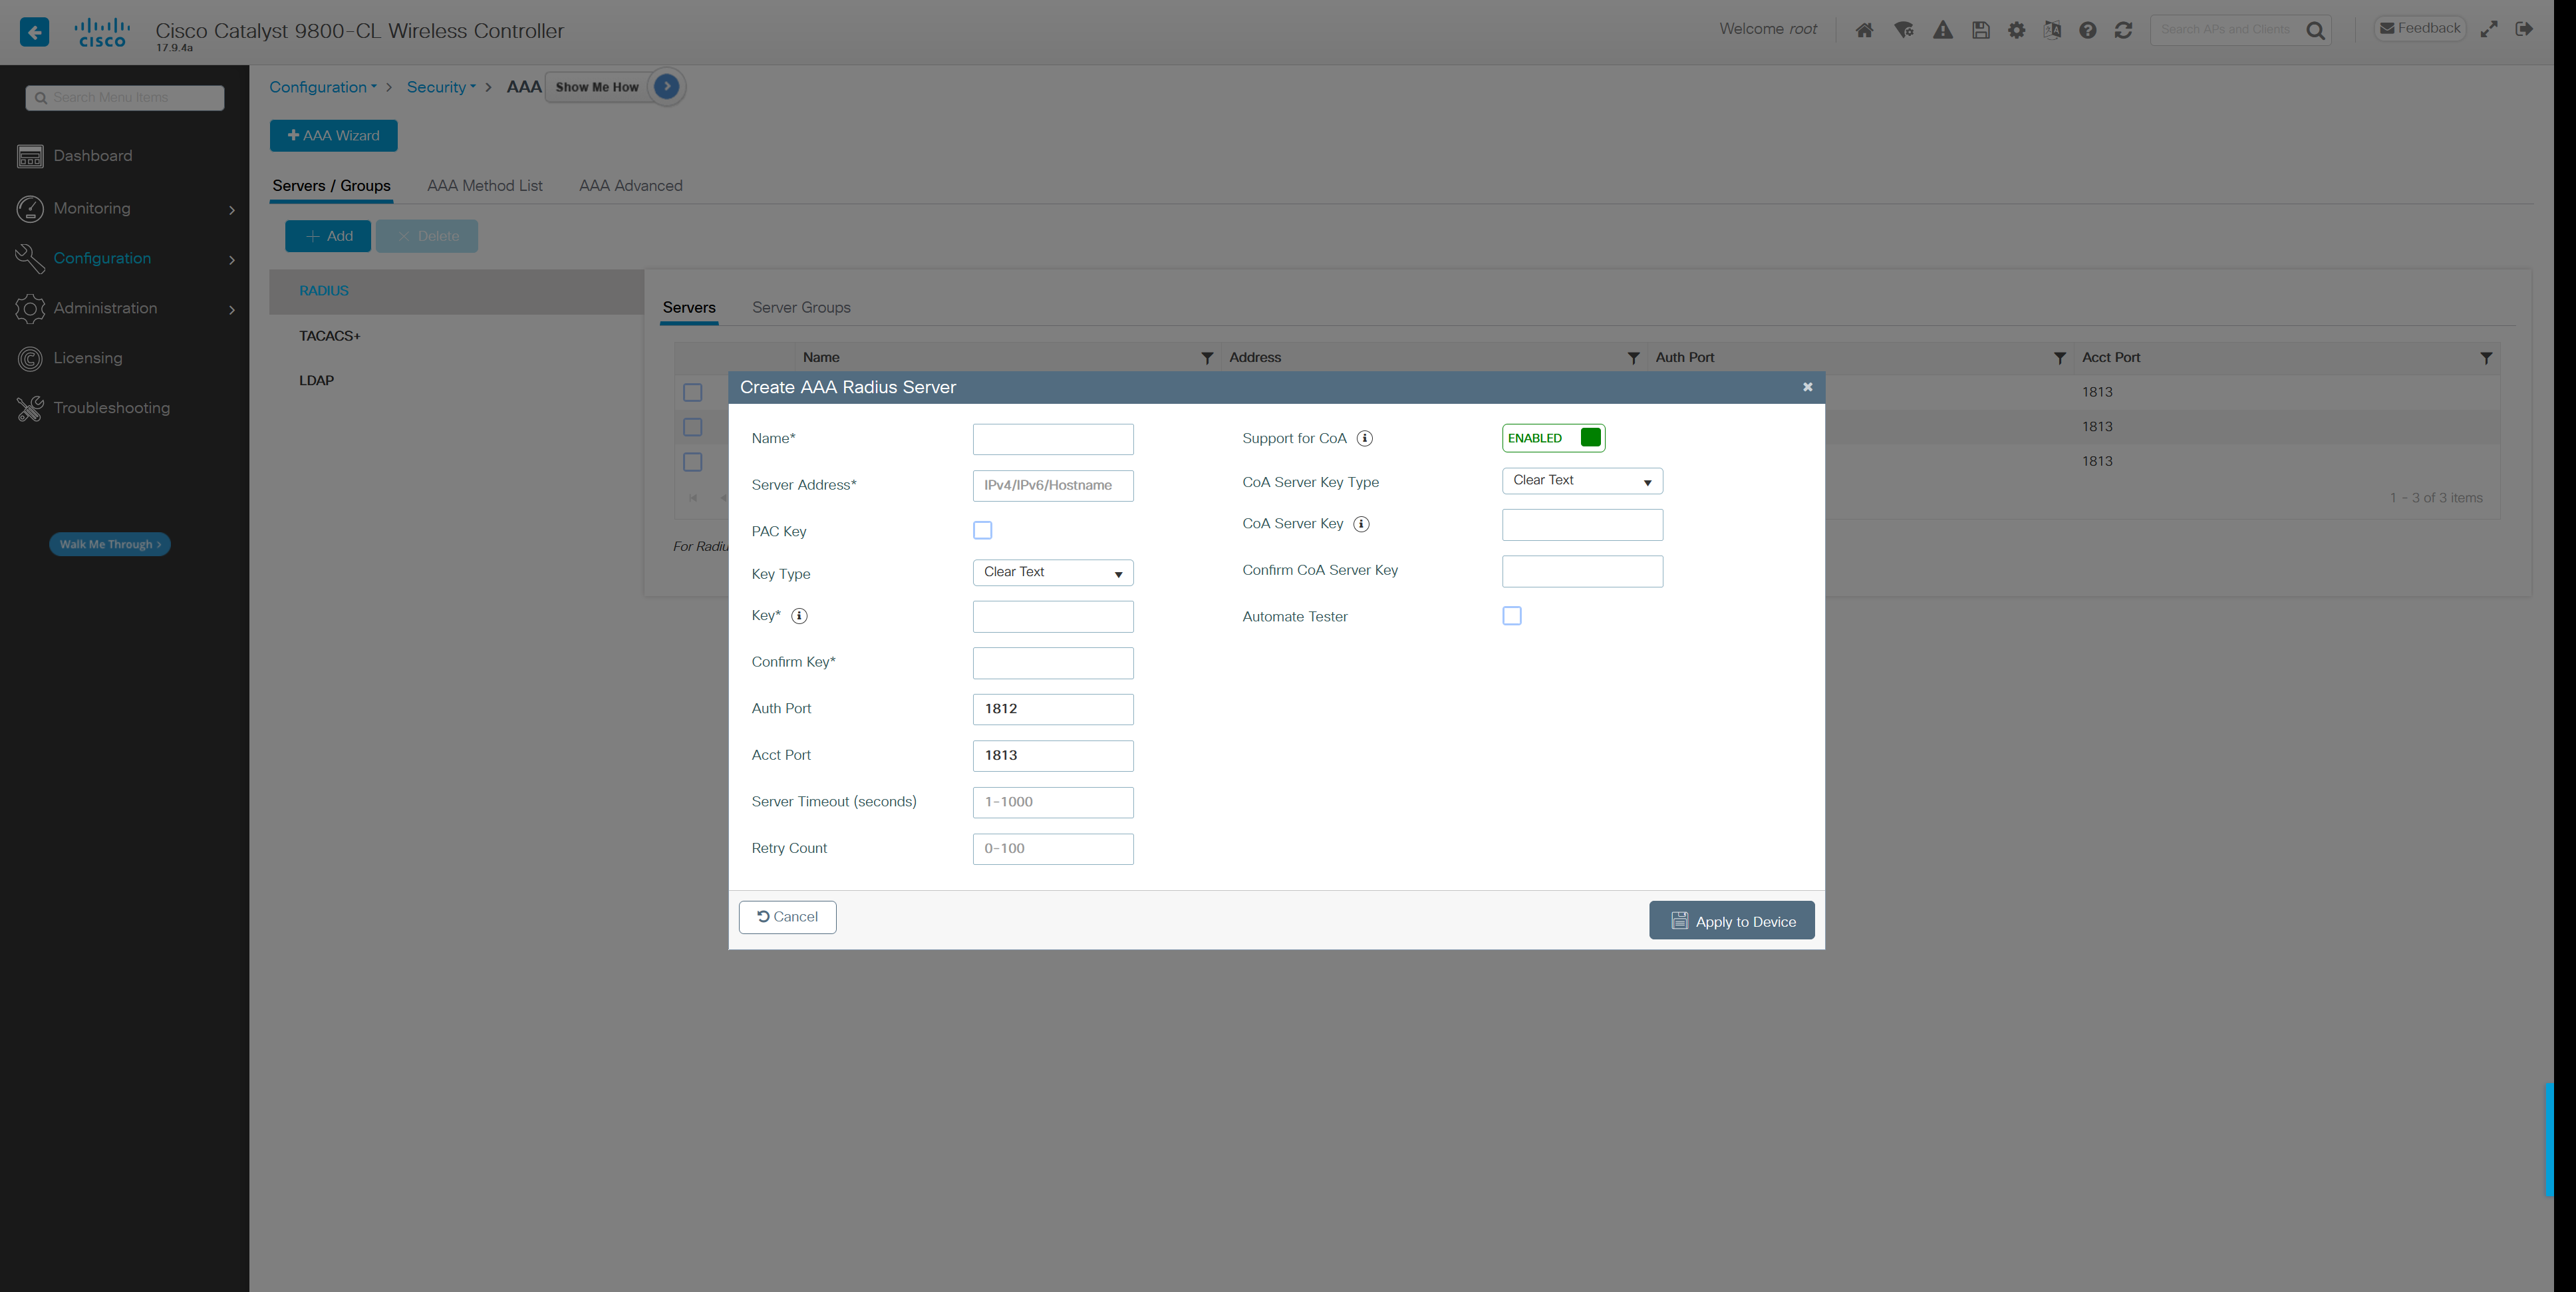
- Copy your Radiator IP address from the ‘Parameters and Outputs’ section of the managed application (parameter radiatorIP) and paste it as the server address.
- Copy the shared secret you entered or generated in the ‘NAS Clients’ section and paste it as the ‘secret’, ‘shared secret’ or ‘Key’ value depending on your device manufacturer.
- Use Authentication port 1812 and Accounting Port 1813. Your configuration should look something like in the picture below.

- Save these settings. For possible additional configuration options, please refer to your NAS device’s documentation.
- Add a user (See Adding users one-by-one or Adding users with csv for more instructions).
After the changes have been updated to your NAS client and the application’s database, you should be able to log into the network with the credentials you have created in Azure.
Overview
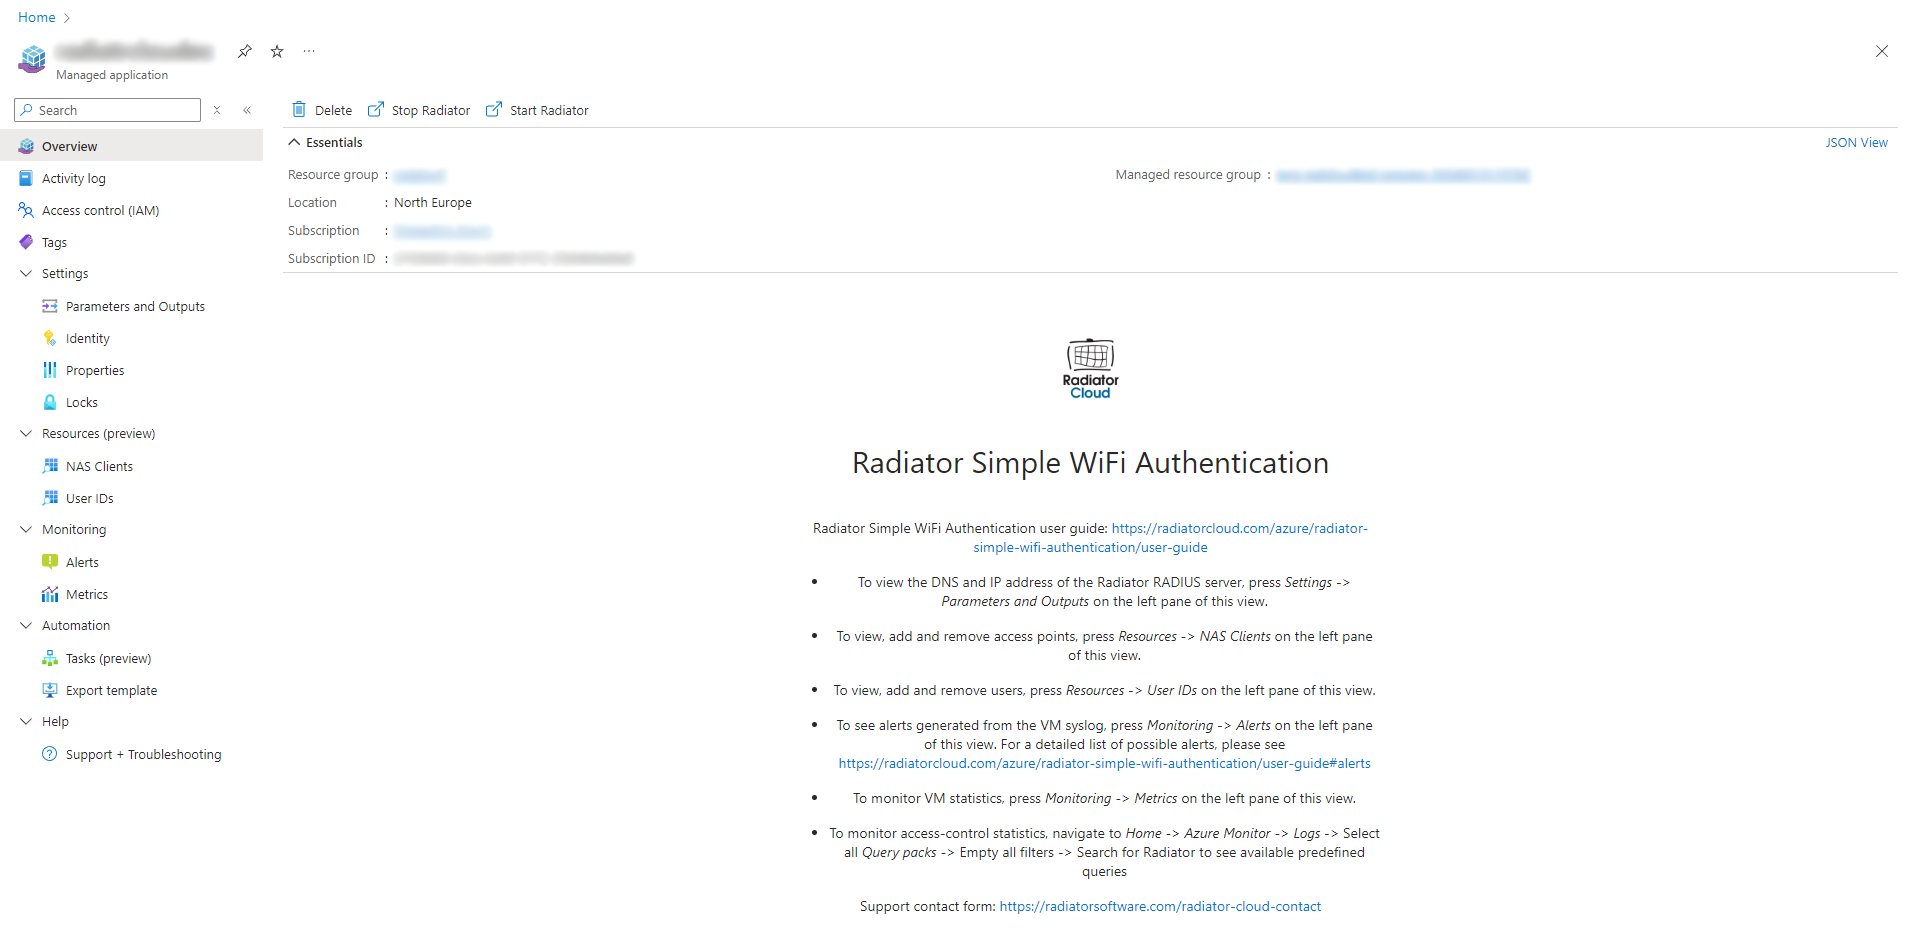
This is the overview screen of the application. It contains basic information about the application at the top as well as short descriptions of each menu at the bottom.
There are several menus and functionality you can access from this page. At the top, there are two buttons for starting and stopping Radiator. Stopping Radiator will not stop or remove the application, but it will stop any further authentications from going through.
NOTE: Stopping Radiator will not stop or decrease the application’s running costs, it only stops authentications from going through.
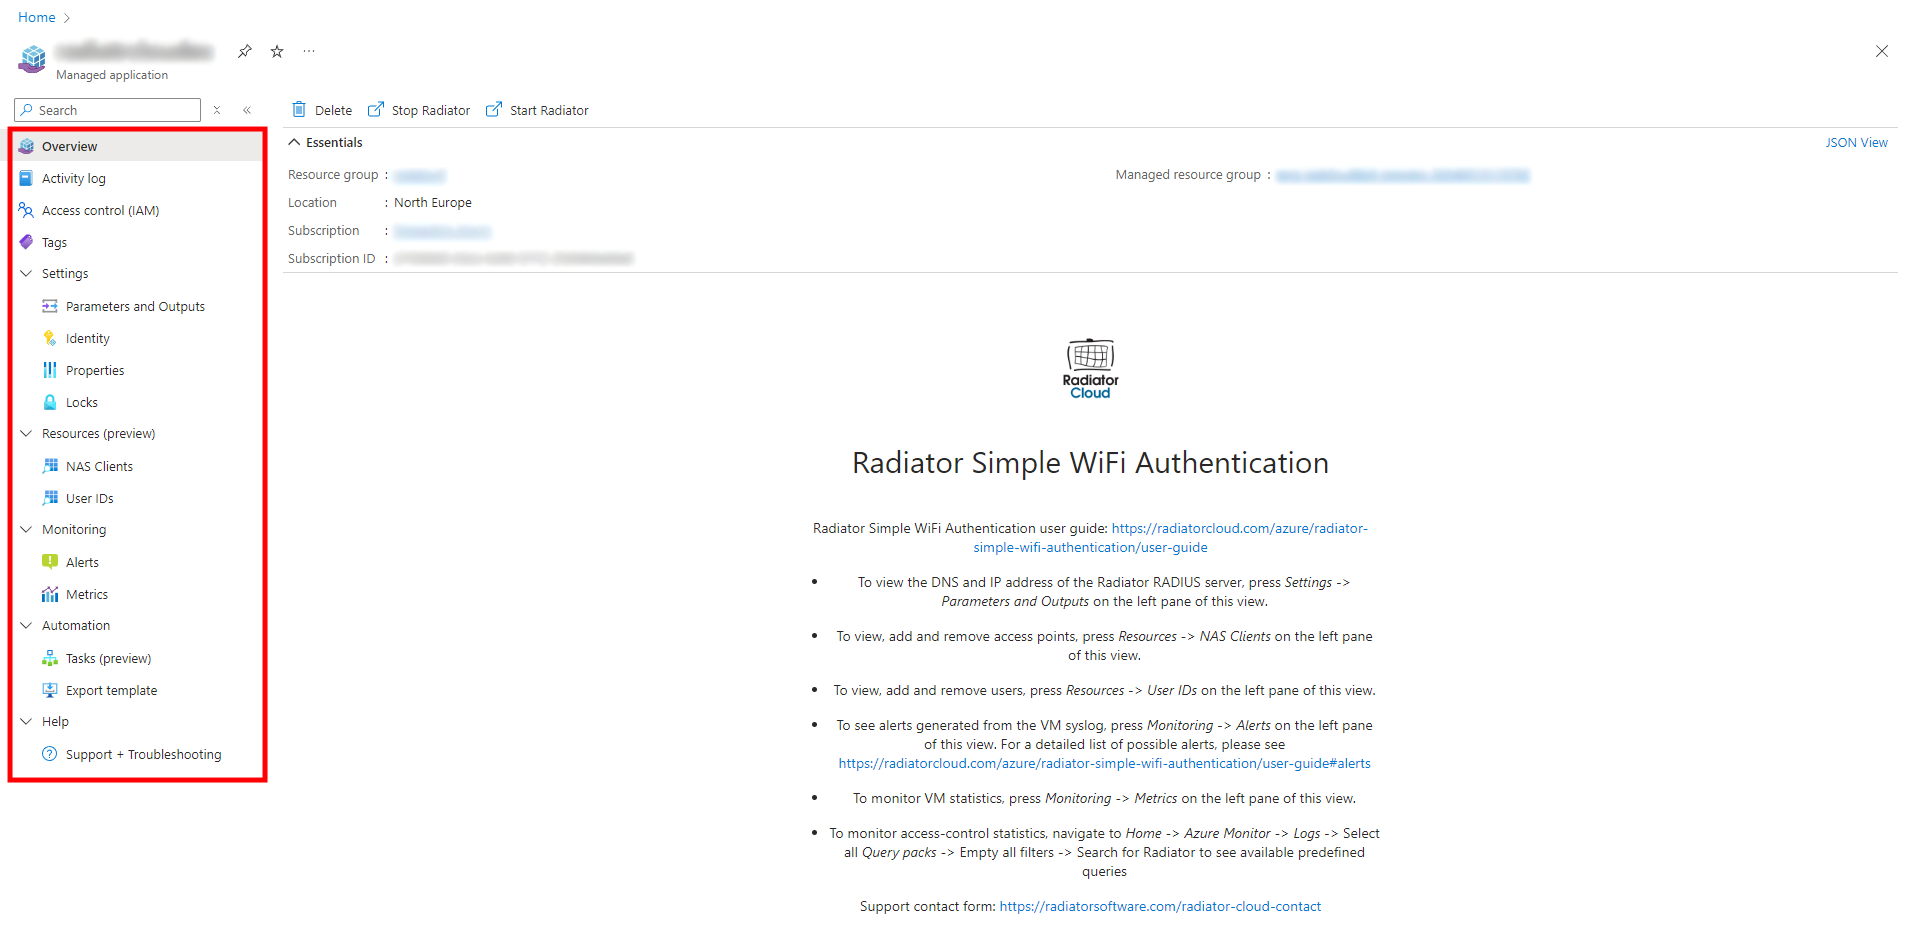
On the left pane of the application, there are several menus you can access.
- Overview: Takes you back to this screen.
- Activity log: Shows a log of changes made within the application, such as adding and removing NAS clients and users.
- Parameters and Outputs: Shows application parameters, the main one needed here is the Radiator RADIUS server IP and DNS address, which is used in the access points to direct authentication traffic to the application.
- NAS Clients: Adding, modifying and removing access points is done in this menu.
- User IDs: Adding, modifying and removing users is done in this menu.
- Alerts: Displays alerts for the application, for more information about default alerts please see Description of default alerts.
- Metrics: Displays statistics (CPU, RAM, availability) for the VM Radiator Cloud managed application runs on.
Radiator logs and related graphs are accessed through Azure Monitor. Instructions to monitoring Radiator logs and graphs can be found at Radiator logs and graphs section.
NAS Clients
Viewing NAS clients

Navigate to ‘NAS Clients’ on the left pane of the application.
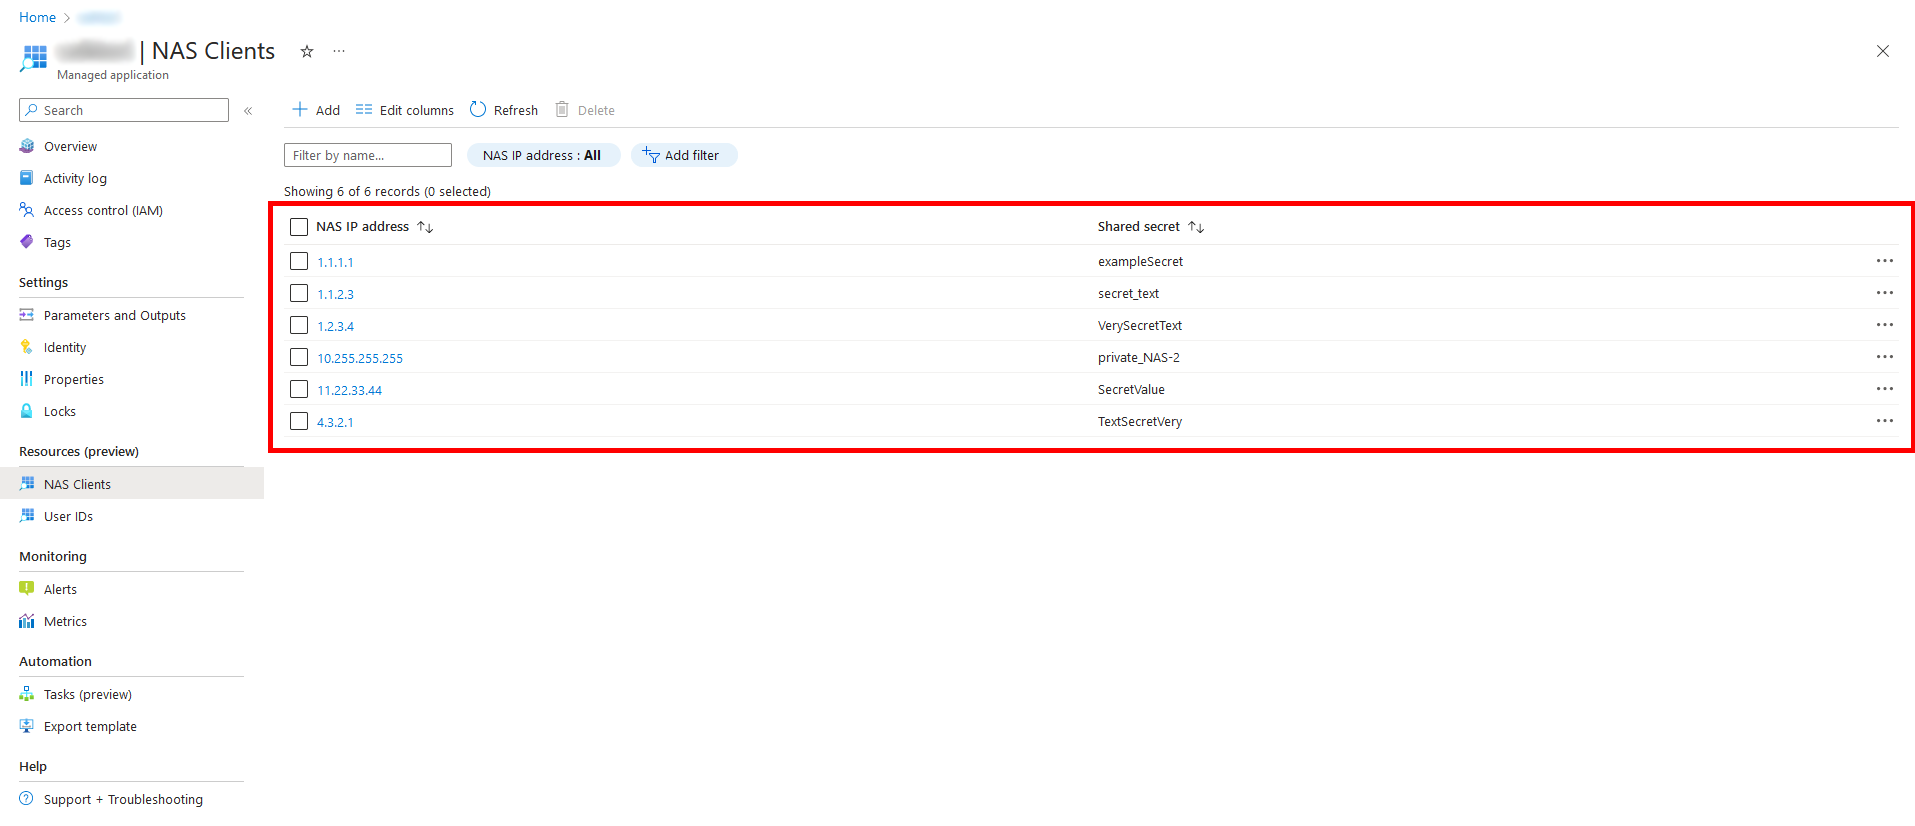
Your NAS Clients will be displayed here.
Adding NAS clients
Navigate to ‘NAS Clients’ on the left pane of the application.
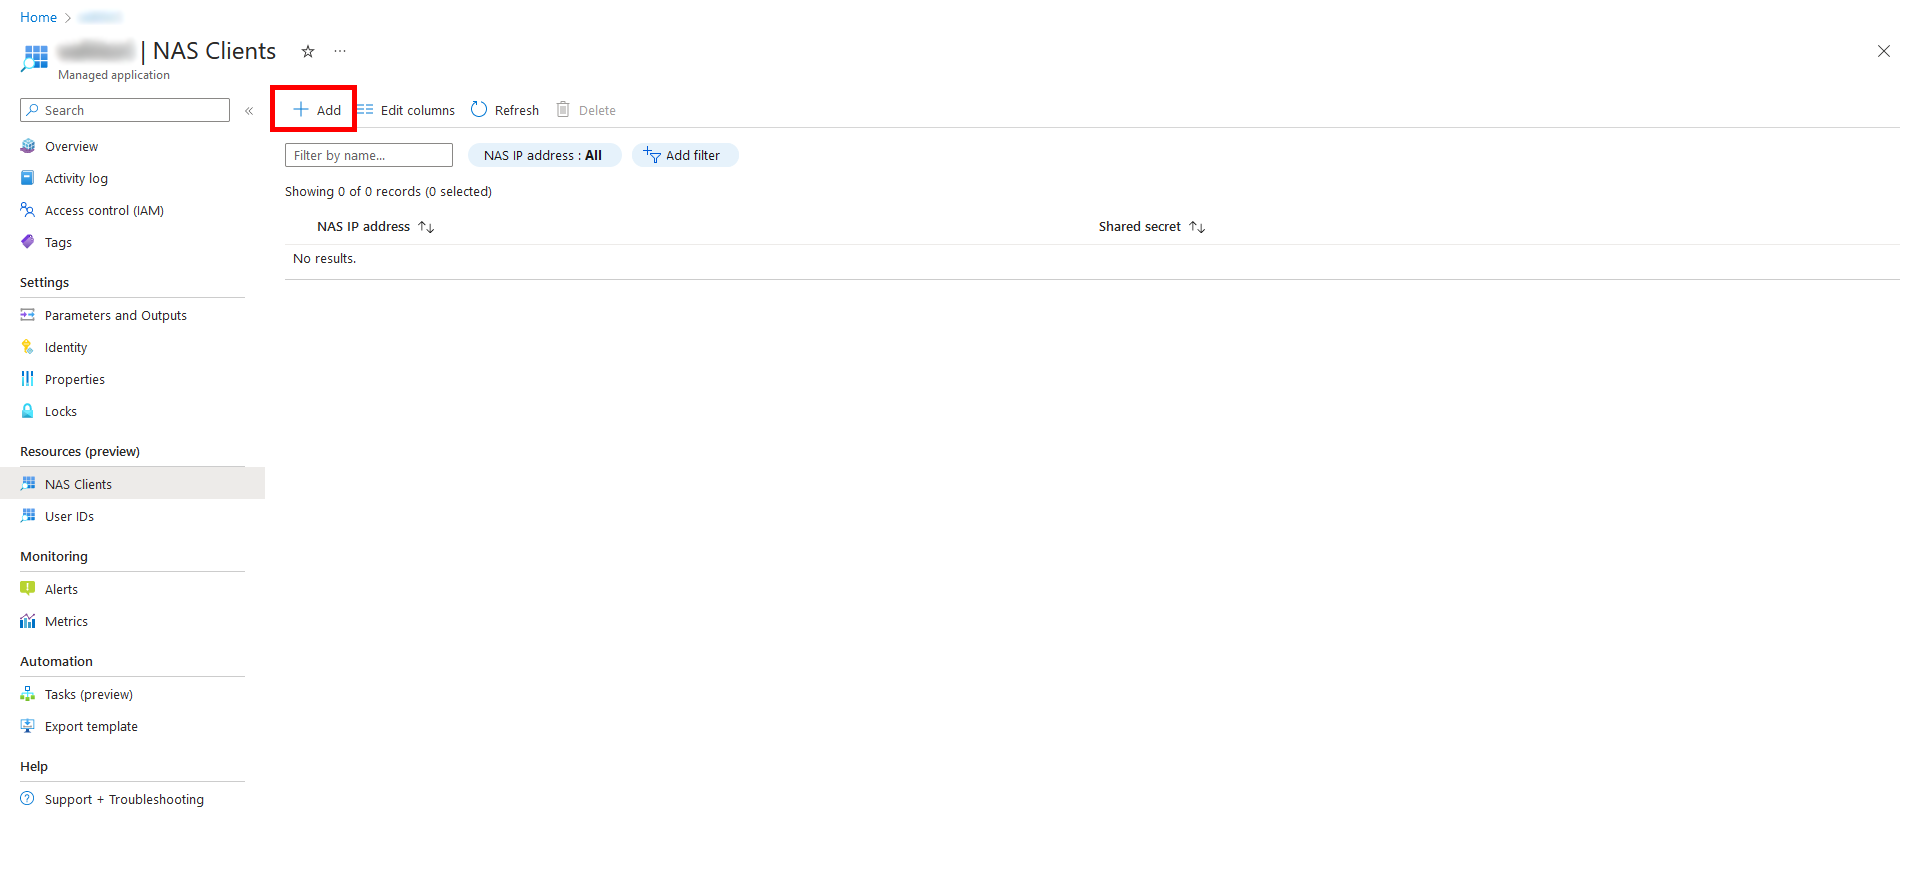
Press ‘Add’ at the top of the view.

Fill out the NAS IP address and shared secret. It is important to have the same shared secret within the device and in Azure as the solution does not work without it.
Choose whether the server should require Message Authenticator to be used for this NAS client. Enabling Message Authenticator enhances RADIUS traffic security, if you can configure NAS to use it, it is recommended. If you are unsure whether your NAS client supports this, leave this option ‘Off’.
After filling out the information, press either ‘Next’ or ‘Review + submit’.
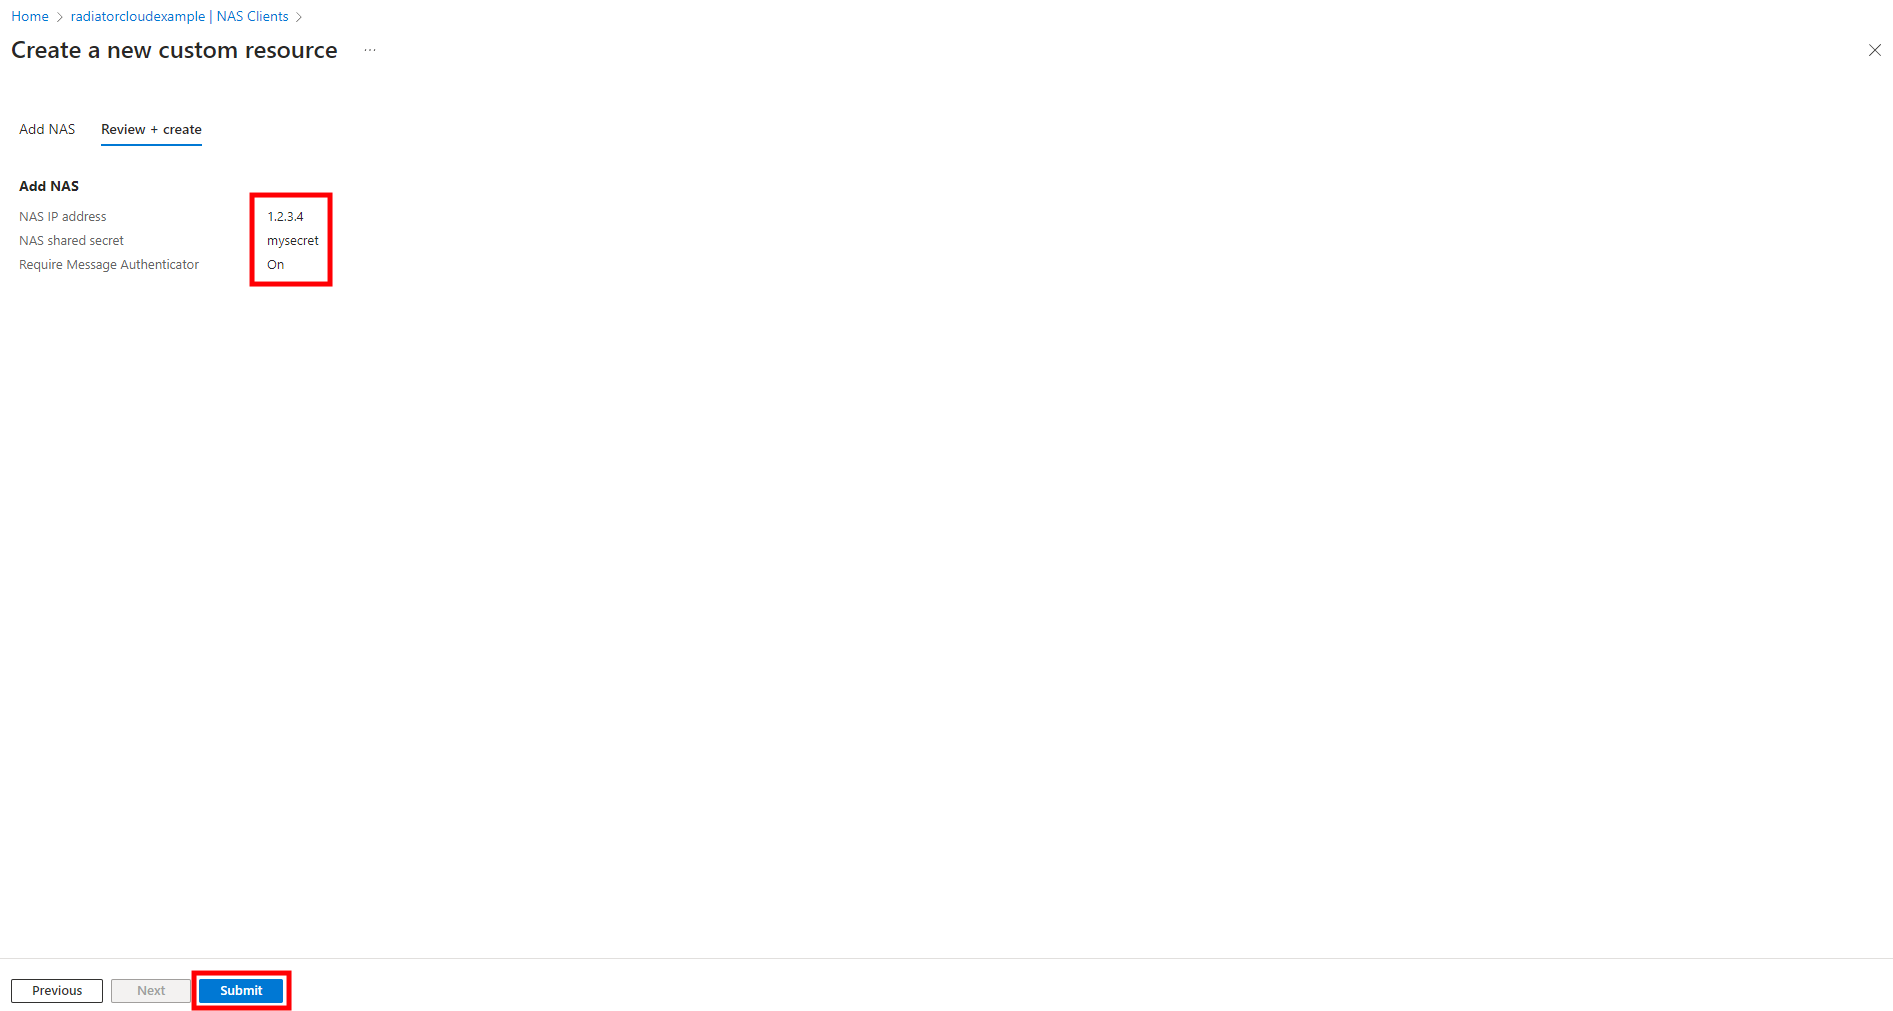
Review the NAS device IP and shared secret and when they are correct, press ‘Submit’ at the bottom of the view.
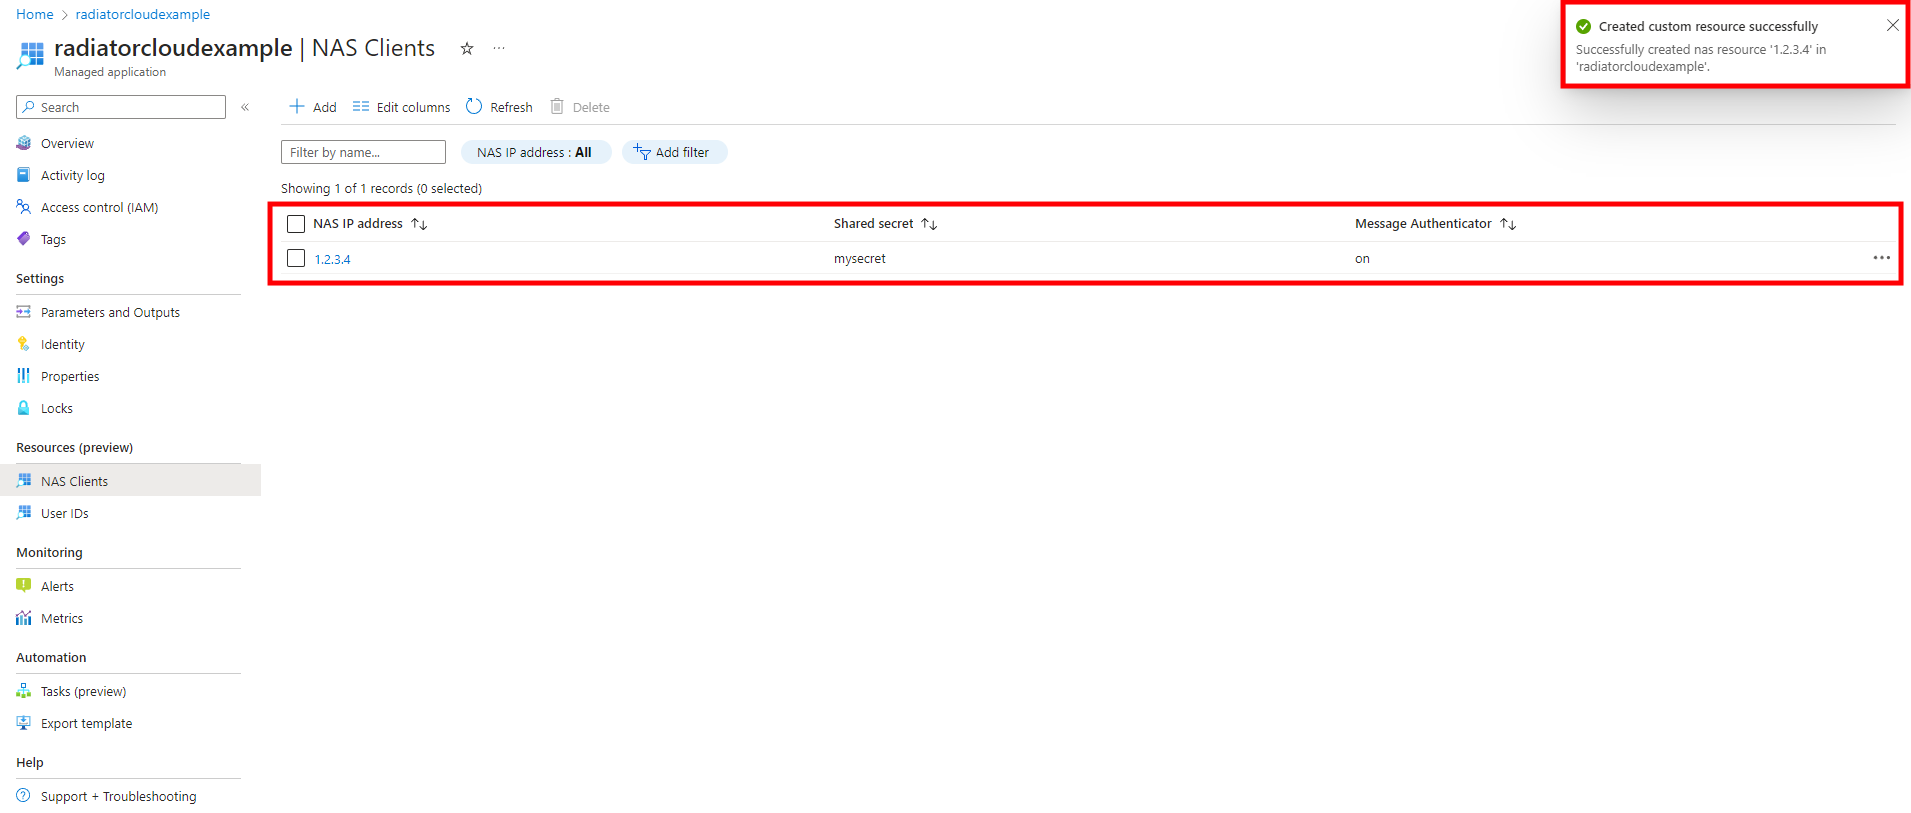
You have now added a new NAS device for the Azure Application. You should see a notification at the top right of your screen stating “Created custom resource successfully”.
Removing NAS clients
Navigate to ‘NAS Clients’ on the left pane of the application.
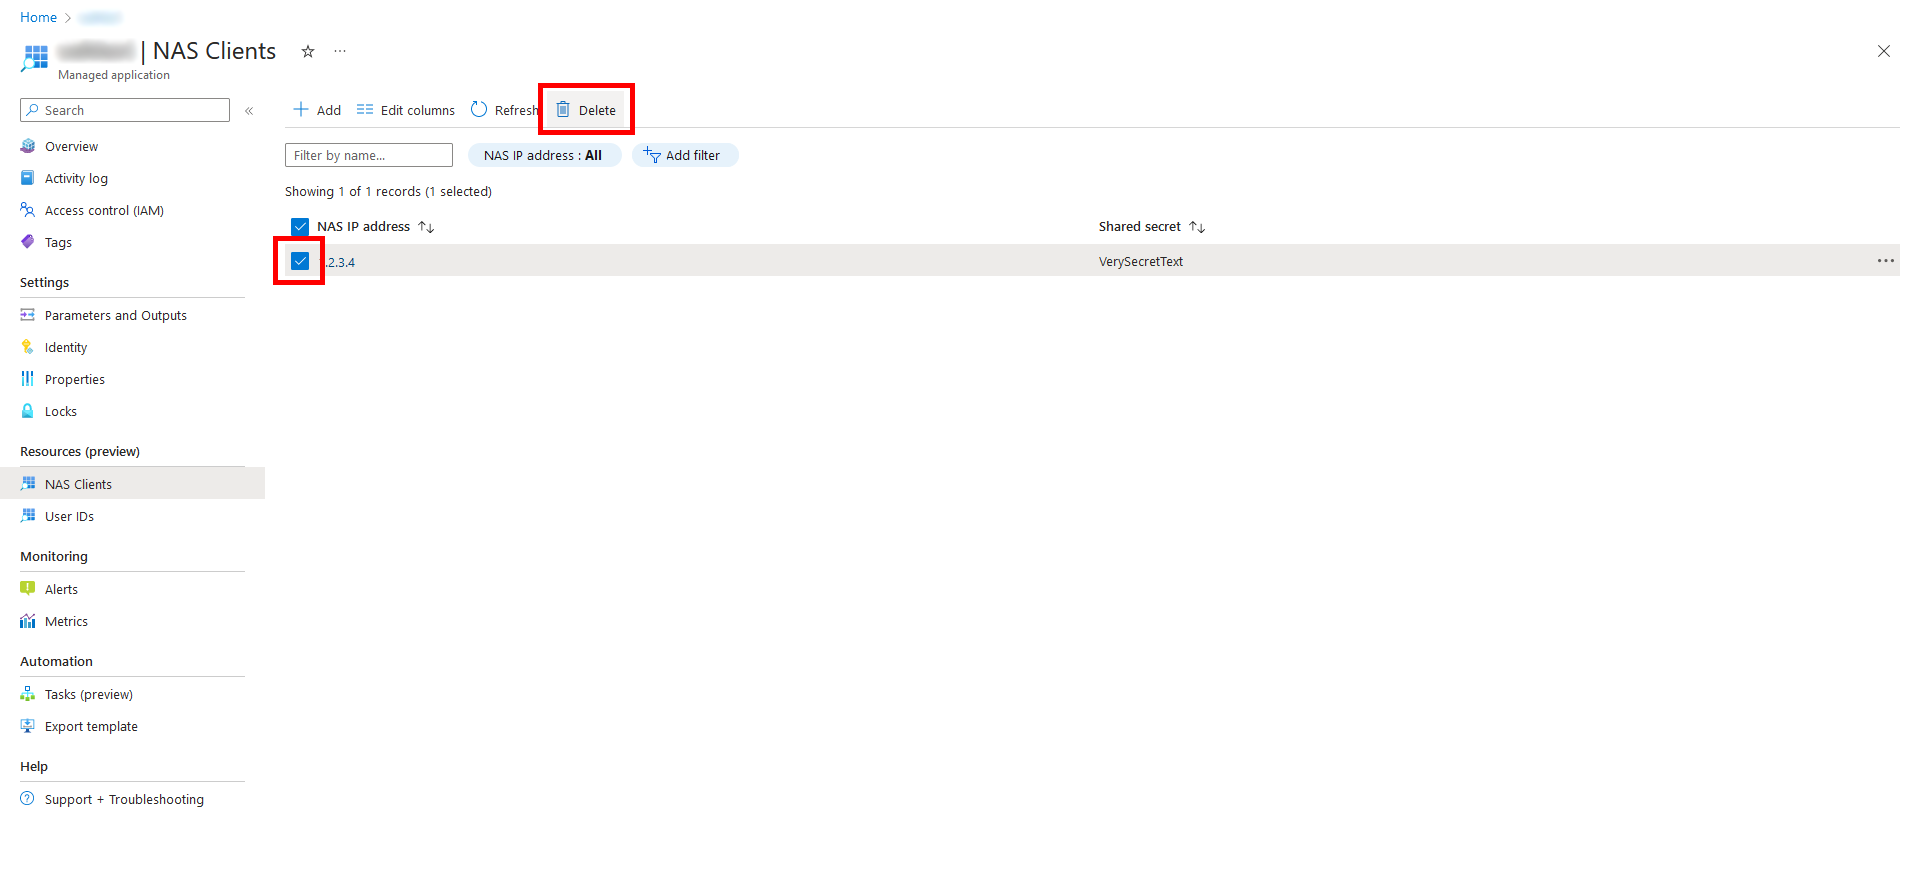
Select the NAS device you want to remove from the list of NAS devices by clicking the checkbox on the left side of the NAS list. Press ‘Delete’ at the top of the view.
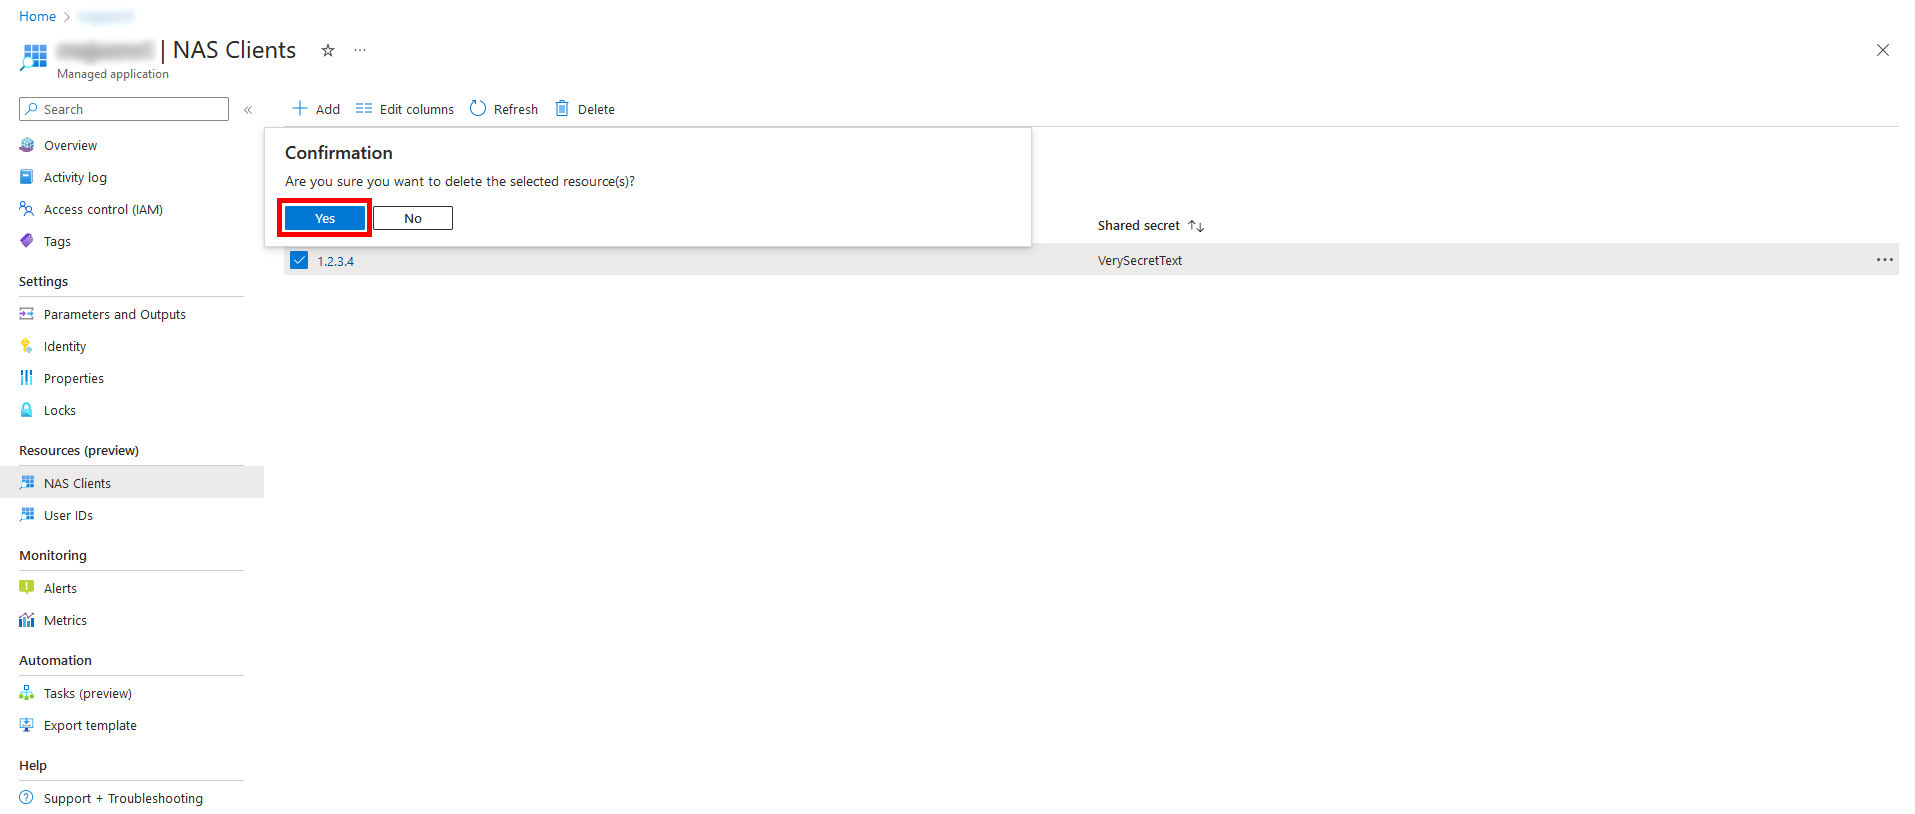
A confirmation window will pop up asking ‘Are you sure you want to delete the selected resource(s)?’
Select ‘Yes’.

You have successfully removed the selected NAS device for the Azure Application. You should see a notification at the top right of your screen stating “Deleted custom resource successfully”.
Modifying NAS clients
Azure UI does not allow modification of NAS custom resources. Therefore, you will have to remove the existing NAS client and add the modified NAS client afterwards.
Navigate to ‘NAS Clients’ on the left pane of the application.

Locate the NAS client you want to modify from the list of clients.
Select and copy the information from the NAS IP address and Shared secret fields and optionally paste them onto a temporary text file.
Select the NAS device you want to remove from the list of NAS devices by clicking the checkbox on the left side of the NAS list. Press ‘Delete’ at the top of the view.
A confirmation window will pop up asking ‘Are you sure you want to delete the selected resource(s)?’
Select ‘Yes’.
Press ‘Add’ at the top of the view.
Paste the NAS IP address and shared secret from your clipboard or from the temporary text file and make the changes you wanted to make.
Remember to also make this modification within the NAS client so it has the same shared secret. It is important to have the same shared secret within the device and in Azure as the solution does not work without it.
Choose whether the server should require Message Authenticator to be used for this NAS client. Enabling Message Authenticator enhances RADIUS traffic security, if you can configure NAS to use it, it is recommended. If you are unsure whether your NAS client supports this, leave this option ‘Off’.
After filling out the information, press either ‘Next’ or ‘Review + submit’.
Review the NAS device IP and shared secret and when they are correct, press ‘Submit’ at the bottom of the view.
You have now successfully modified the NAS device in the Azure Application. You should see a notification at the top right of your screen stating “Created custom resource successfully”.
Error: Missing NAS Clients?

If you have added NAS clients but the NAS Clients view is empty and the view has an error like shown above, it means the Radiator server is stopped.
To fix this, navigate to the left side of the view and press ‘Overview’.

At the top middle of the view, press ‘Start Radiator’.
Afterwards, press ‘NAS Clients’ at the left pane of the view to navigate back to the NAS Clients section.

Your NAS clients should now be visible.
Users
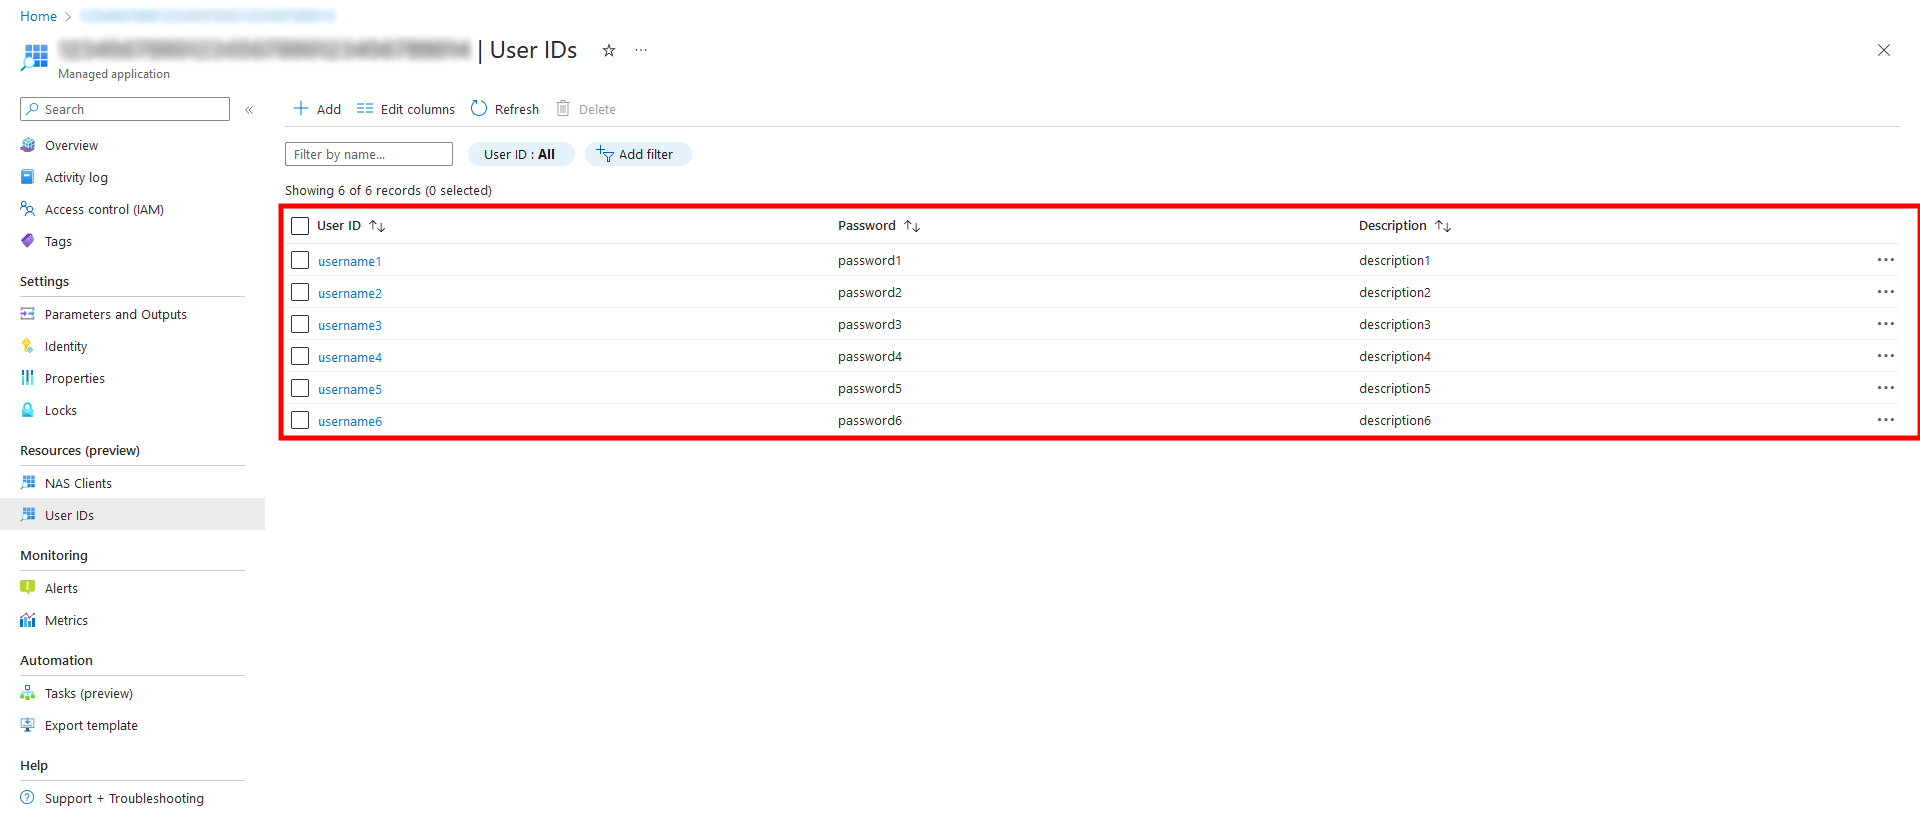
Viewing users

Navigate to ‘User IDs’ on the left pane of the application.

The existing User IDs will be displayed here.
Adding users one-by-one
*Note: If you want to add multiple users at once, please see the section ‘Adding users with csv’
Navigate to ‘User IDs’ on the left pane of the application.

Press ‘Add’ at the top of the view.

In ‘Select how to add information’, select ‘Insert one-by-one’.
Fill out the username, password and optionally user description.
After filling out the information, press either ‘Next’ or ‘Review + submit’.

Review the username, password and user description and when they are correct, press ‘Submit’ at the bottom of the view.
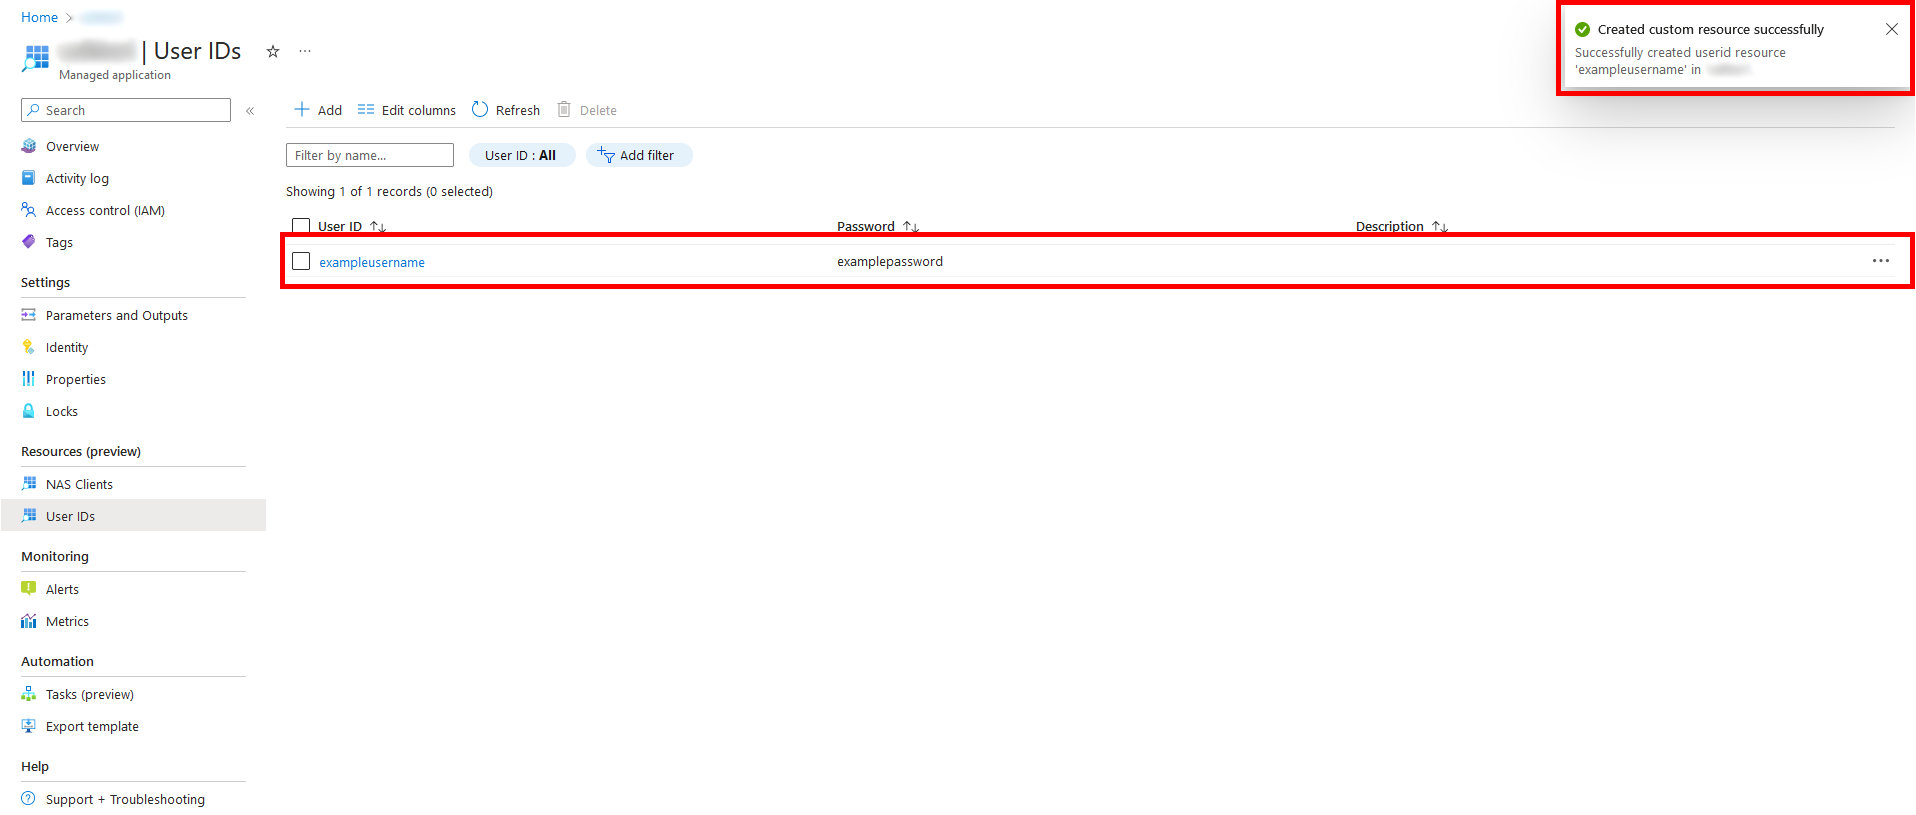
You have now added a new User ID for the Azure Application. You should see a notification at the top right of your screen stating “Created custom resource successfully”.
Adding users with csv
Navigate to ‘User IDs’ on the left pane of the application.
Press ‘Add’ at the top of the view.

In ‘Select how to add information’, select ‘Insert with csv’.
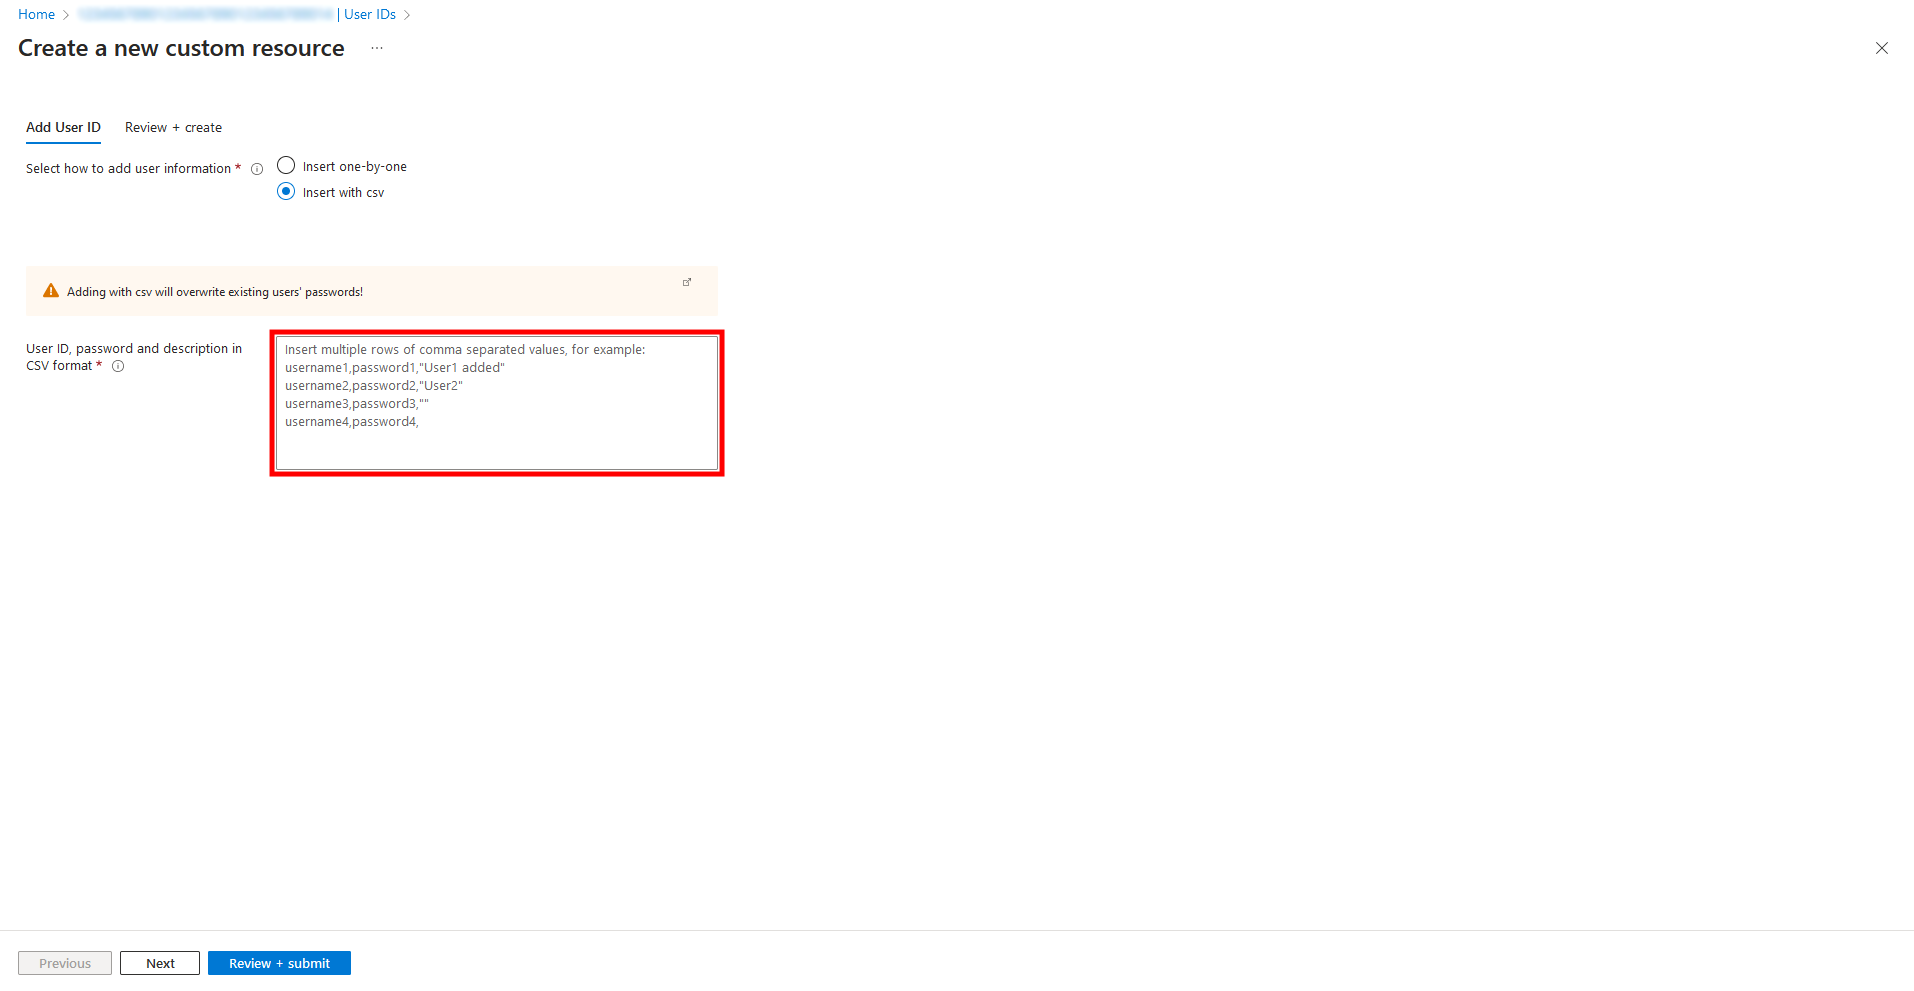
You’ll notice the view has changed.
The textbox includes a brief description of the correct syntax.
The addition will work both with standard csv format as well as the common Excel csv with ; as separator.
However, the syntax must be consistent within one addition
Example 1:
username1,password1,”description1”
username2,password2,”description2”
username3,password3,”description3”
Example 2:
username4;password4;description4
username5;password5;description5
username6;password6;description6
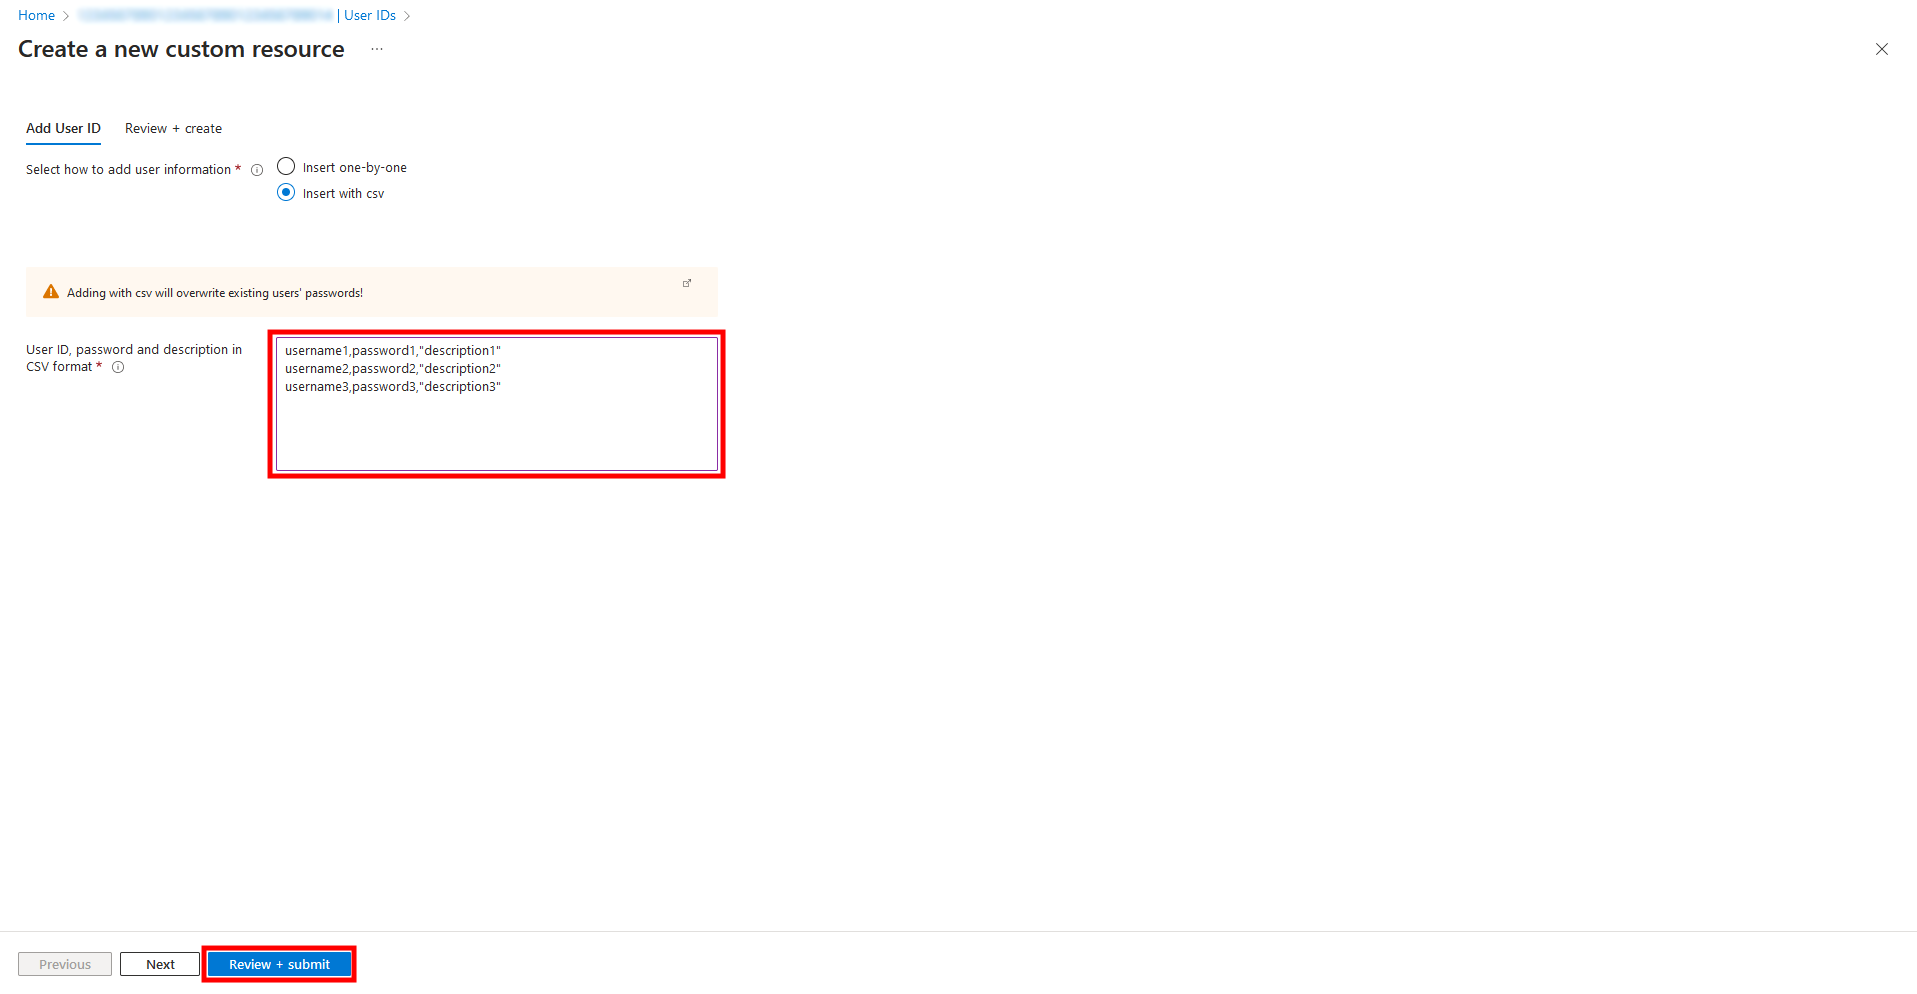
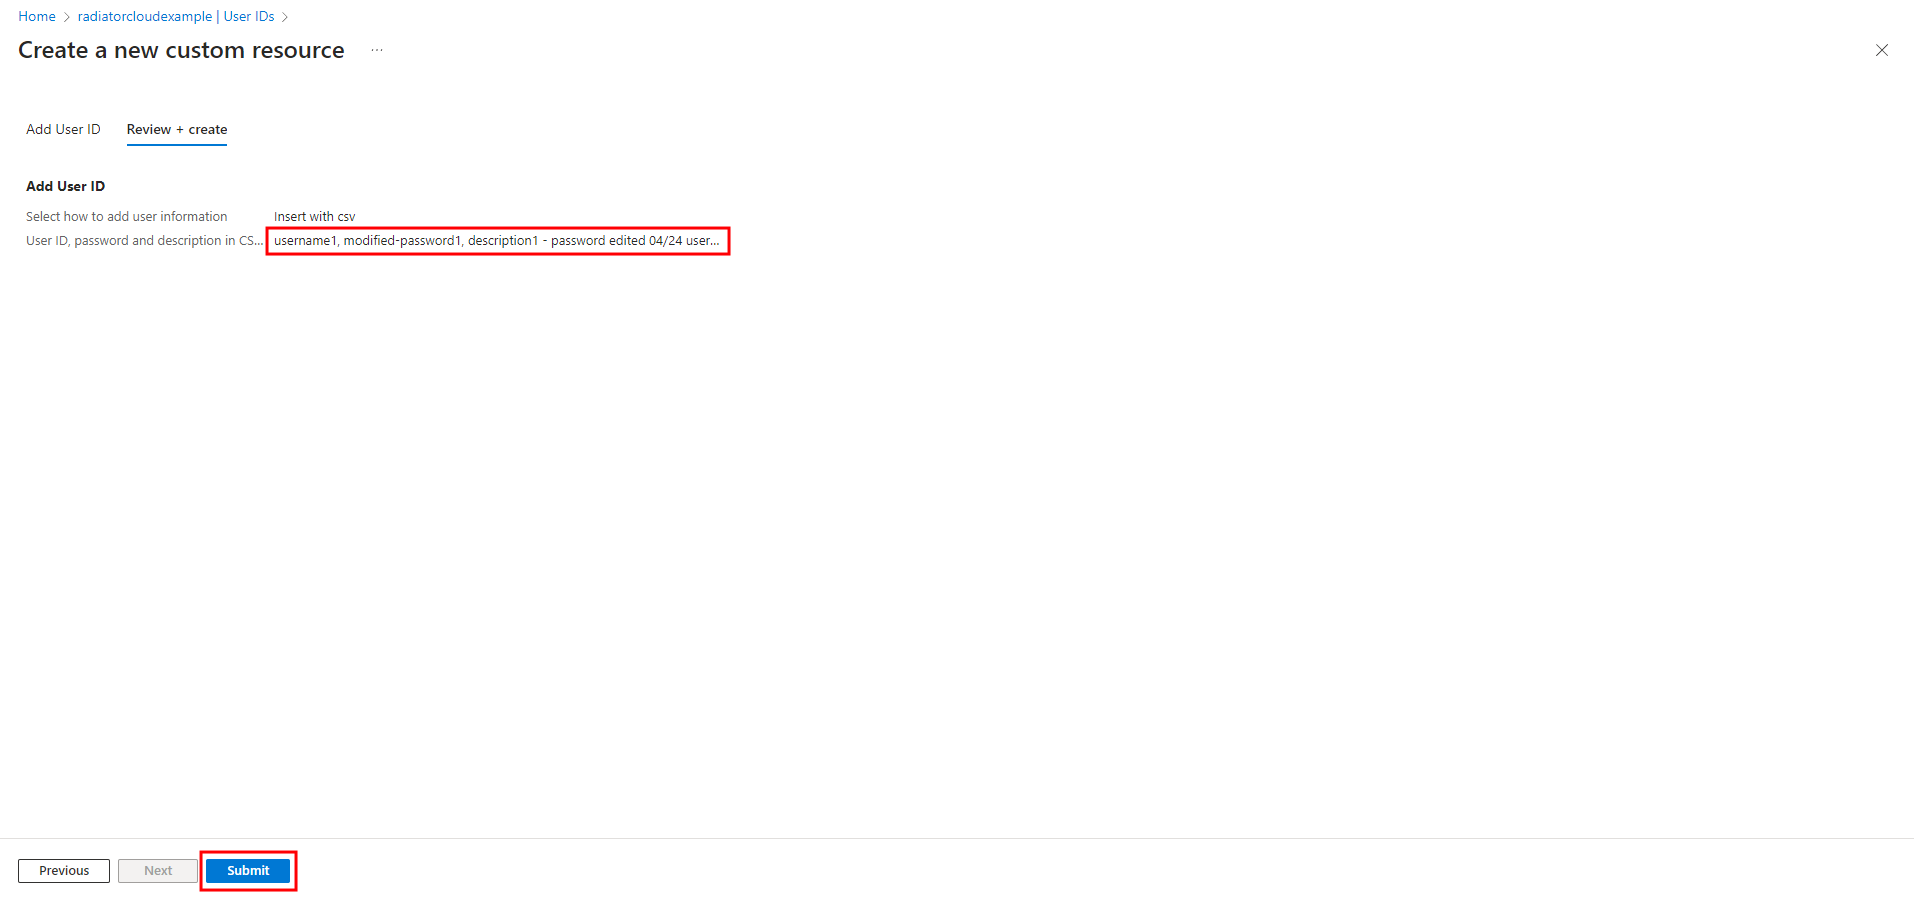
Fill out the user IDs, passwords and descriptions according to the examples above. After filling the information, press ‘Review + submit’.
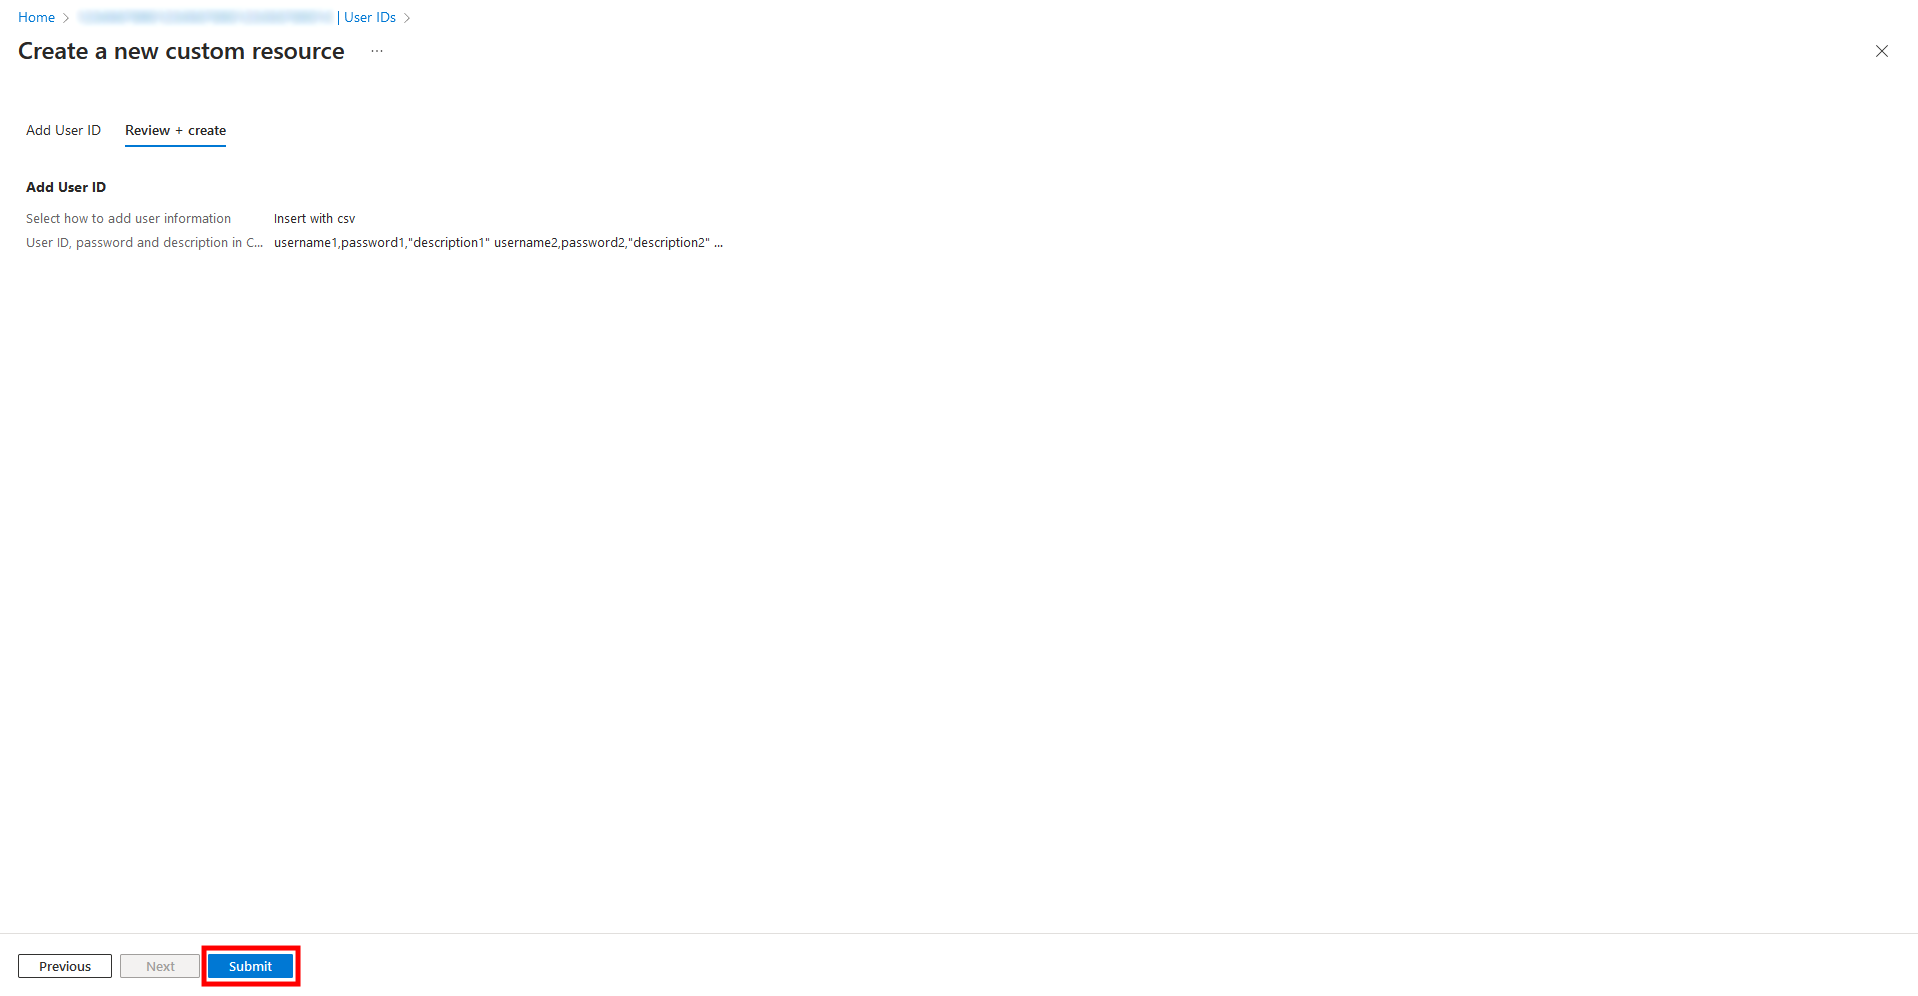
In the next view, press ‘Submit’.
After a few seconds, you should see the users added in the middle of the view.
Please note that the more users you add, the longer this will take.
Removing users
Navigate to ‘User IDs’ on the left pane of the application.

Select the User ID(s) you want to remove from the list of NAS devices by clicking the checkbox on the left side of the row. Press ‘Delete’ at the top of the view.
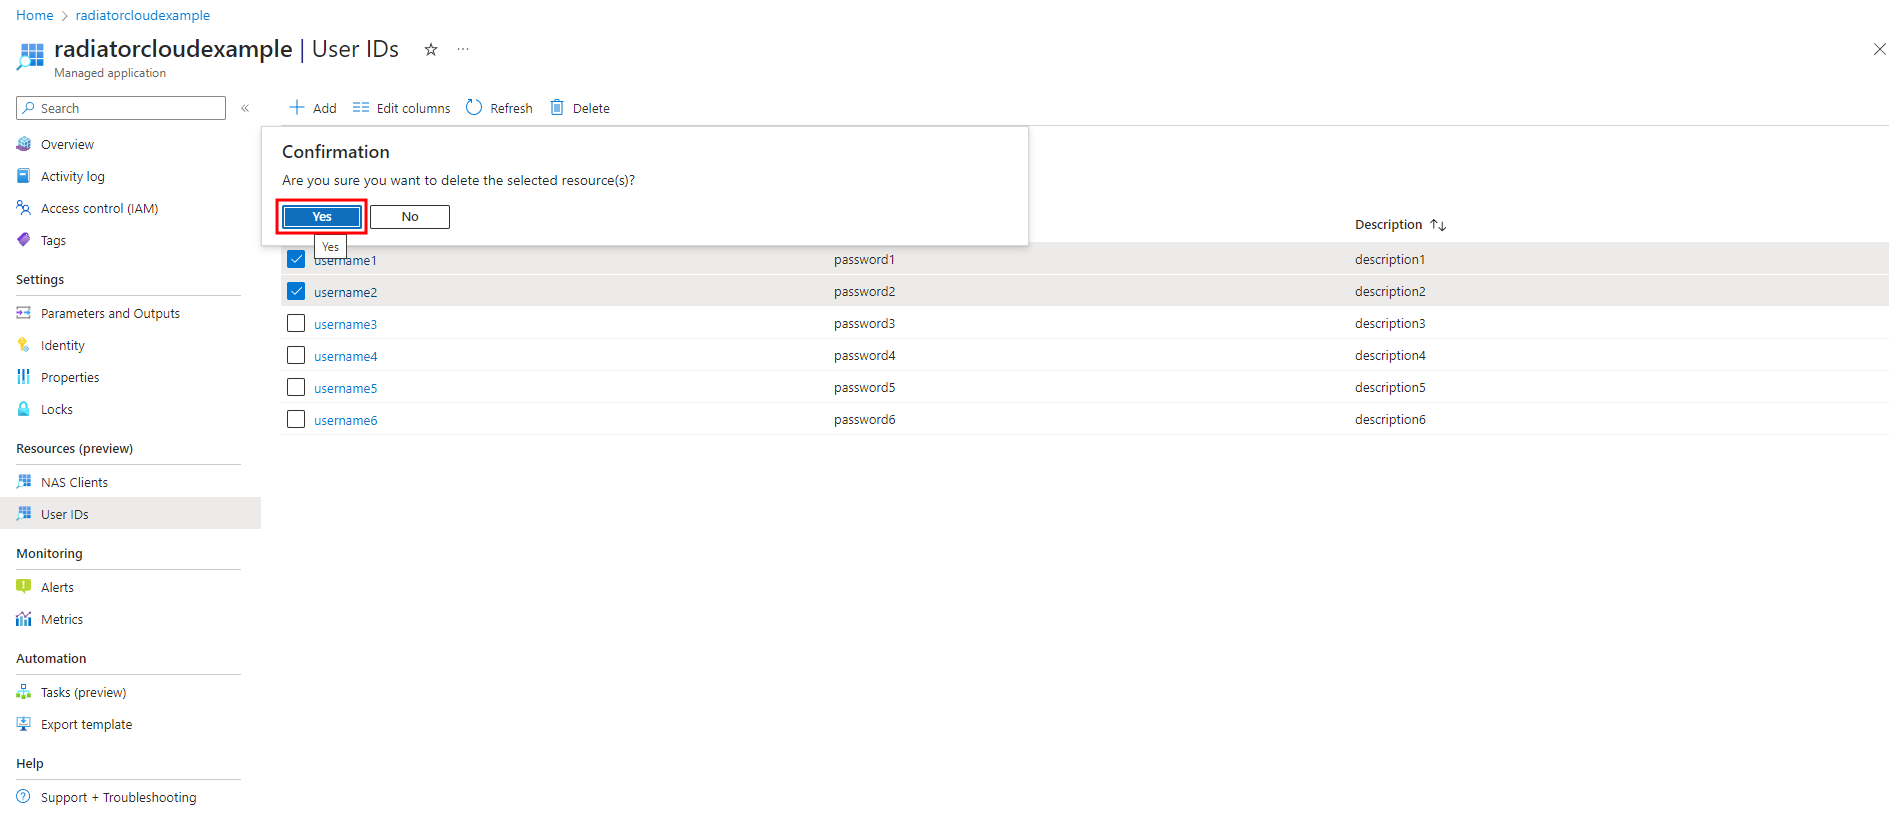
A confirmation window will pop up asking ‘Are you sure you want to delete the selected resource(s)?’
Select ‘Yes’.

You have successfully removed the selected User ID(s) from the Azure Application. You should see a notification at the top right of your screen stating “Deleted custom resource(s) successfully”.
Modifying users
Azure UI does not allow modification of custom resources. Therefore, you will have to remove the existing User ID and add the modified User ID afterwards.
However, if you need to modify passwords and decriptions for existing User IDs, you can simply add with csv as it overwrites existing information.
Navigate to ‘User IDs’ on the left pane of the application.
Locate the User ID(s) you want to modify from the list of users.
Select and copy the information from the User ID, password and user description fields and optionally paste them onto a temporary text file.
Select the User ID(s) you want to remove from the list by clicking the checkbox on the left side of the row. Press ‘Delete’ at the top of the view.
A confirmation window will pop up asking ‘Are you sure you want to delete the selected resource(s)?’
Select ‘Yes’.
Press ‘Add’ at the top of the view.
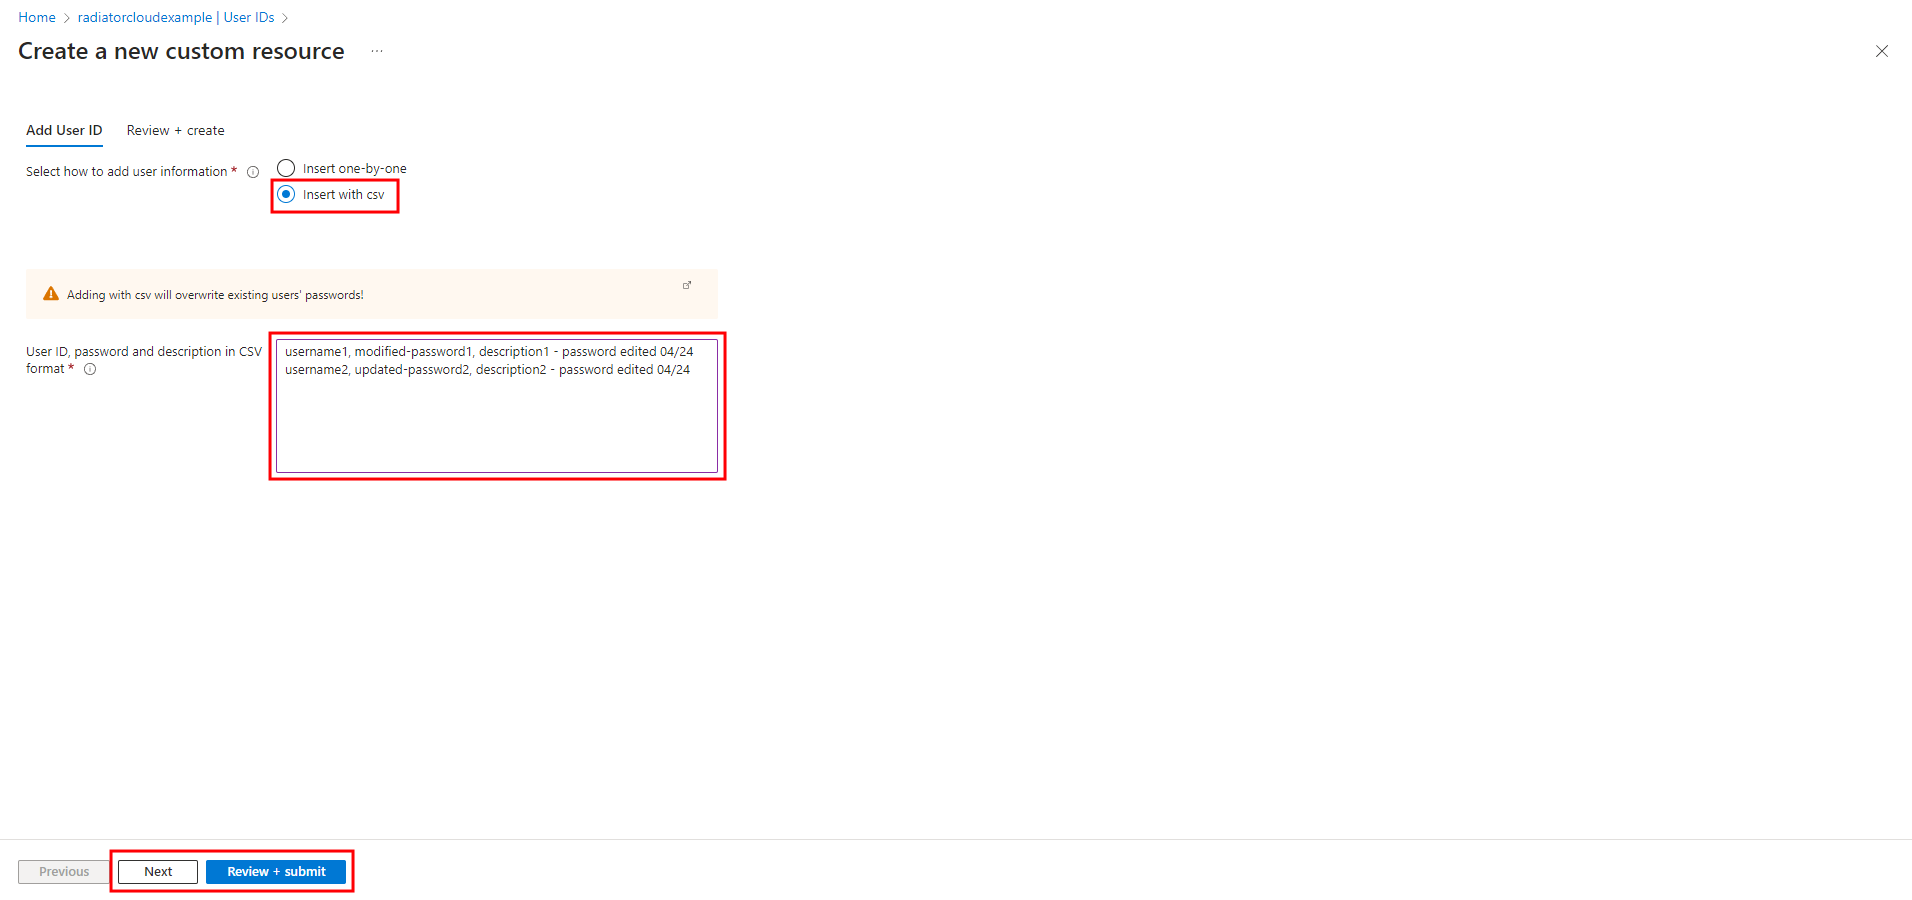
In ‘Select how to add information’, select ‘Insert with csv’.
Paste the username, password and optional user description from your clipboard or the optional temporary file and edit the fields you needed to edit.
Add the modified information for all users you deleted.
After filling out the information, press either ‘Next’ or ‘Review + submit’.
Review the entered information and when they are correct, press ‘Submit’ at the bottom of the view.
Though if you enter with csv, it’s likely the entered information does not fit into the ‘Review + create’ view.
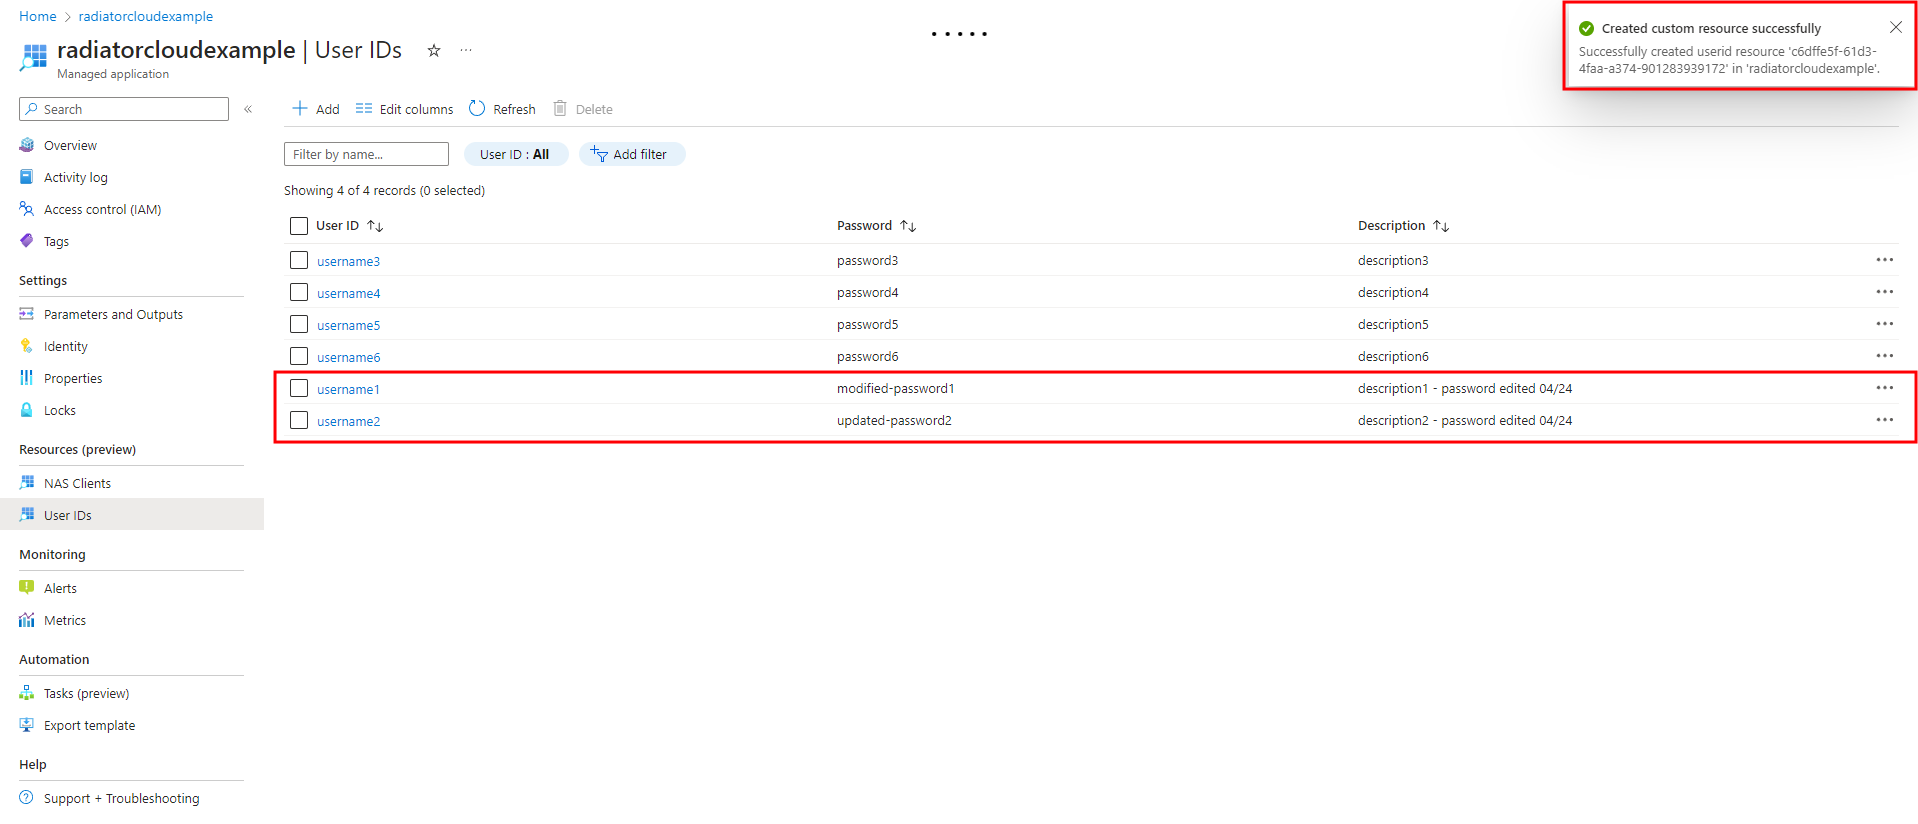
You have now successfully modified the User ID(s) in the Azure Application. You should see a notification at the top right of your screen stating “Created custom resource successfully”.
Exporting users to csv
User data is backed up once per day at midnight UTC. You can export this data in csv format from the export site that is generated upon deploying the managed application.

To find the necessary details for the export, press ‘Parameters and Outputs’ on the left pane of the view.
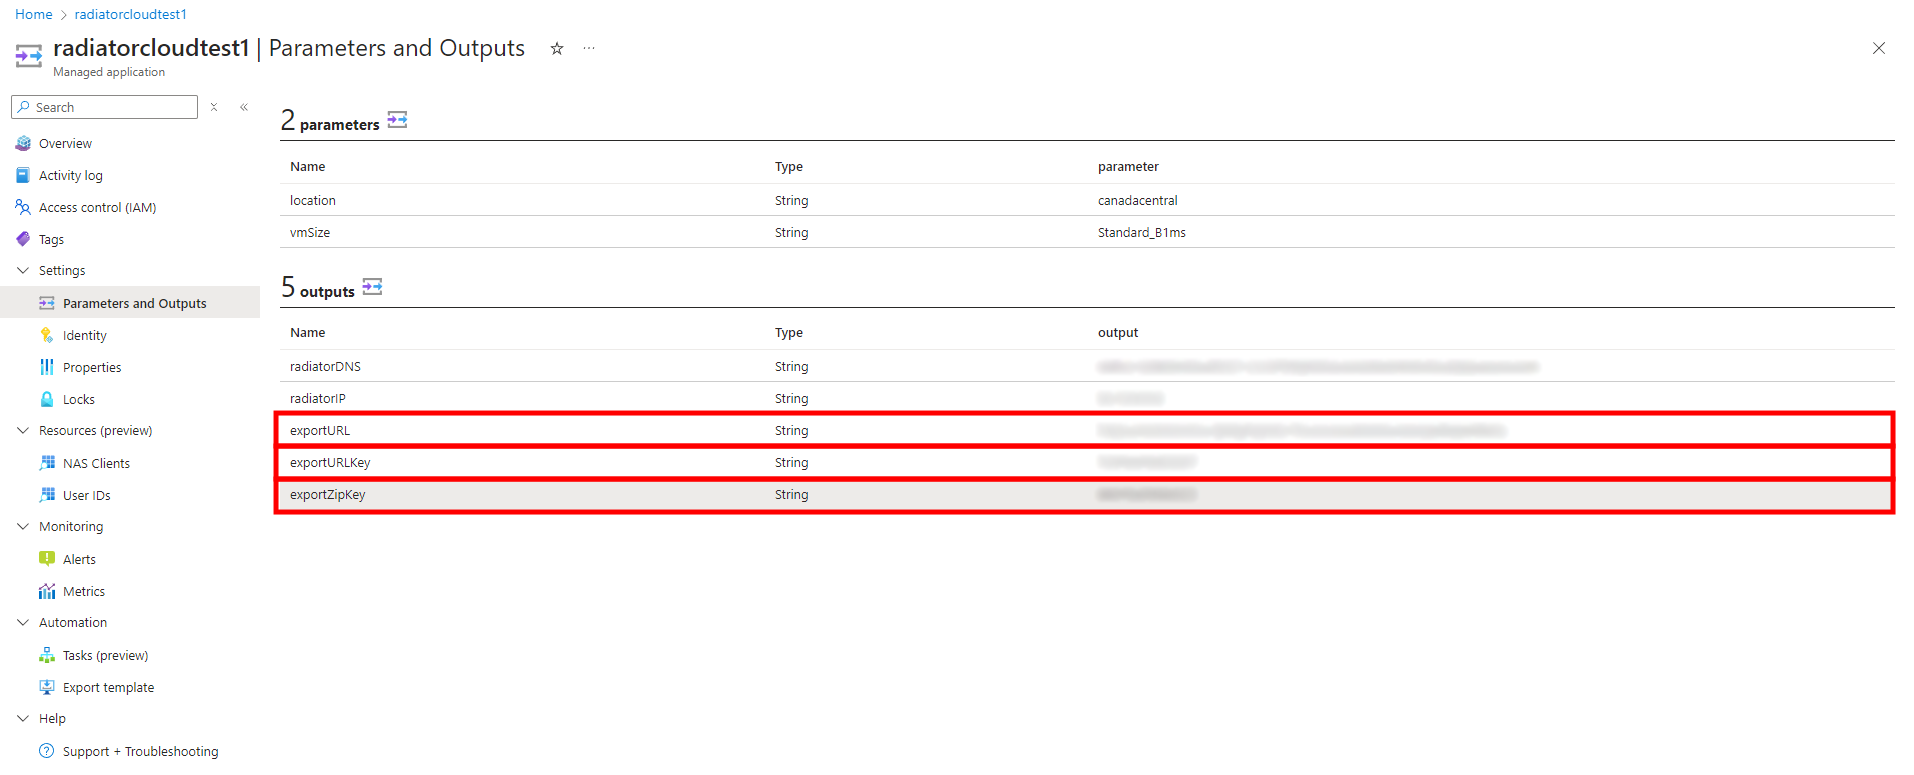
The three bottom parameters ‘exportURL’, ‘exportURLKey’ and ‘exportZipKey’ are required to download and decrypt the user information.
Do not share the values of these parameters to people outside your organisation.
Copy the ‘exportURL’ url address and open the website on your browser.
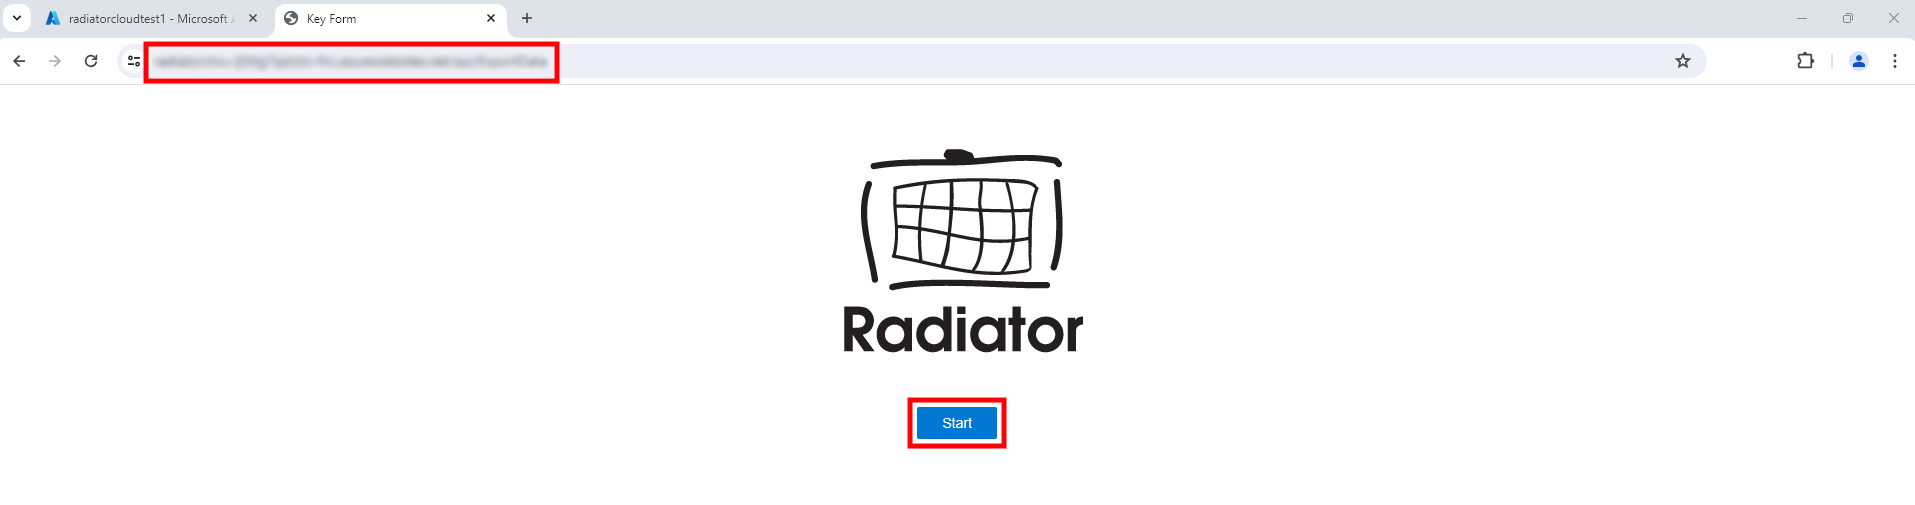
Press ‘Start’.

Copy the ‘exportURLKey’ from the application and paste it to the text box below the Radiator logo.
After you’ve entered the key, press ‘Send’.
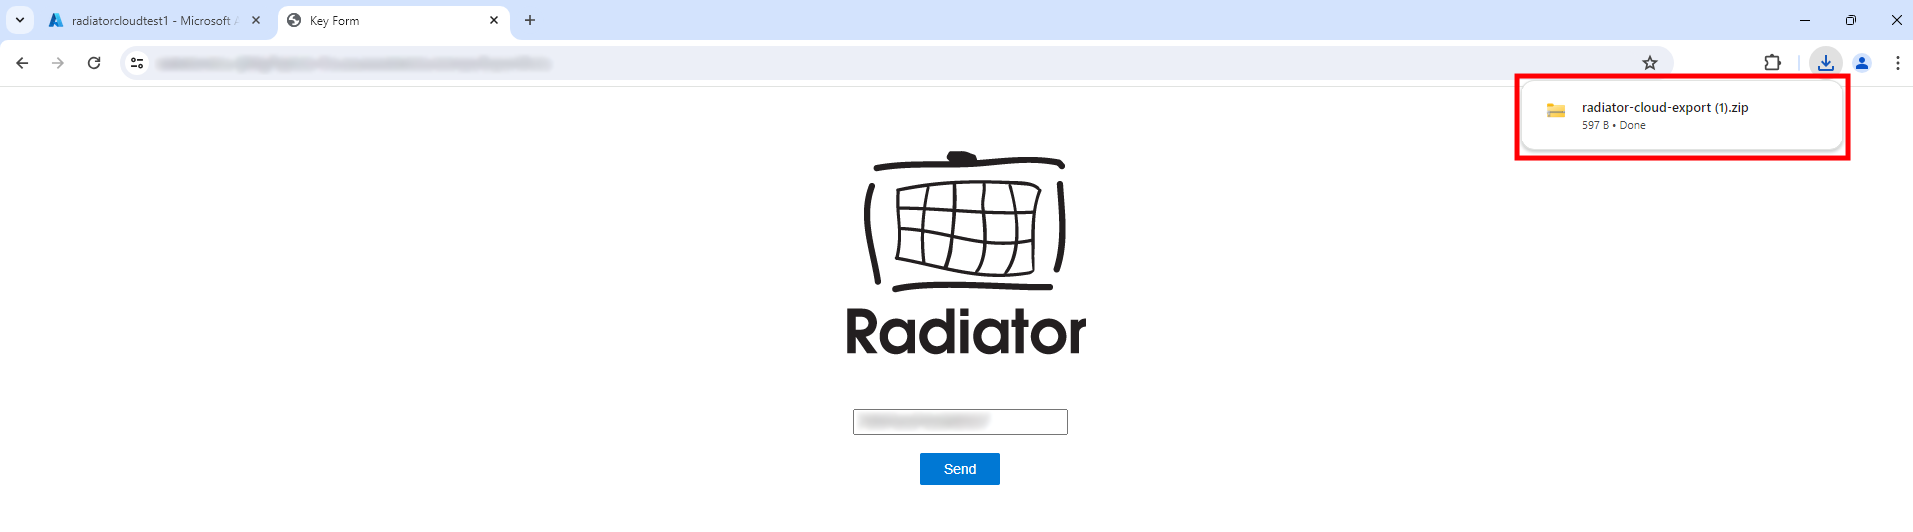
You’ll see that a .zip file will begin to download.
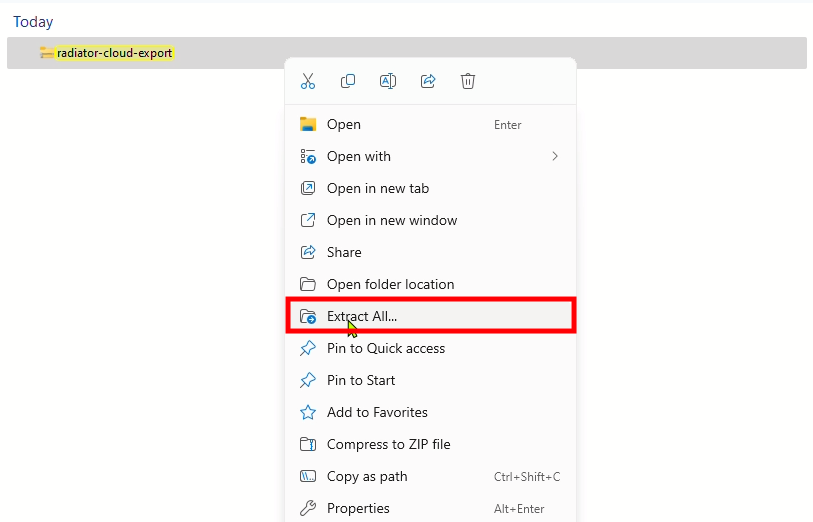
Extract the .zip file.
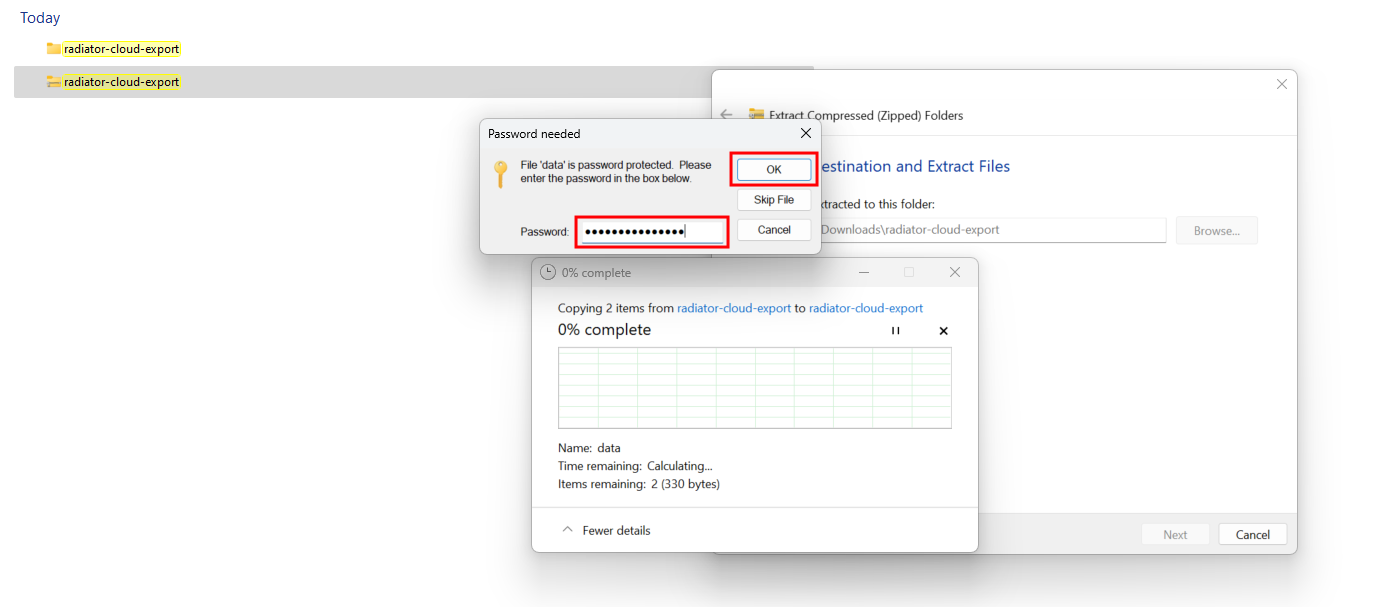
The system will prompt you for a password. Copy the value of the ‘exportZipKey’ parameter from the managed application and enter it here.
After entering the zip password, press OK.

You should now have a folder containing data.csv and a README file. The data.csv will contain the latest backup of your users and can be used to add users with csv.
Activity log
In the ‘Activity log’ section, you can monitor changes made within the managed application. Addition and deletion of NAS clients and User IDs will be shown here.
Whenever there is an error when making changes within the application, the full error message and reason can be found here.
Please note that the activity log ingestion for Azure causes a 3 to 10 minute delay for the changes to show within the application’s activity log.
Viewing changes in activity log
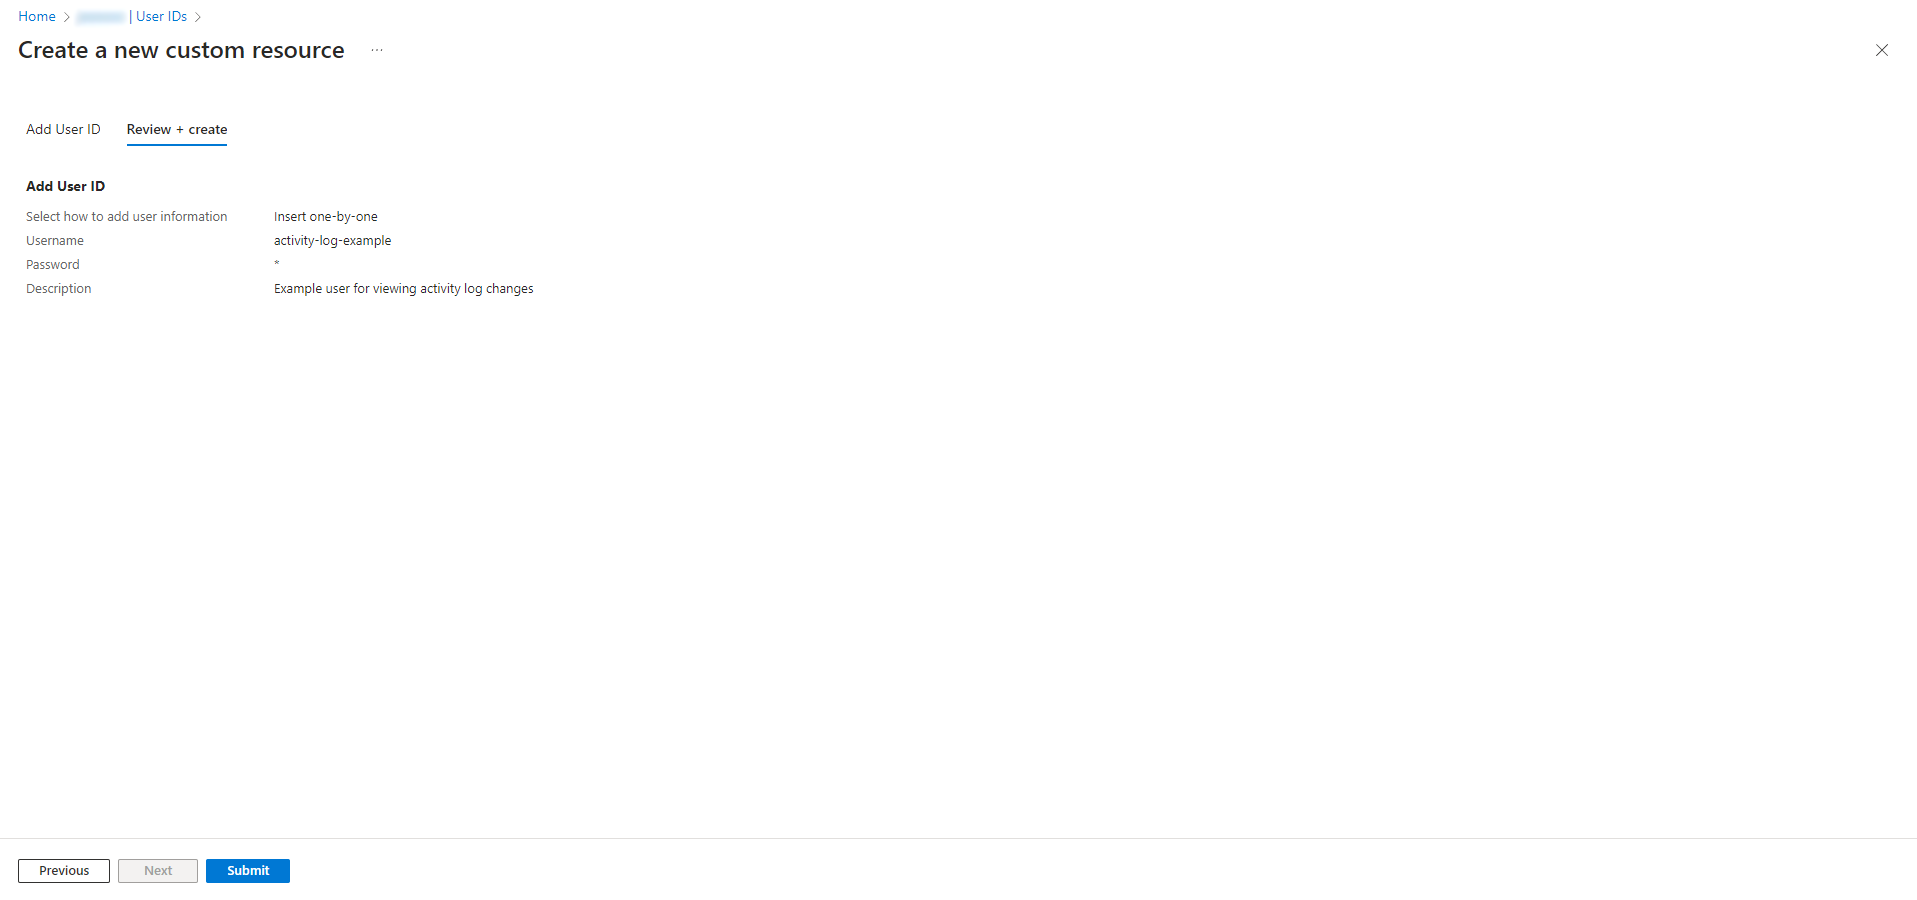
After you create a user, in this example the User ID ‘activity-log-example’, you will receive a notification about the change.
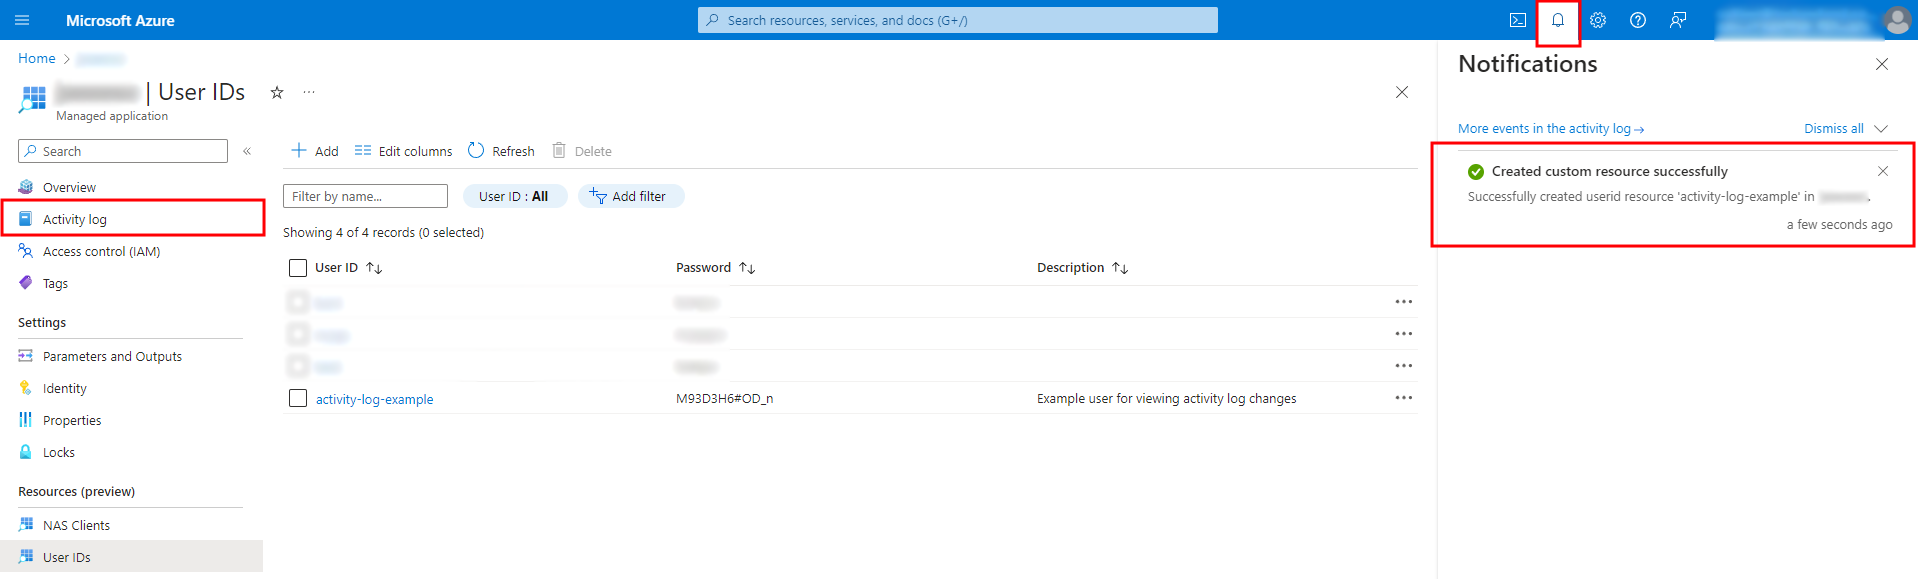
You can toggle notifications view from the top right corner of the page.
Upon creating a user, you will see either a notification of successful user creation or notification of error during user creation.
To view the changes in activity log, press ‘Activity log’ at the left pane of the view.
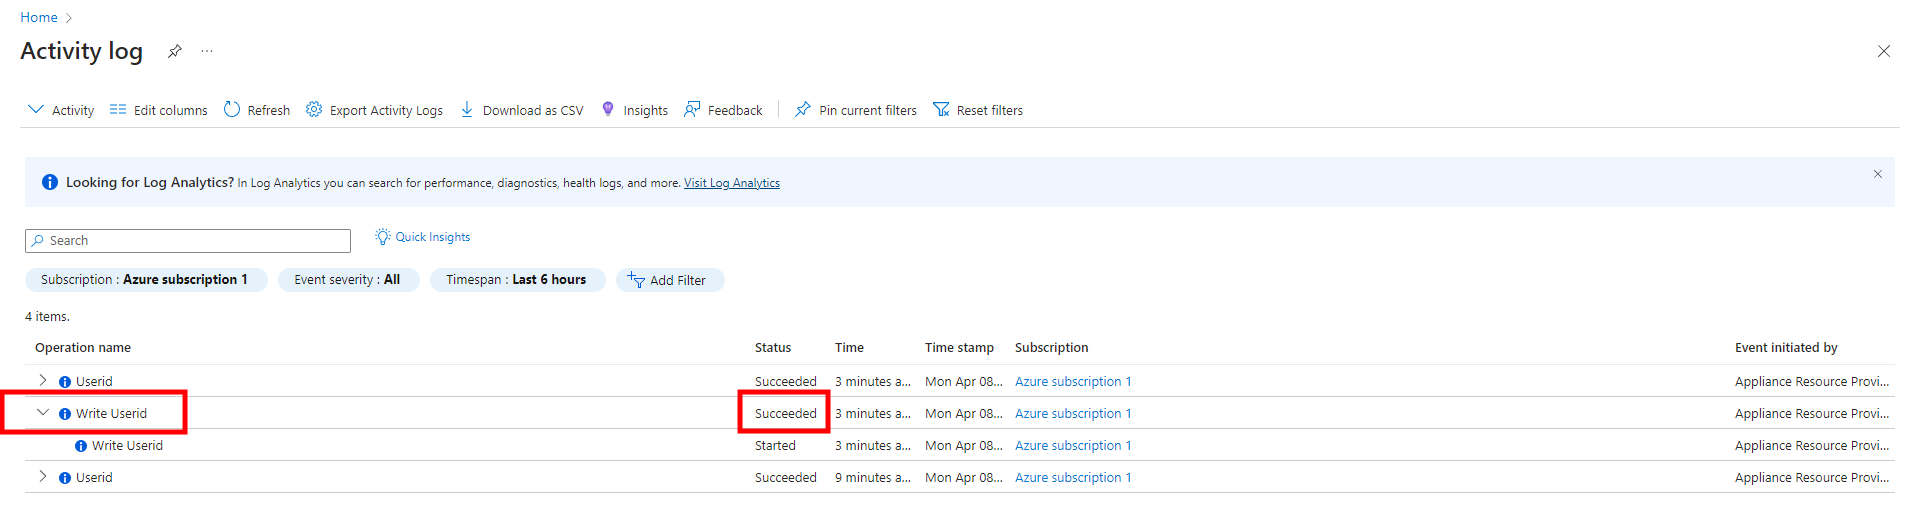
After the logs have updated in Azure (can take anywhere from 3 to 10 minutes), you will see the change within the activity log.
To view more details, click open the log message.
Here, you can see the resource as well as the action that was done, in this case a new user was added.
Viewing errors in activity log
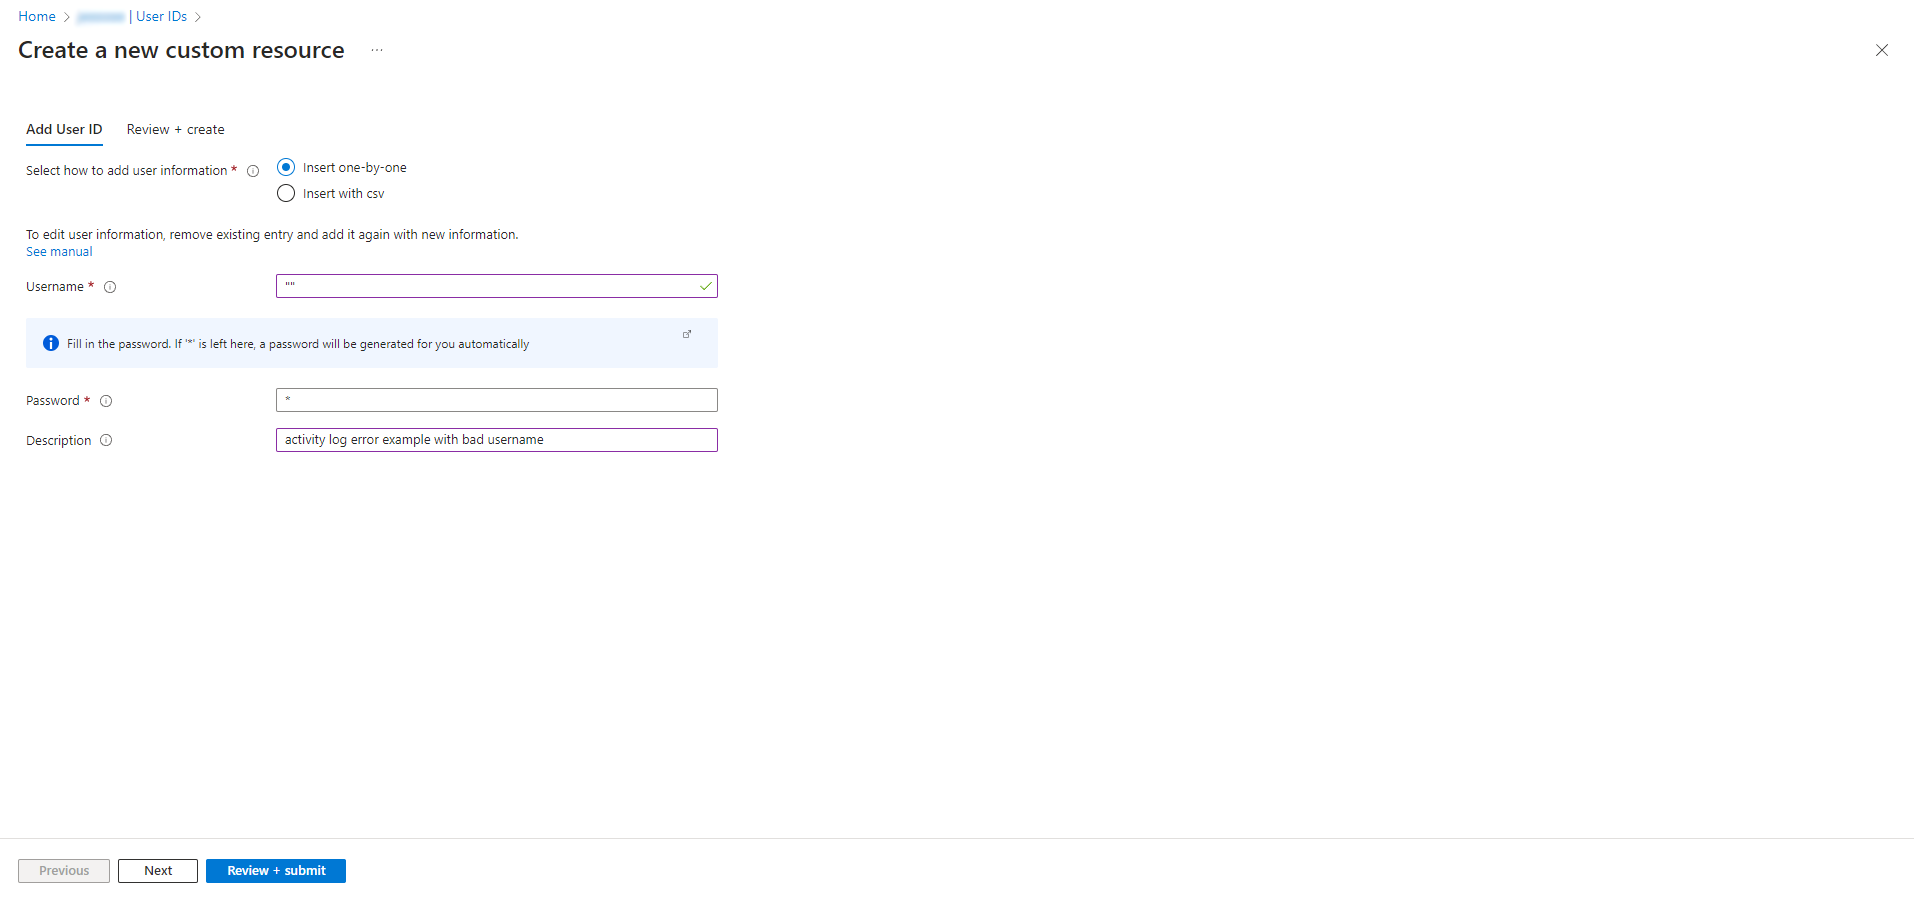
For the purposes of this example, we will attempt to create a User ID with double quotation mark ‘ ”“ ‘ as username. To prevent formatting errors, this has been disallowed.
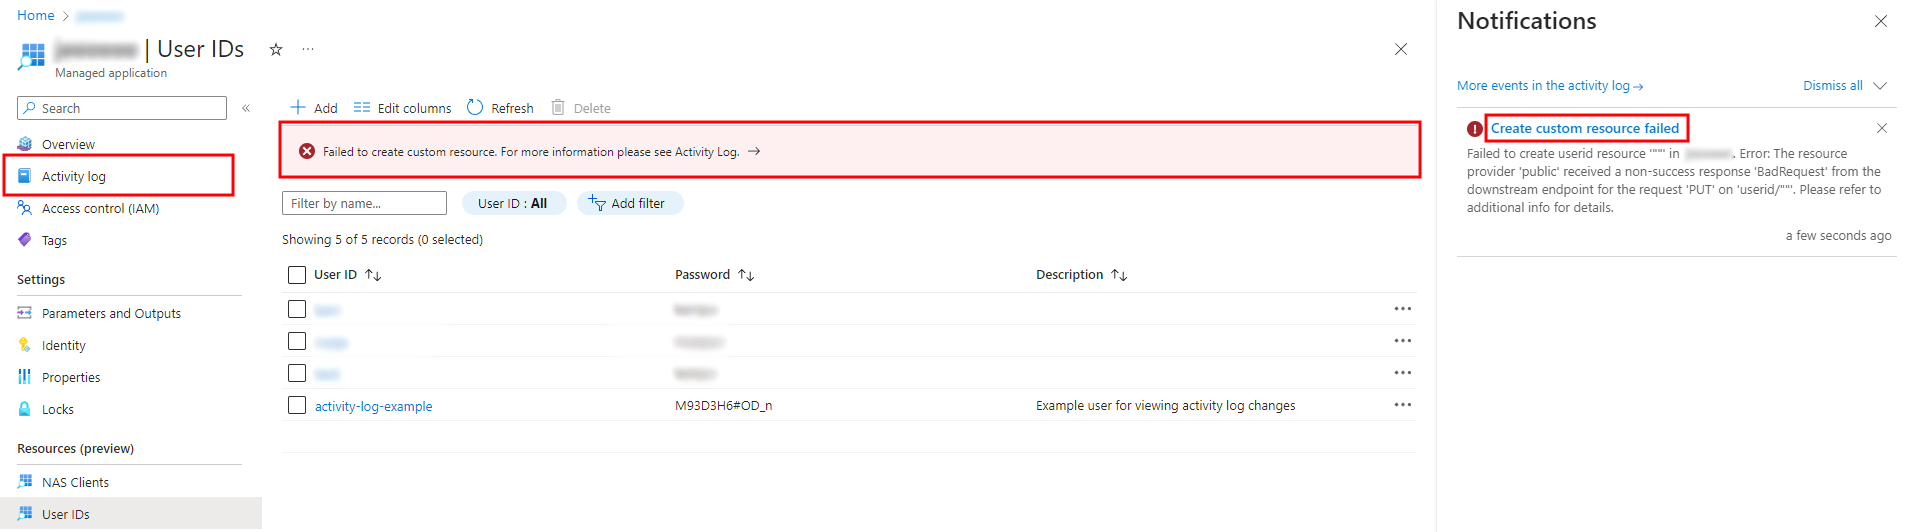
When there is an error during User ID creation, you will see a red box at the middle of the view stating creation of custom resource failed. You will also see a similar notification in the ‘Notifications’ section that can be opened from the right side of the blue pane at the top of the page.
To see the error reason, press the title ‘Create custom resource failed’ in the ‘Notifications’ section.
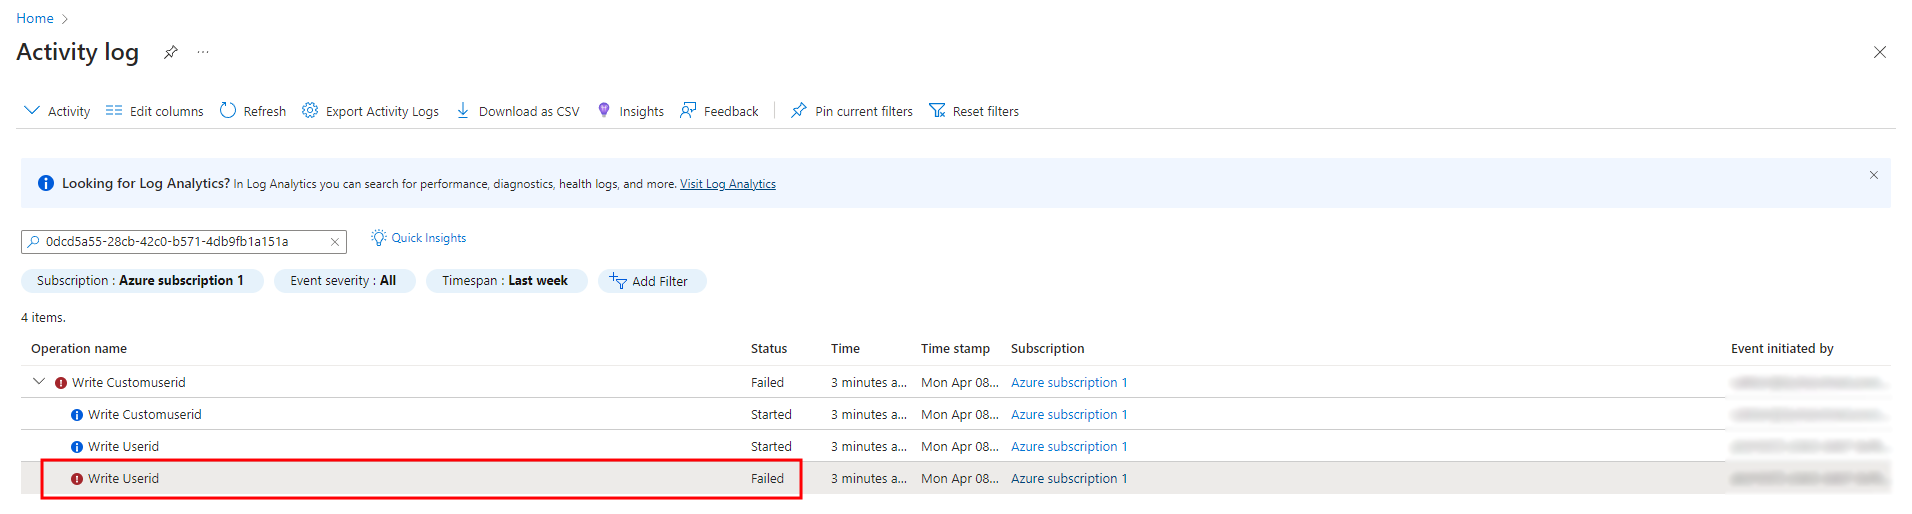
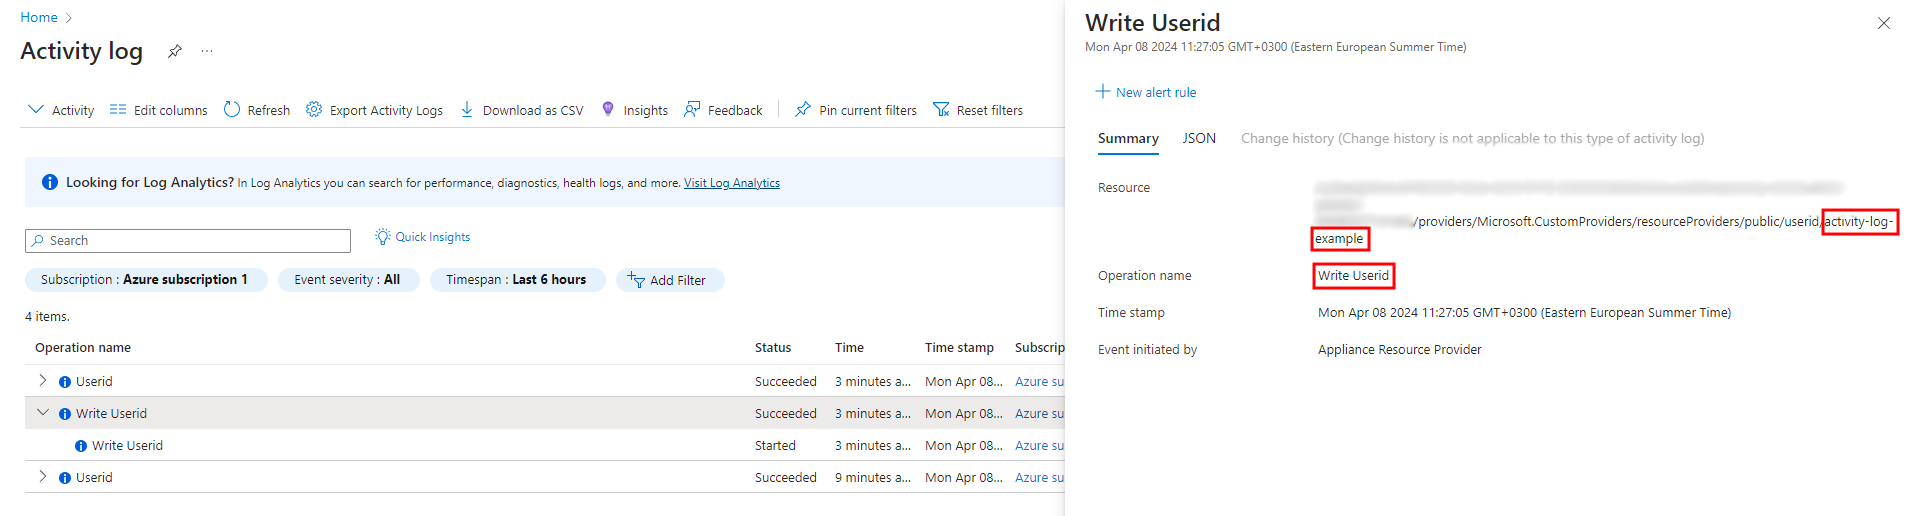
In the activity log, you will see a failed operation, in this case ‘Write Customuserid - Failed’. Open the dropdown for this operation and press the title of the first failed operation.
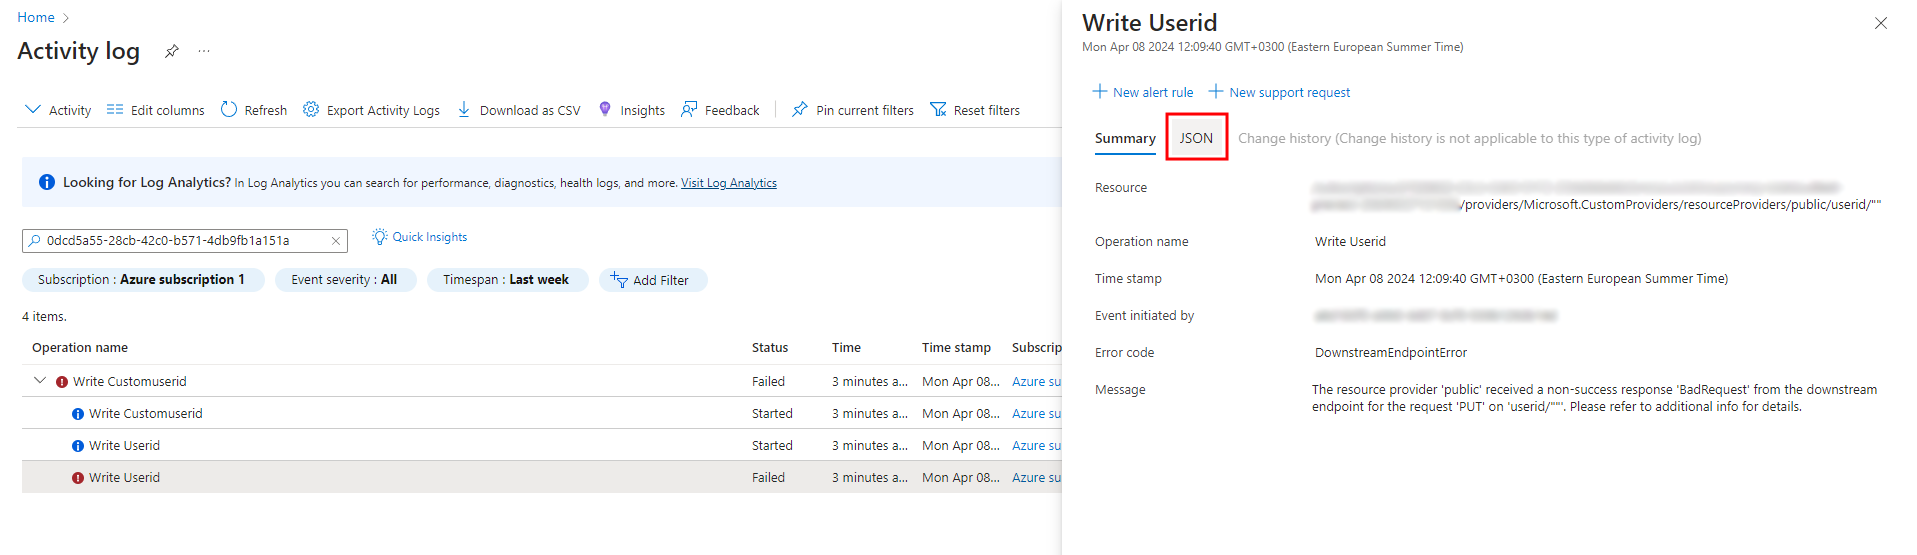
In this view, you will see the resource, in this case the userid you attempted to create, operation, in this case creation of new user ID, and the error. To get the detailed error message from Radiator Cloud, press ‘JSON’ at the top of the error description.
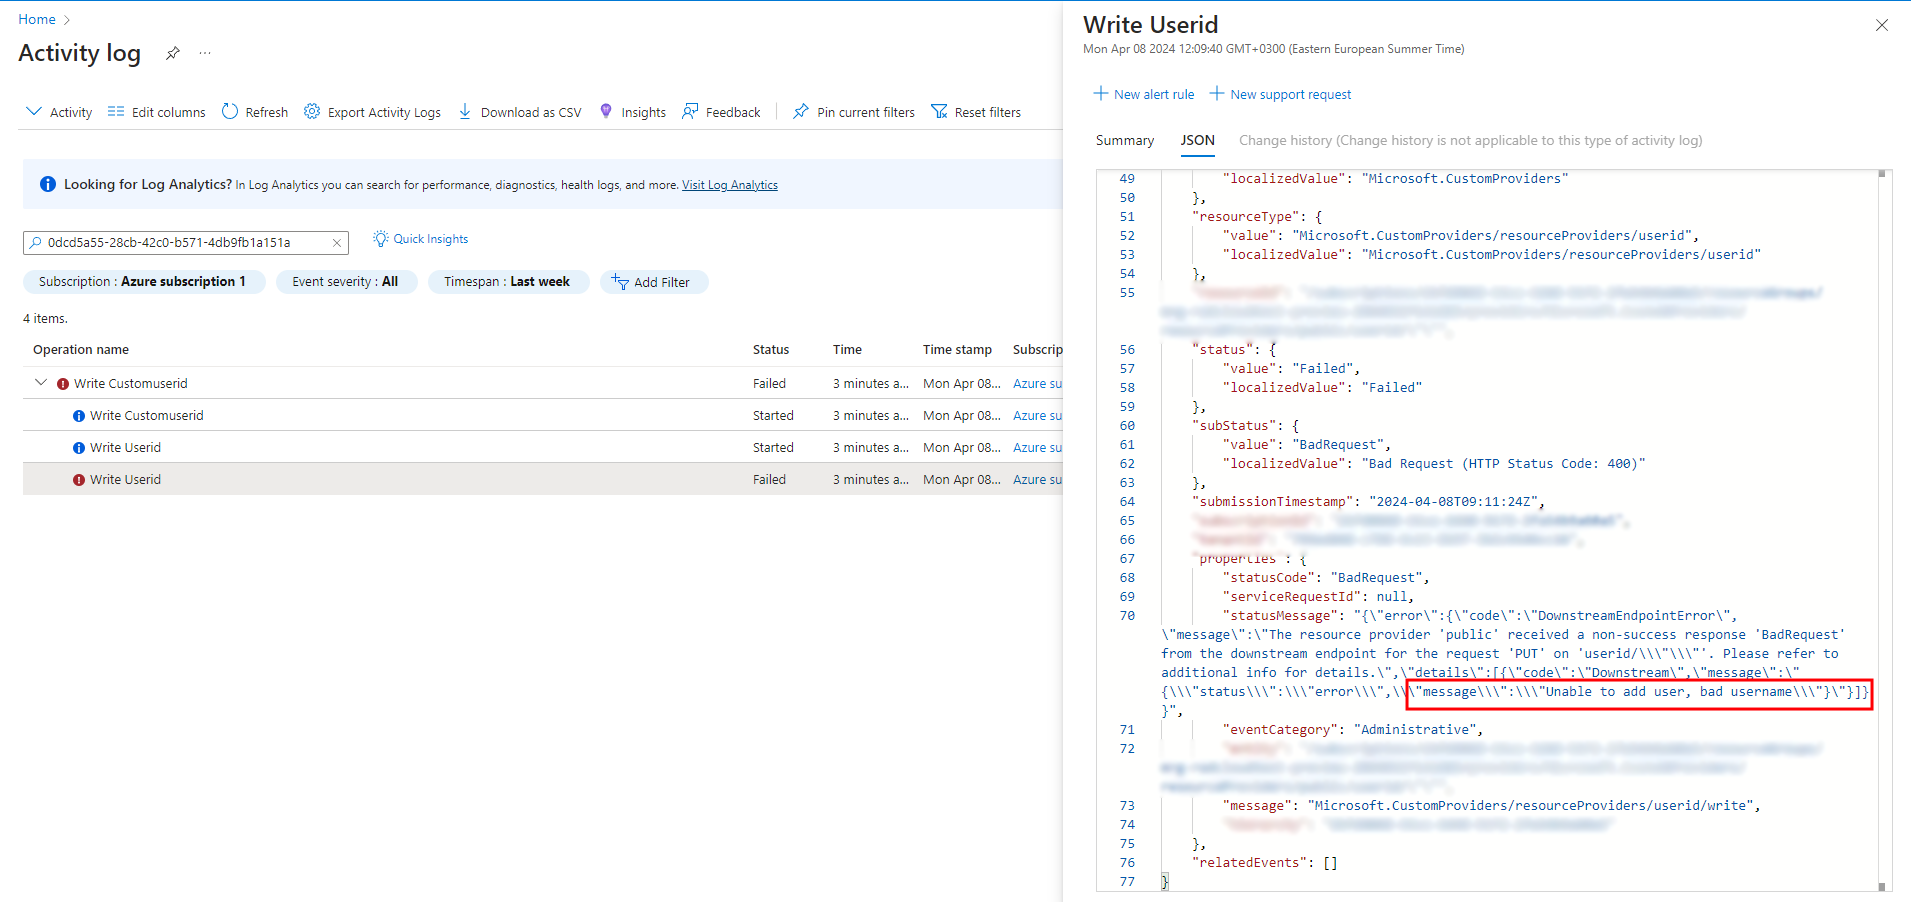
In the JSON format, you will see a lot more information. Scroll down to the bottom to see the error reason from the ‘statusMessage’. In this case, the error reason is ‘Unable to add user, bad username.’
A detailed list of all possible errors is included in the next subsection.
Description of errors in activity log
- ‘error stopping radiator-server’: The application is not responsive, please wait 5 minutes and press ‘Stop Radiator’ at the top of the ‘Overview’ window. If the problem persists, please submit a ticket for the Radiator Cloud team.
- ‘error starting radiator-server’: The application is not responsive, please wait 5 minutes and press ‘Start Radiator’ at the top of the ‘Overview’ window. If the problem persists, please submit a ticket for the Radiator Cloud team.
- ‘Malformed CSV data’: None of the information entered when adding users via csv could be processed. Please ensure your formatting follows the guidelines stated in the section ‘Adding users with csv’.
- ‘Plan limit exceeded’: Request to add users would exceed the user count included in your Plan. The maximum amount of users for each plan is Starter: 50, Basic: 100, Pro: 500, Premium: 1000. Remove unsused User IDs or consider a bigger Plan.
- ‘Unable to add users from CSV data’: Formatting in ‘adding users with CSV’ request is inconsistent, please ensure the details you’ve entered follow the formatting stated in the section ‘Adding users with csv’.
- ‘Unable to add user, bad username’: The entered username is invalid, most likely blank.
- ‘No proper username found in request’: The request to delete user was malformed by Azure, please retry deleting the user.
- ‘Unable to add user’: There was an error in the user database, please retry adding the user. If the error persists, please submit a ticket for the Radiator Cloud team.
- ‘Unable to add user’: There was an error in the user database, please retry removing the user. If the error persists, please submit a ticket for the Radiator Cloud team.
Alerts
Alerts are used to signal several noteworthy events within the managed application. You can find the list and description of all alerts in ‘Description of default alerts’.
Viewing and responding to alerts
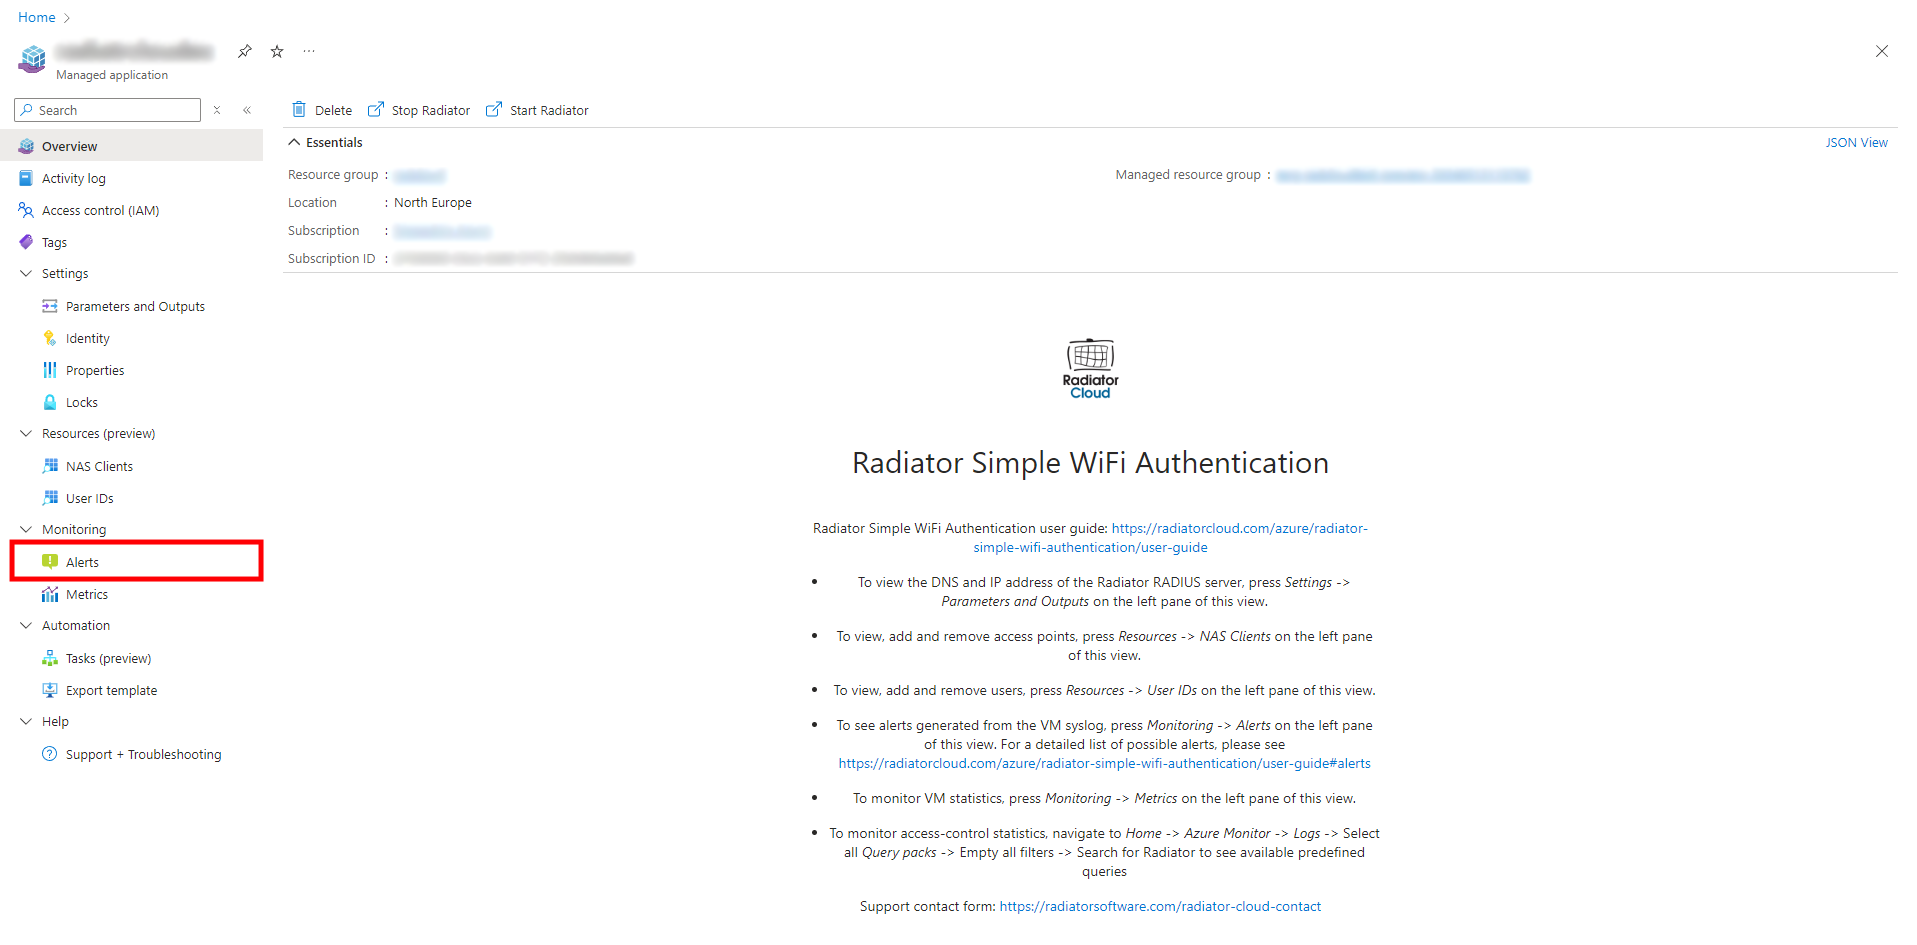
Navigate to the left pane of the view and press ‘Alerts’.
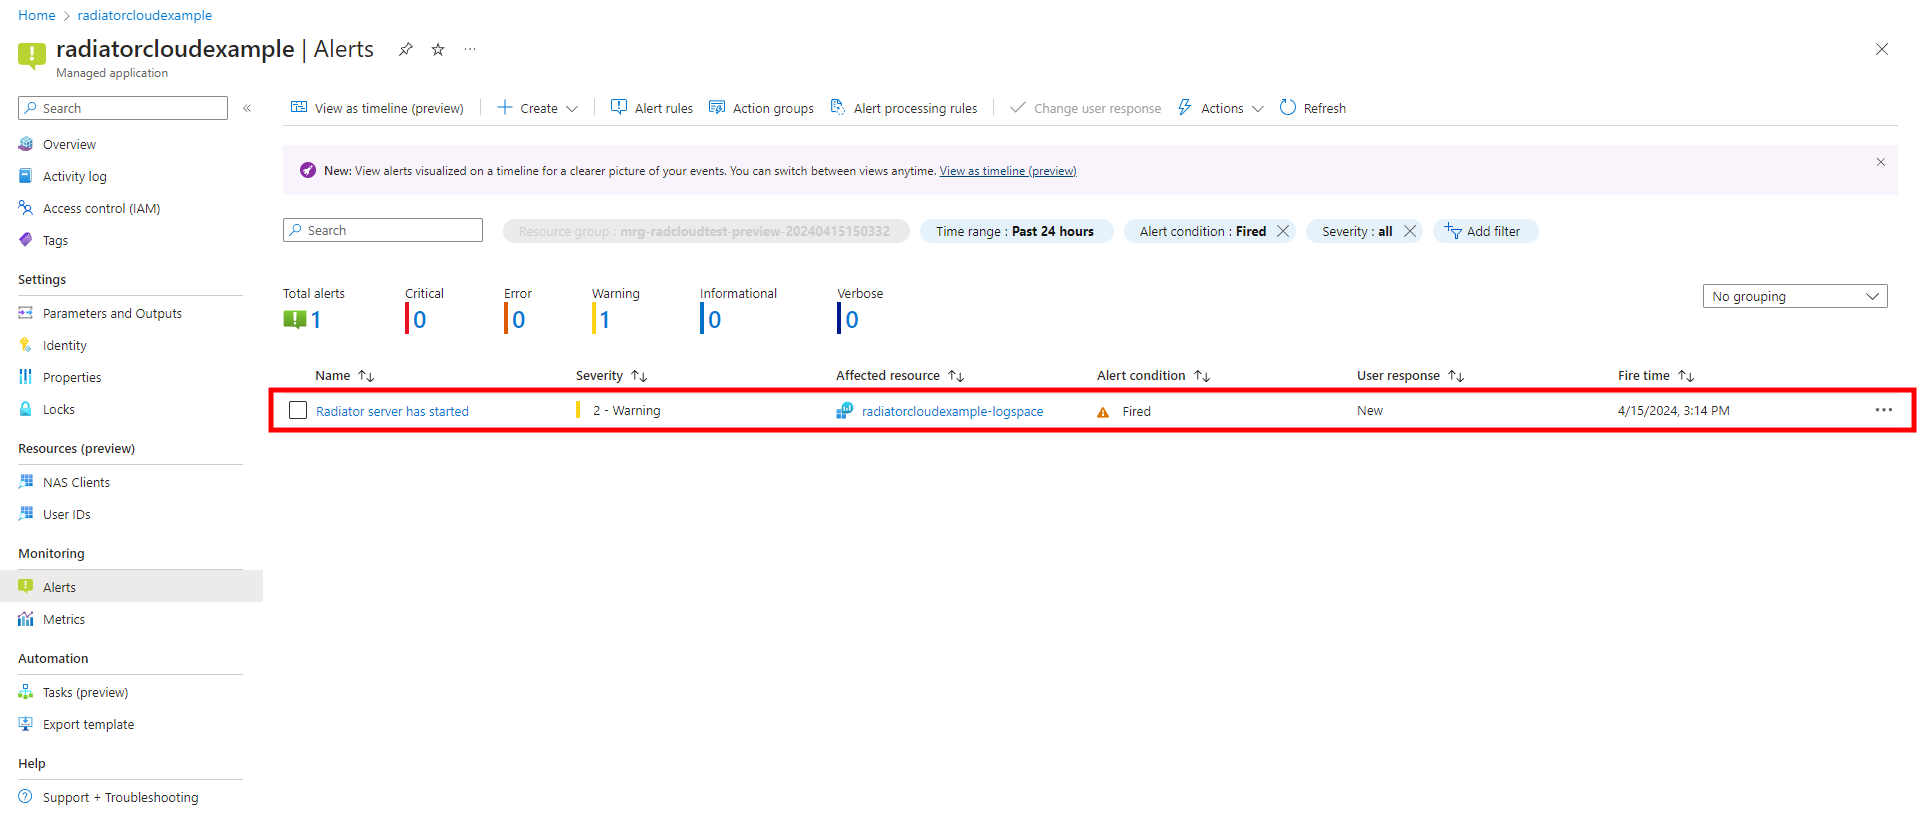
In this view, we can see an example alert ‘Radiator server started’. This means that the Radiator server has been started from top of the ‘Overview’ window.
Click on the title text ‘Radiator server has started’. This will open a pane on the right side with more details.
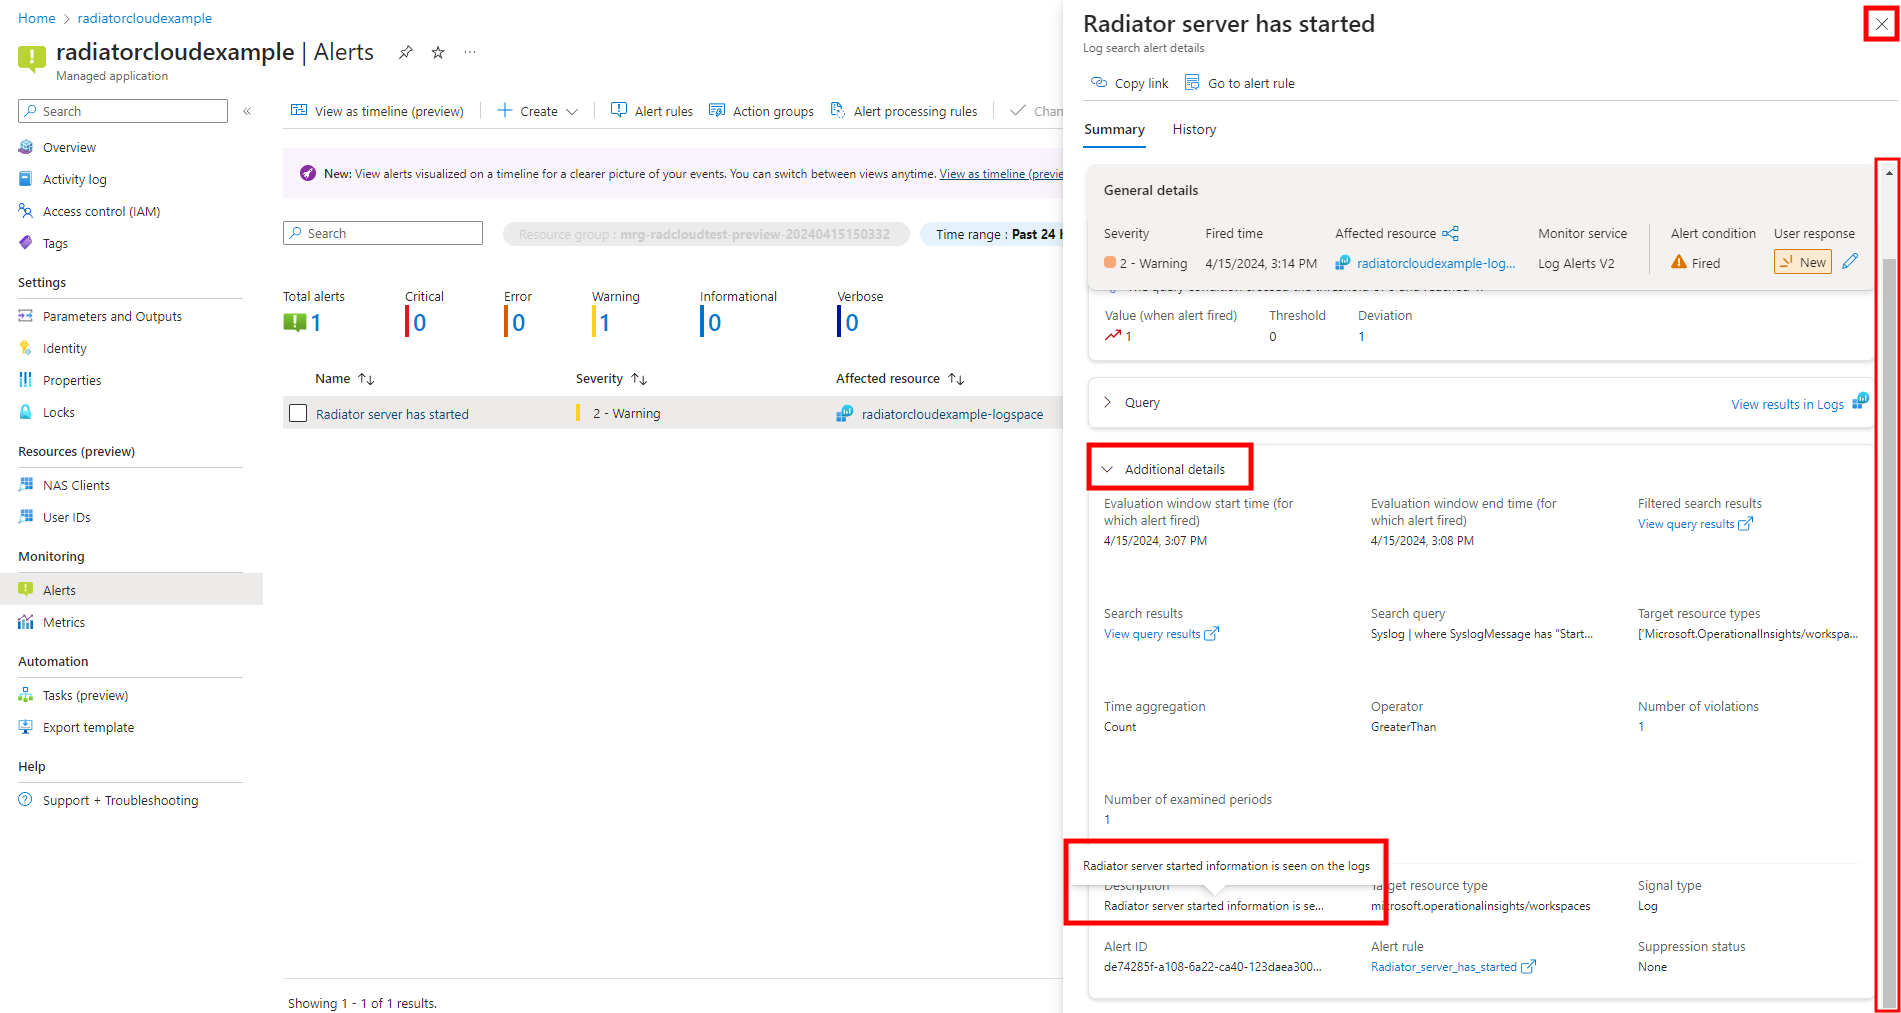
In the right pane, click ‘Additional details’. When you hover over the ‘Description’ field, you will see a more detailed explanation of what the alert means. After viewing the alert description, close the right pane from the X button at the top right.

Once you’ve acknowledged the alert and performed actions if needed, you can change the user response of the alert to indicate it has been viewed. Press the three dots at the right side of the alert and then press ‘Change user response’.
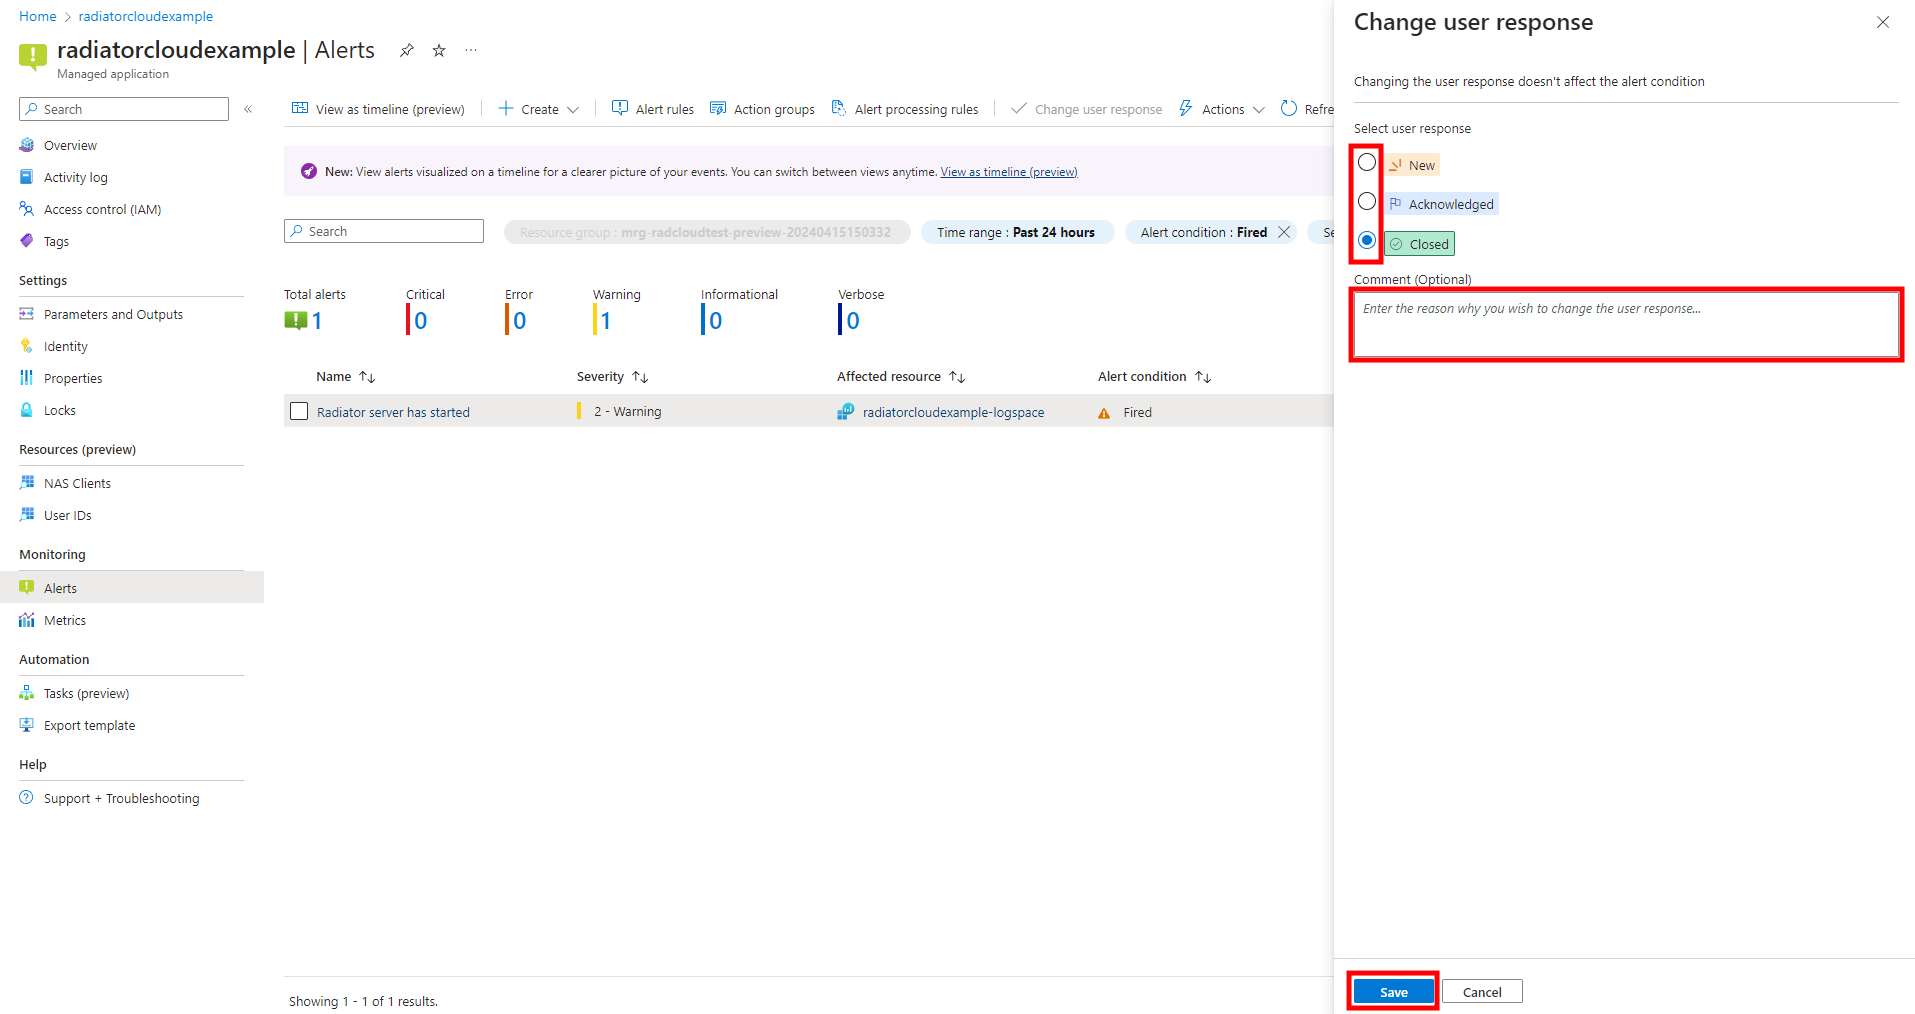
By default, the user response for all alerts is ‘New’. If the alert does not require any action or if necessary actions have been taken, you can change the user response to ‘Closed’ and optionally insert a comment. After you’ve made the changes to user response, press ‘Save’ at the bottom of the right pane.
Description of default alerts
There are six default alerts in the managed application:
- Radiator server has started & Radiator server has stopped: These two alerts are used to signal the latest state of the Radiator server. When Radiator server is stopped, no authentications will go through and you will not be able to view or modify NAS clients.
- Radiator user limit alert: When you have reached 95% of the chosen user ID count, the application will send an alert to indicate that you are about to reach the user ID limit for your plan.
- Radiator Cloud product expiring - monthly alert: The Radiator Cloud product’s life cycle is tied to the operating system’s end-of-life cycle. When the end-of-life date is within the next 6 months, the application will alert once per month. It is recommended you export your users to csv and re-deploy the application’s latest version.
- Radiator Cloud product expiring - weekly alert: The Radiator Cloud product’s life cycle is tied to the operating system’s end-of-life cycle. When the end-of-life date is within the next 4 weeks, the application will alert once per week. You need to export your users to csv and re-deploy the application’s latest version.
- Radiator Cloud product expired: The operating system the managed application runs on is end-of-life and your managed application has expired. If Radiator server stops, you will not be able to make any changes within the application nor will any authentications go through. You need to export your users and re-deploy to the application’s latest version.
Metrics
In the ‘Metrics’ section, you can monitor stats for the virtual machine that the application runs on.
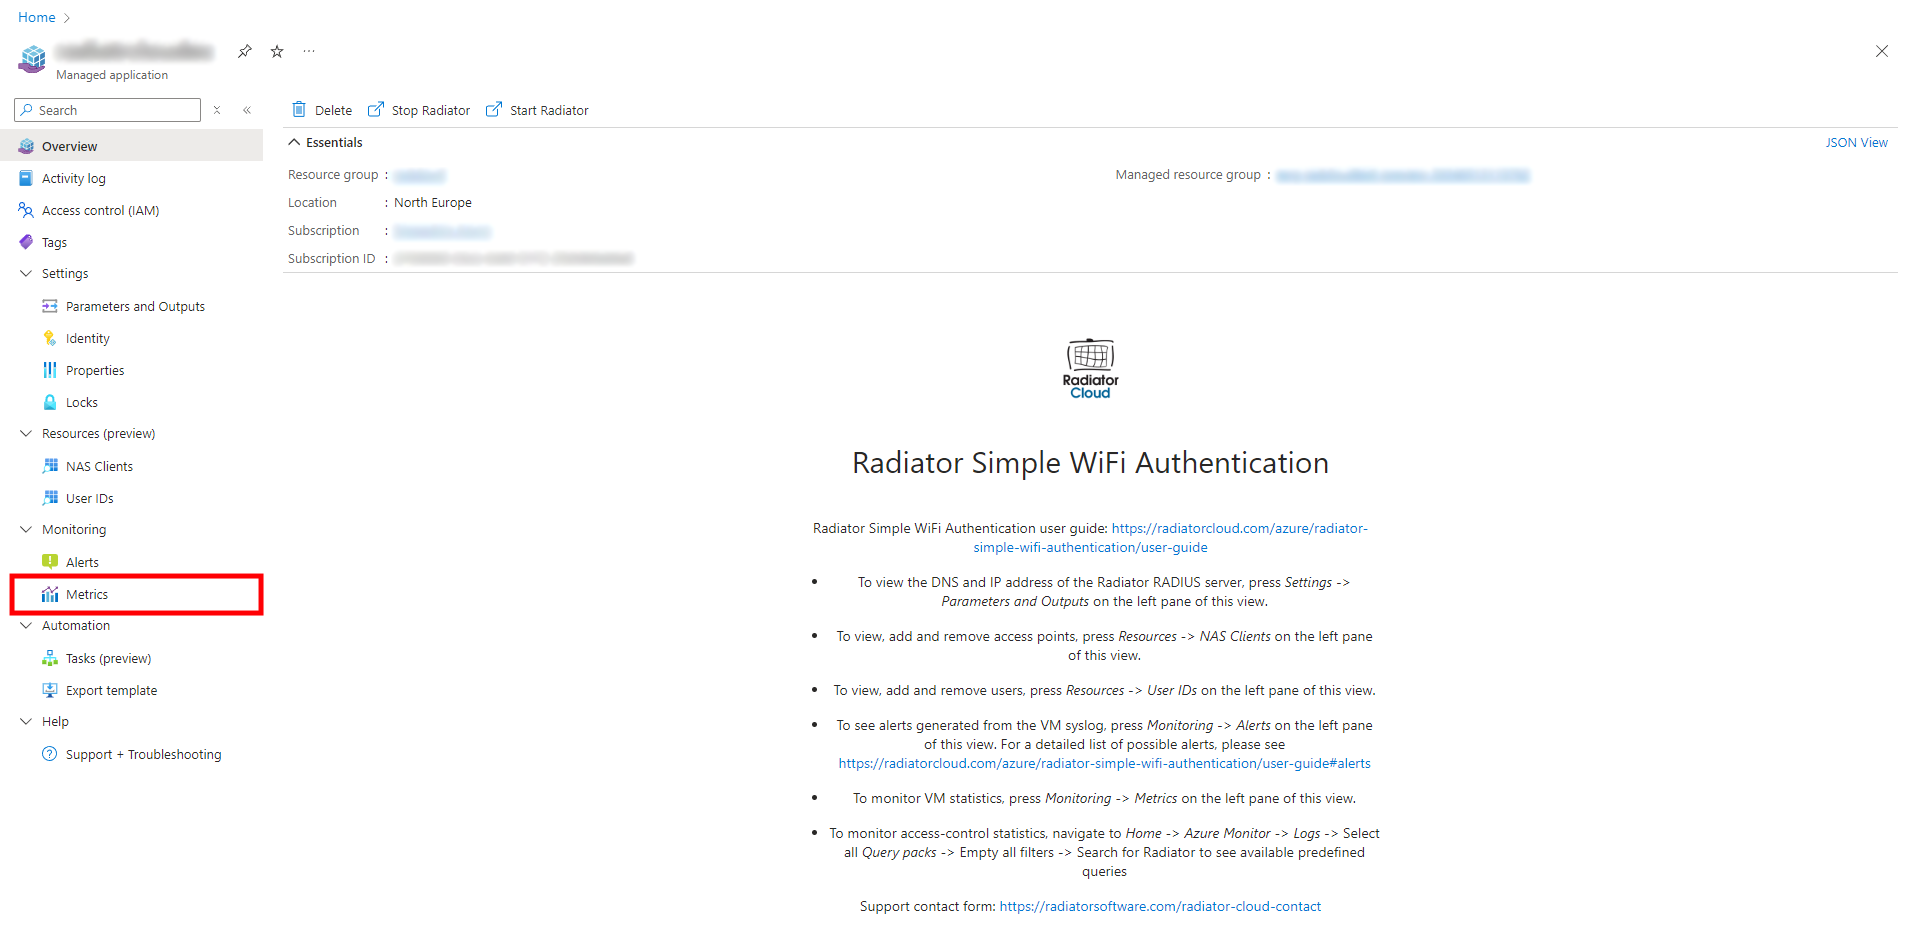
Navigate to ‘Metrics’ from the left pane of the application.
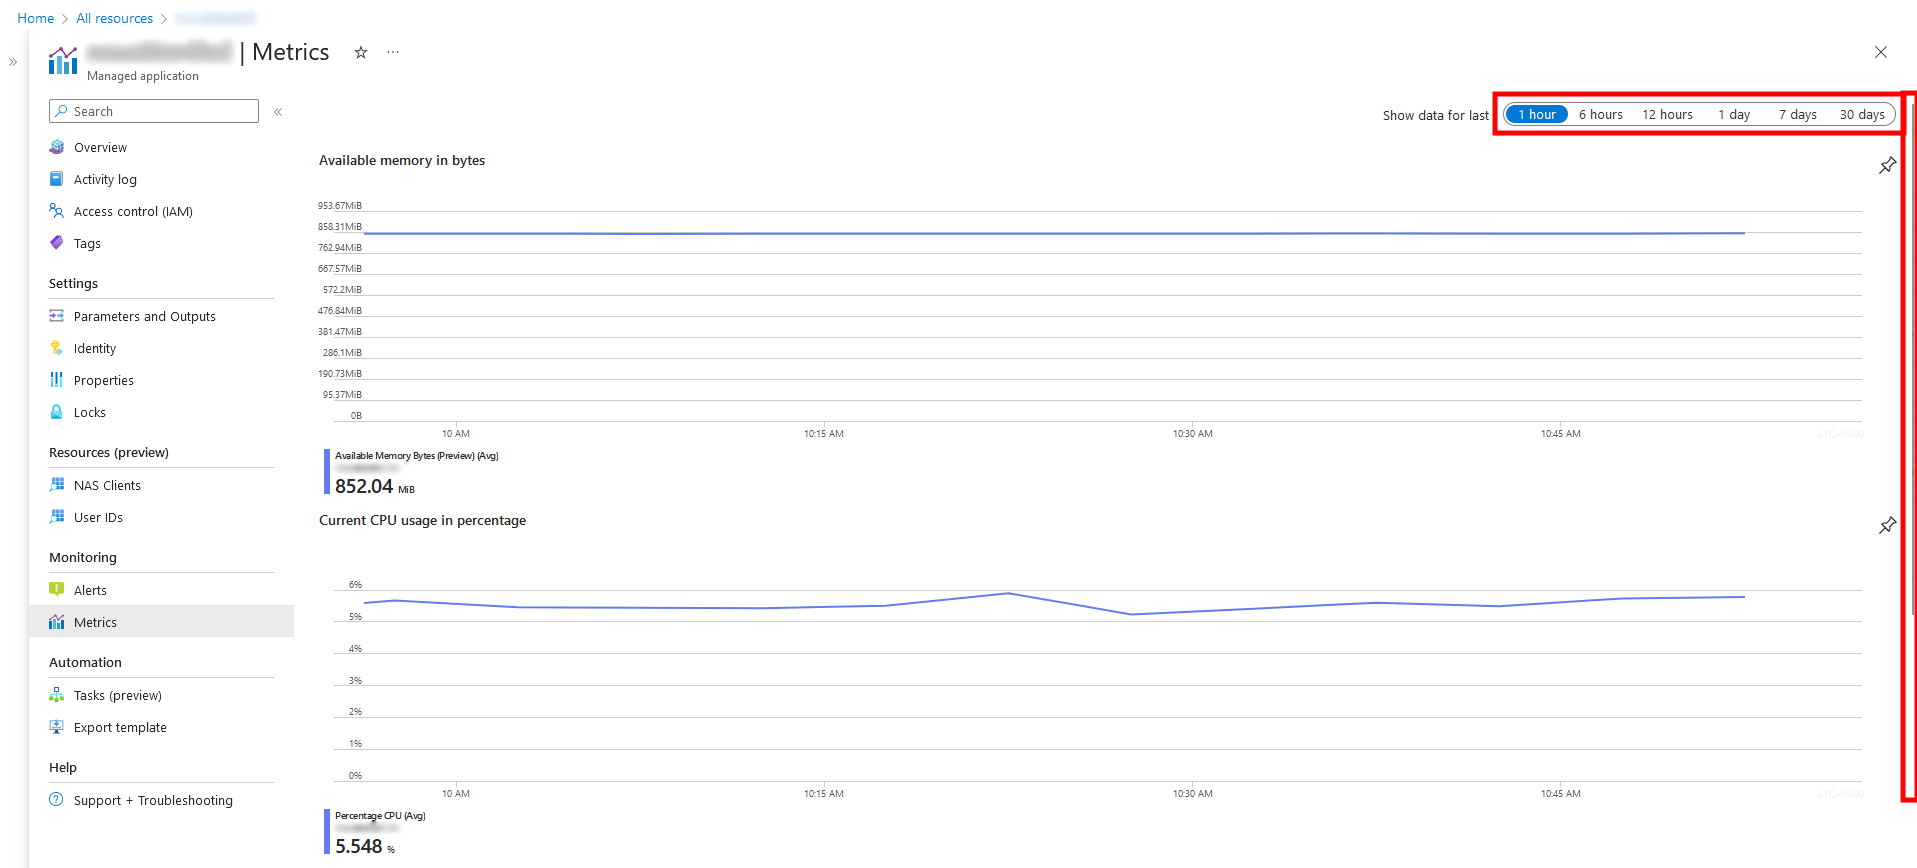
You can monitor the RAM, CPU and virtual machine’s average availability. As the VM’s availability should be 100% (1 in the graph), the RAM and CPU are more more important factors to monitor.
You can change the time you want to see stats for from the top right side of the application.

Here is an example view of what the VM metrics should look like over time.
Radiator logs and graphs
Accessing Radiator logs and graphs
Radiator logs and graphs are located within Azure but outside the Radiator Managed Application.
They can be accessed in Azure Monitor.

Press ‘Home’ at the top left of the view.
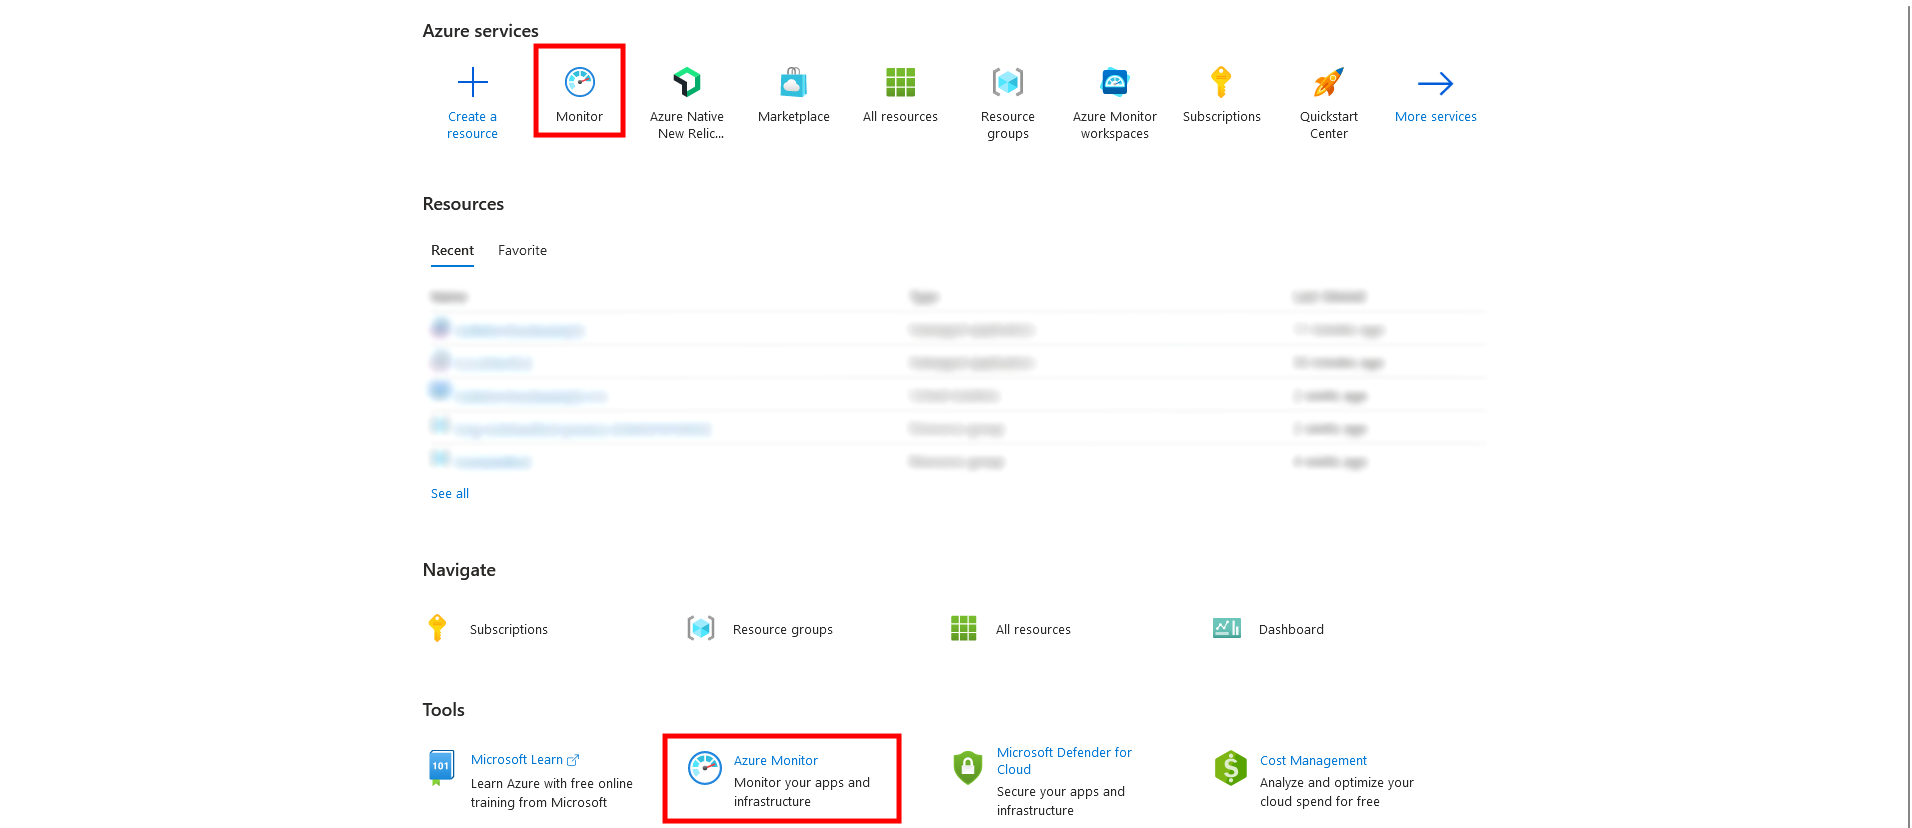
Press the ‘Monitor’ icon at top of the view or the ‘Azure Monitor’ icon at the middle of the view.
If neither of these are visible in your home view, search ‘Monitor’ in the search bar at the top of your view and choose ‘Monitor’ with a white-and-blue gauge icon (shown in the picture above).
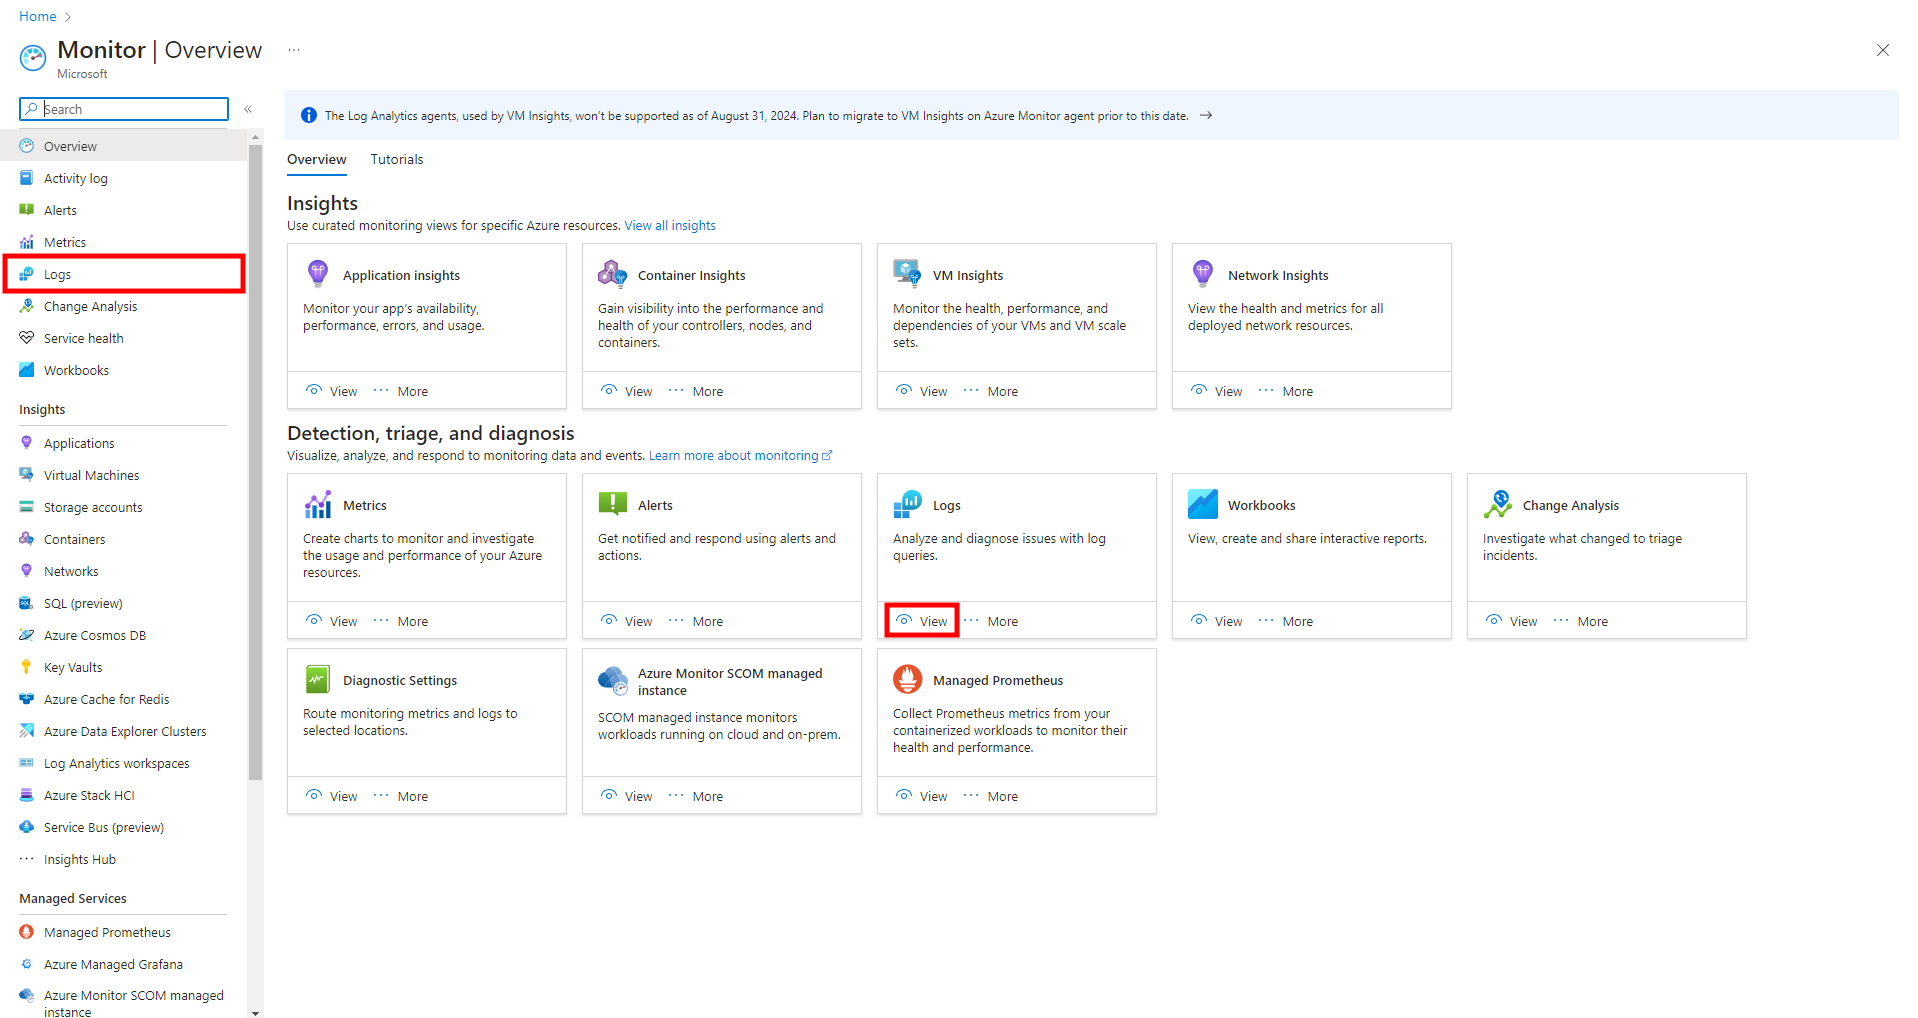
Navigate to the left side of the pane and press ‘Logs’ or at the middle of the view, under ‘Detection, triage and diagnosis’, locate ‘Logs’ and press ‘View’ at the bottom left corner of the ‘Logs’ box.
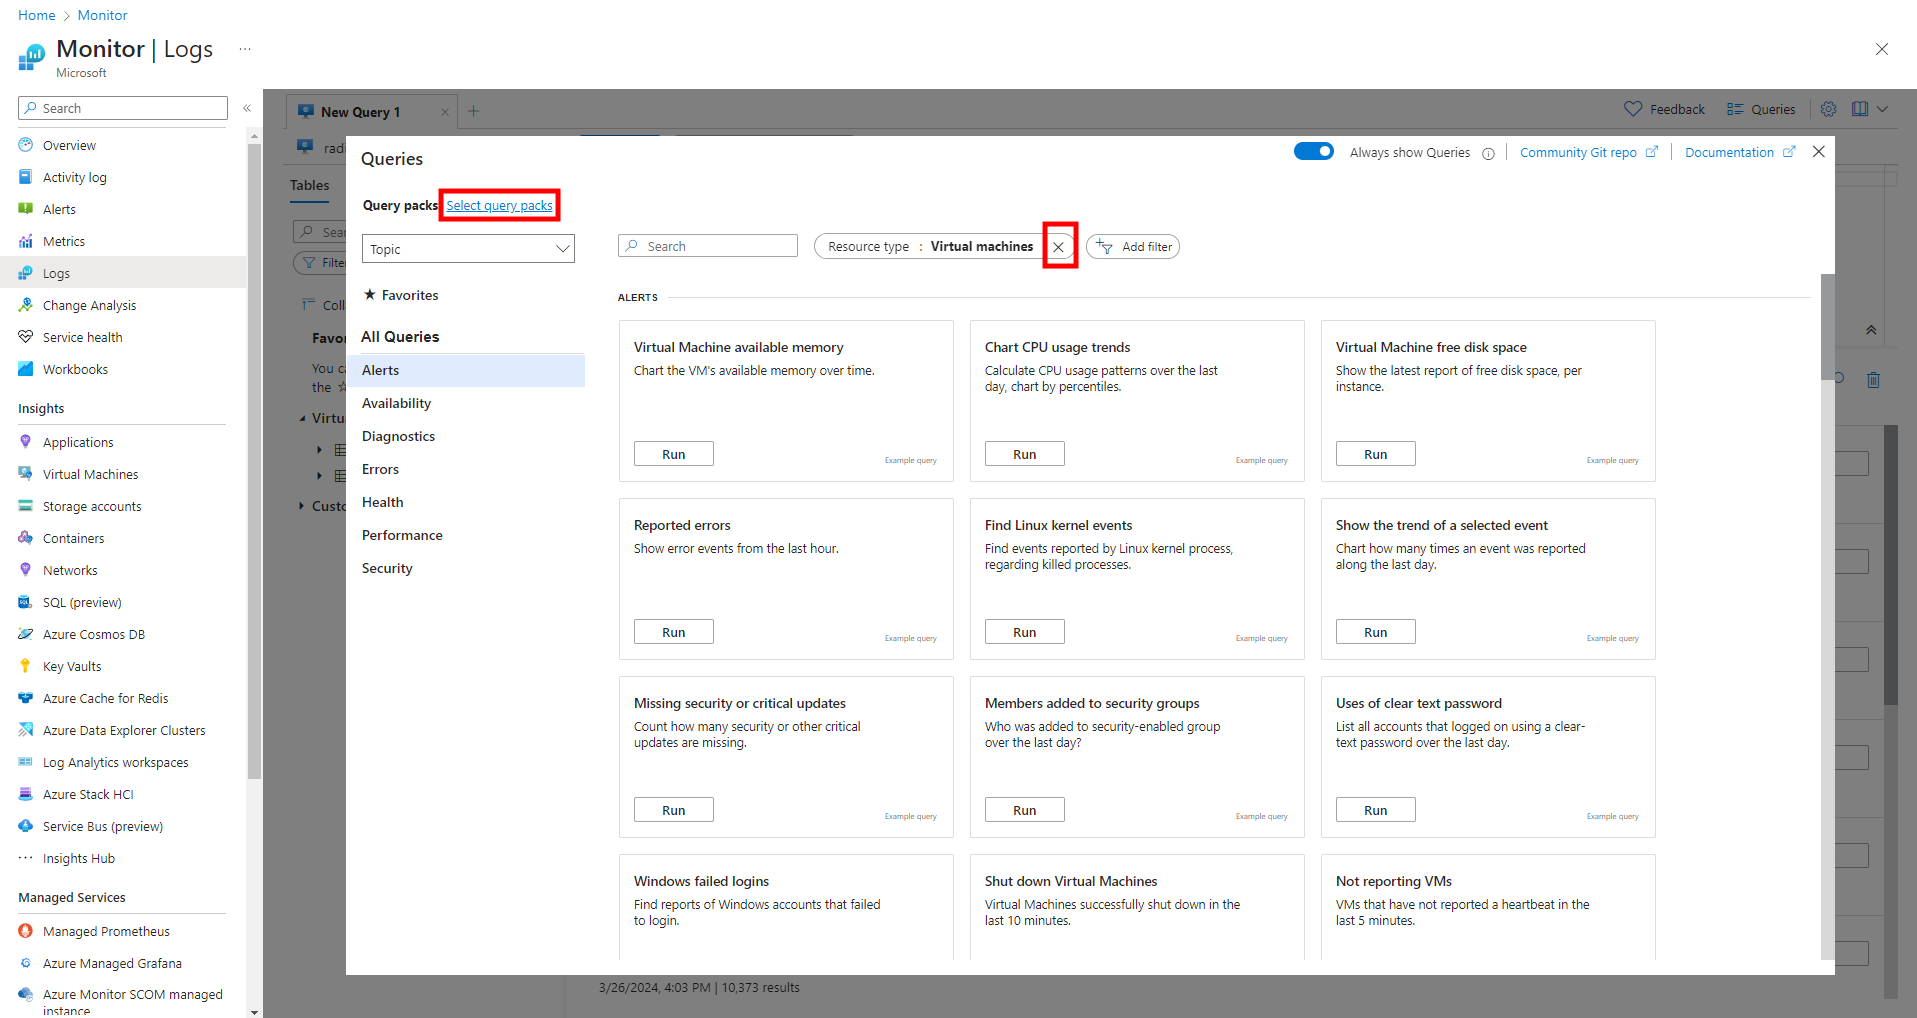
Remove the resource type filter by pressing the X next to ‘Resource type : Virtual Machines’ at the top middle of the view.
Press ‘Select query packs’ at the top left of the view.
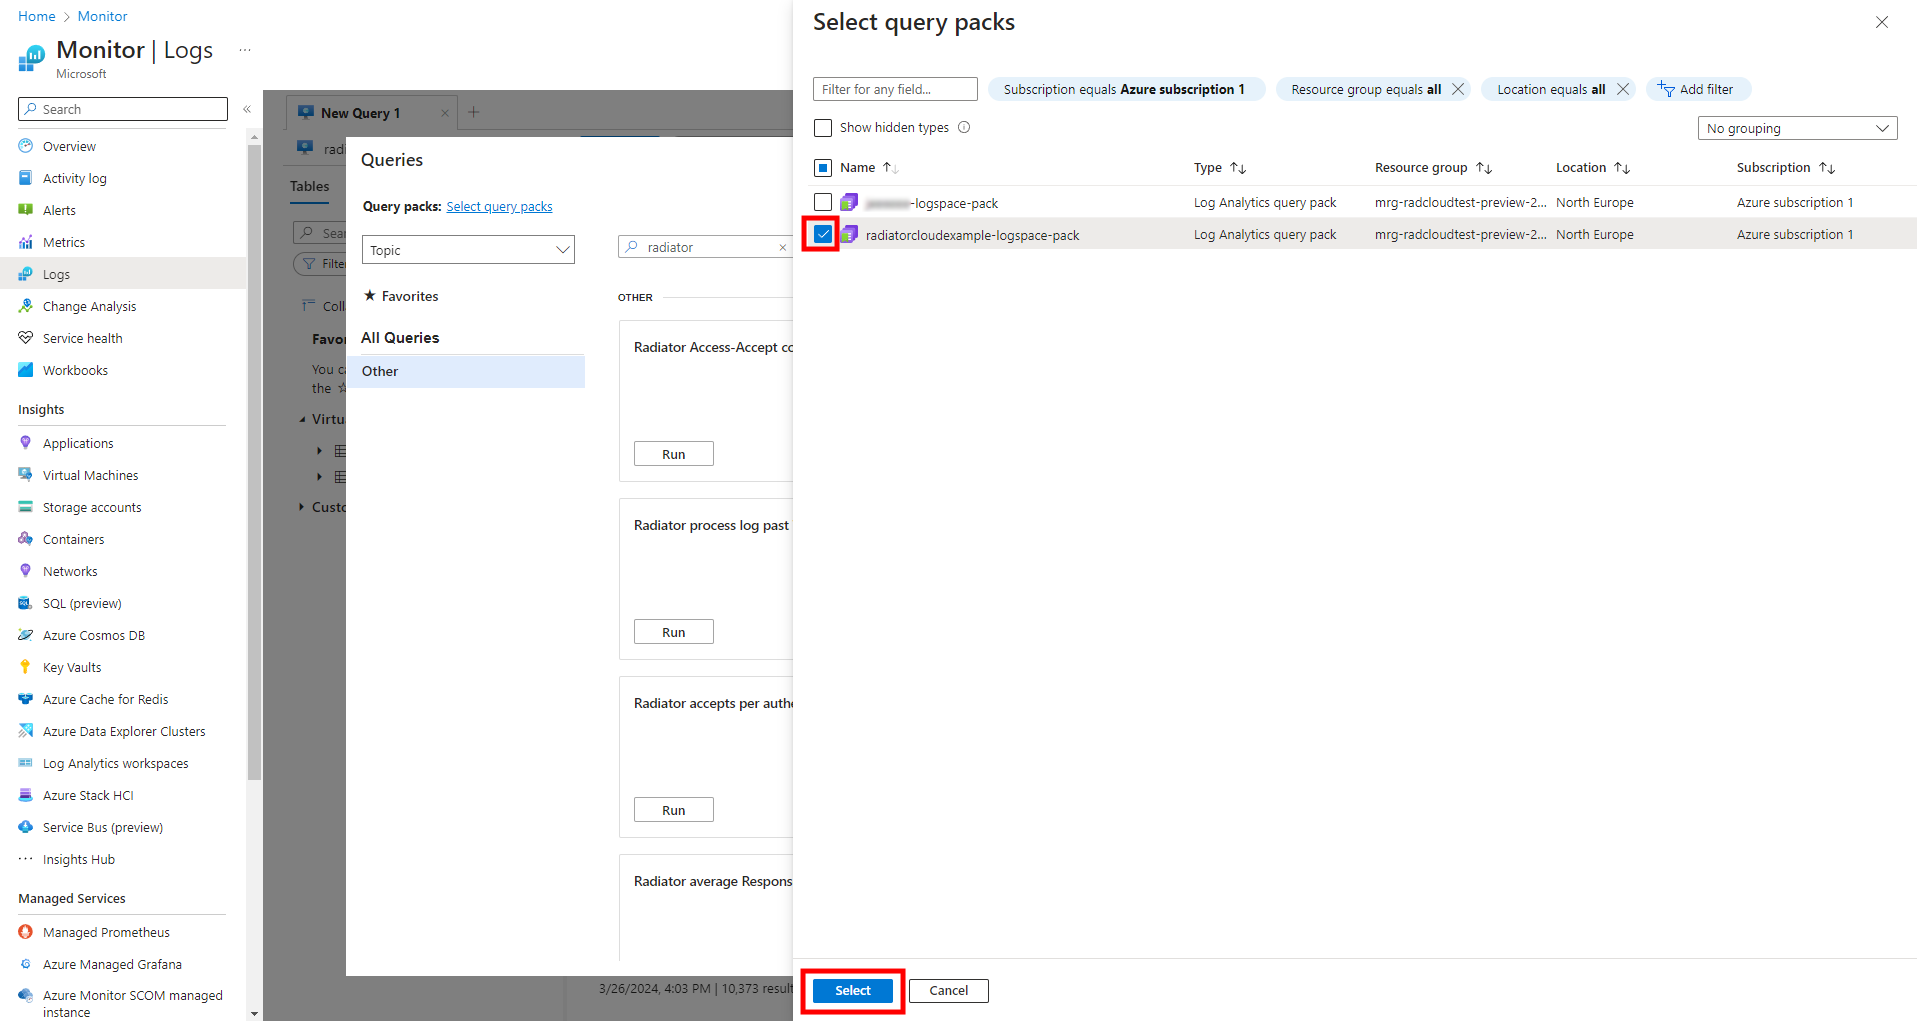
Select a Log Analytics query pack with your Managed Application’s name at the front. In this example, the managed application name is ‘radiatorcloudexample’. Check the box on the left side and press ‘Select’ at the bottom of the view.
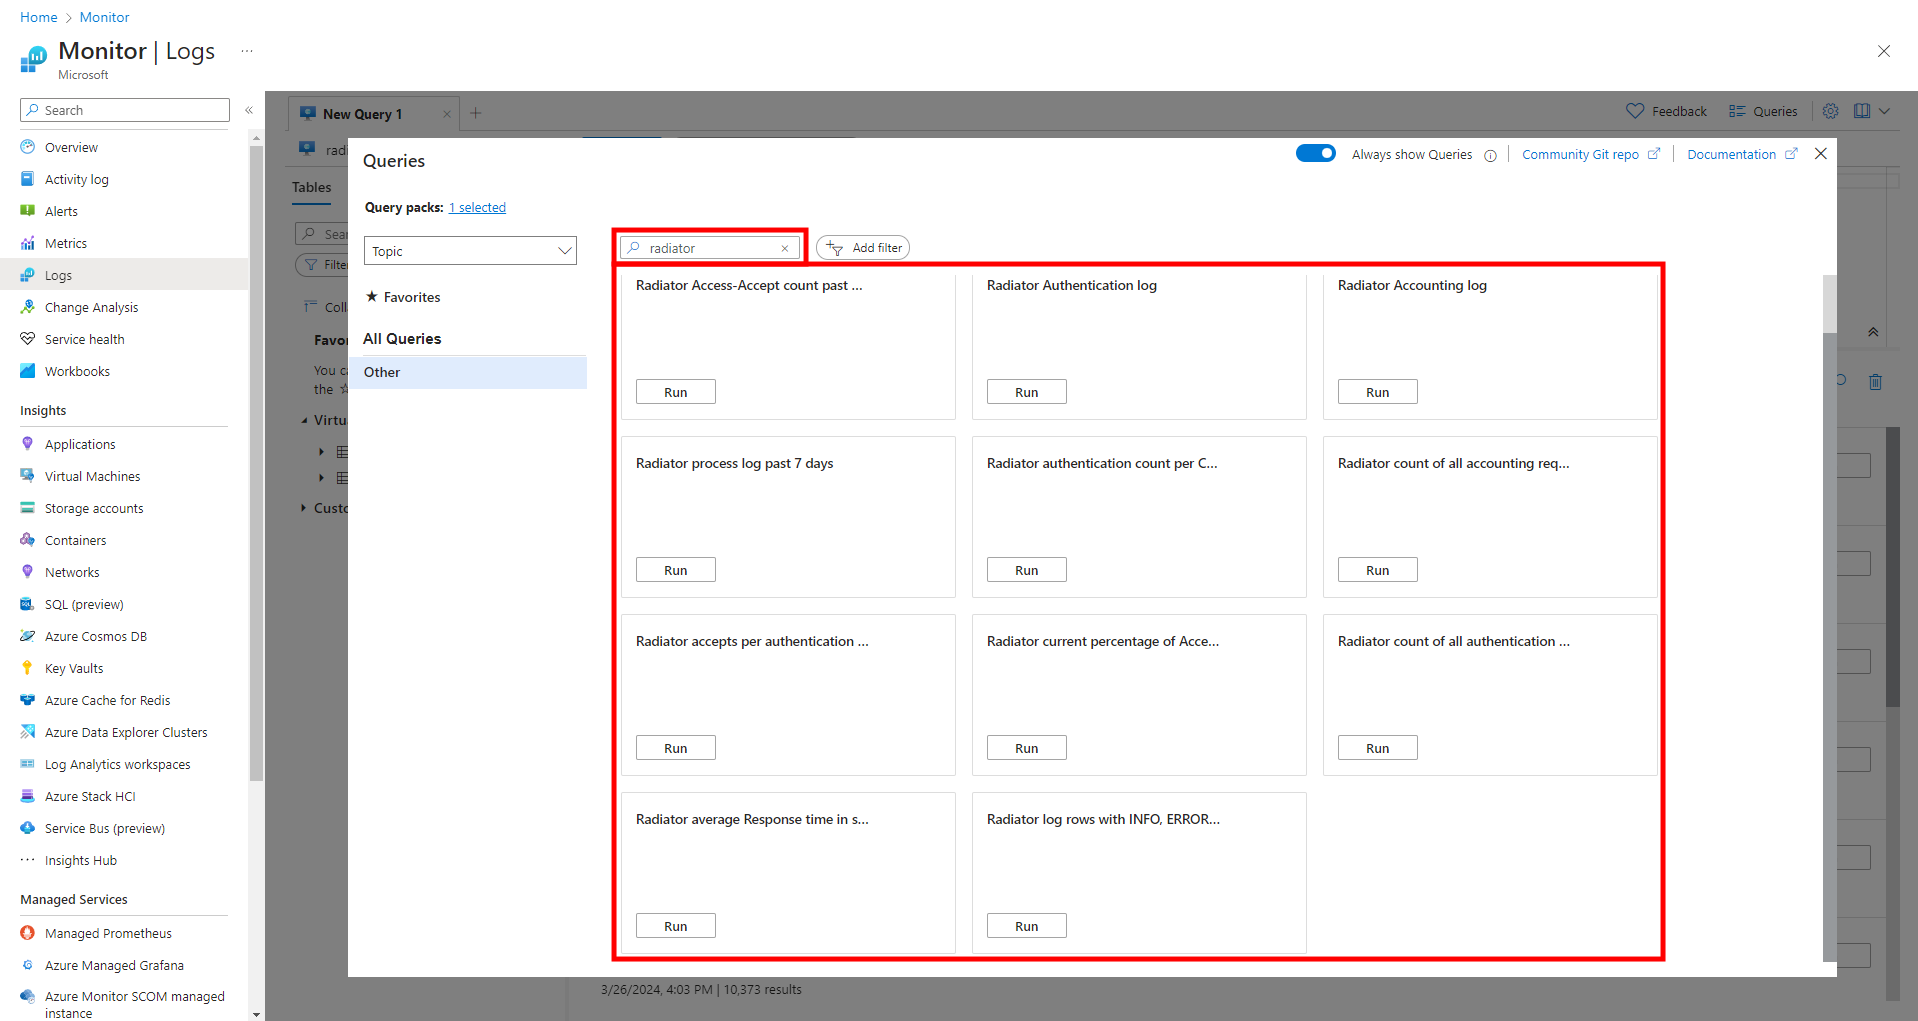
Search for ‘radiator’ in the Queries window.
You should see 15 different query options.
Choose the query you want to see and press ‘Run’.

When viewing the logs and graphs for the first time, you need to edit the scope. Press ‘Select scope’ at the top of the view.
A pane will open to the right side of the window.

From the right pane that opened up, you need to select the managed resource group that includes your Log Analytics Workspace with your managed application’s name ‘[managed application name]-logspace’.
By default, managed resource groups’ icon is a cyan hexagon and the managed resource groups that the managed application creates begin with ‘mrg’.
Once you’ve located the correct managed resource group, select it and press apply at the bottom of the view.

Your log result is at the middle of the view.
To run new logs, search ‘Radiator’ at the top left of the view.
Premade queries
- Radiator Cloud product basic information: Shows plan, version number, User ID limit and product internal licence expiry date
- Radiator accepts per authentication requests percentage and count over time
- Radiator Access-Accepts count past 24 hours
- Radiator Authentication log
- Radiator Accounting log
- Radiator process log past 7 days
- Radiator authentication count per Client IP Address over time with graph
- Radiator average Response time in seconds over last 24h
- Radiator count of all authentication requests processed since start
- Radiator count of all accounting requests processed since start
- Radiator current percentage of Access-Accepts and Access-Rejects with graph
- Radiator log rows with INFO, ERROR or WARNING in past 24h
- Radiator Ignored authentication requests
- Radiator current percentage of Access-Accepts, Access-Rejects and Ignores with graph
- Radiator count of current users with graph
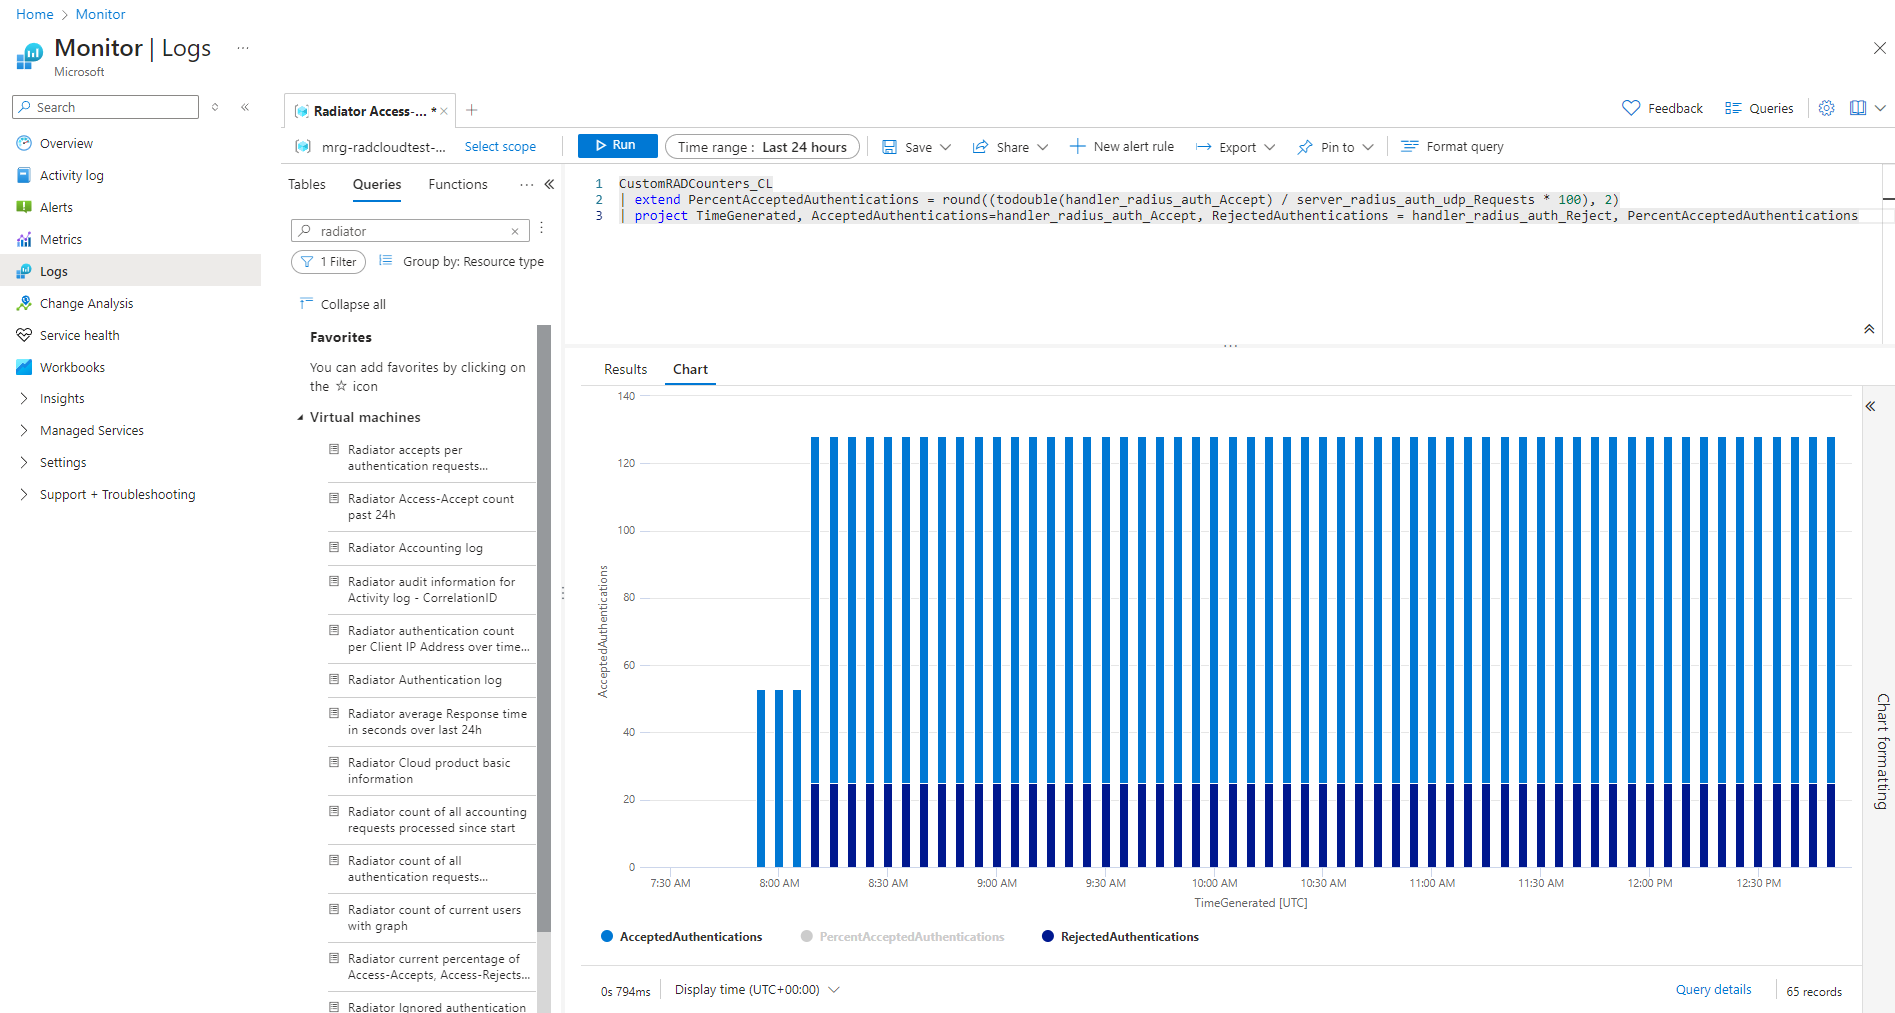
Known issue: Accepts per authentication requests chart includes percentage
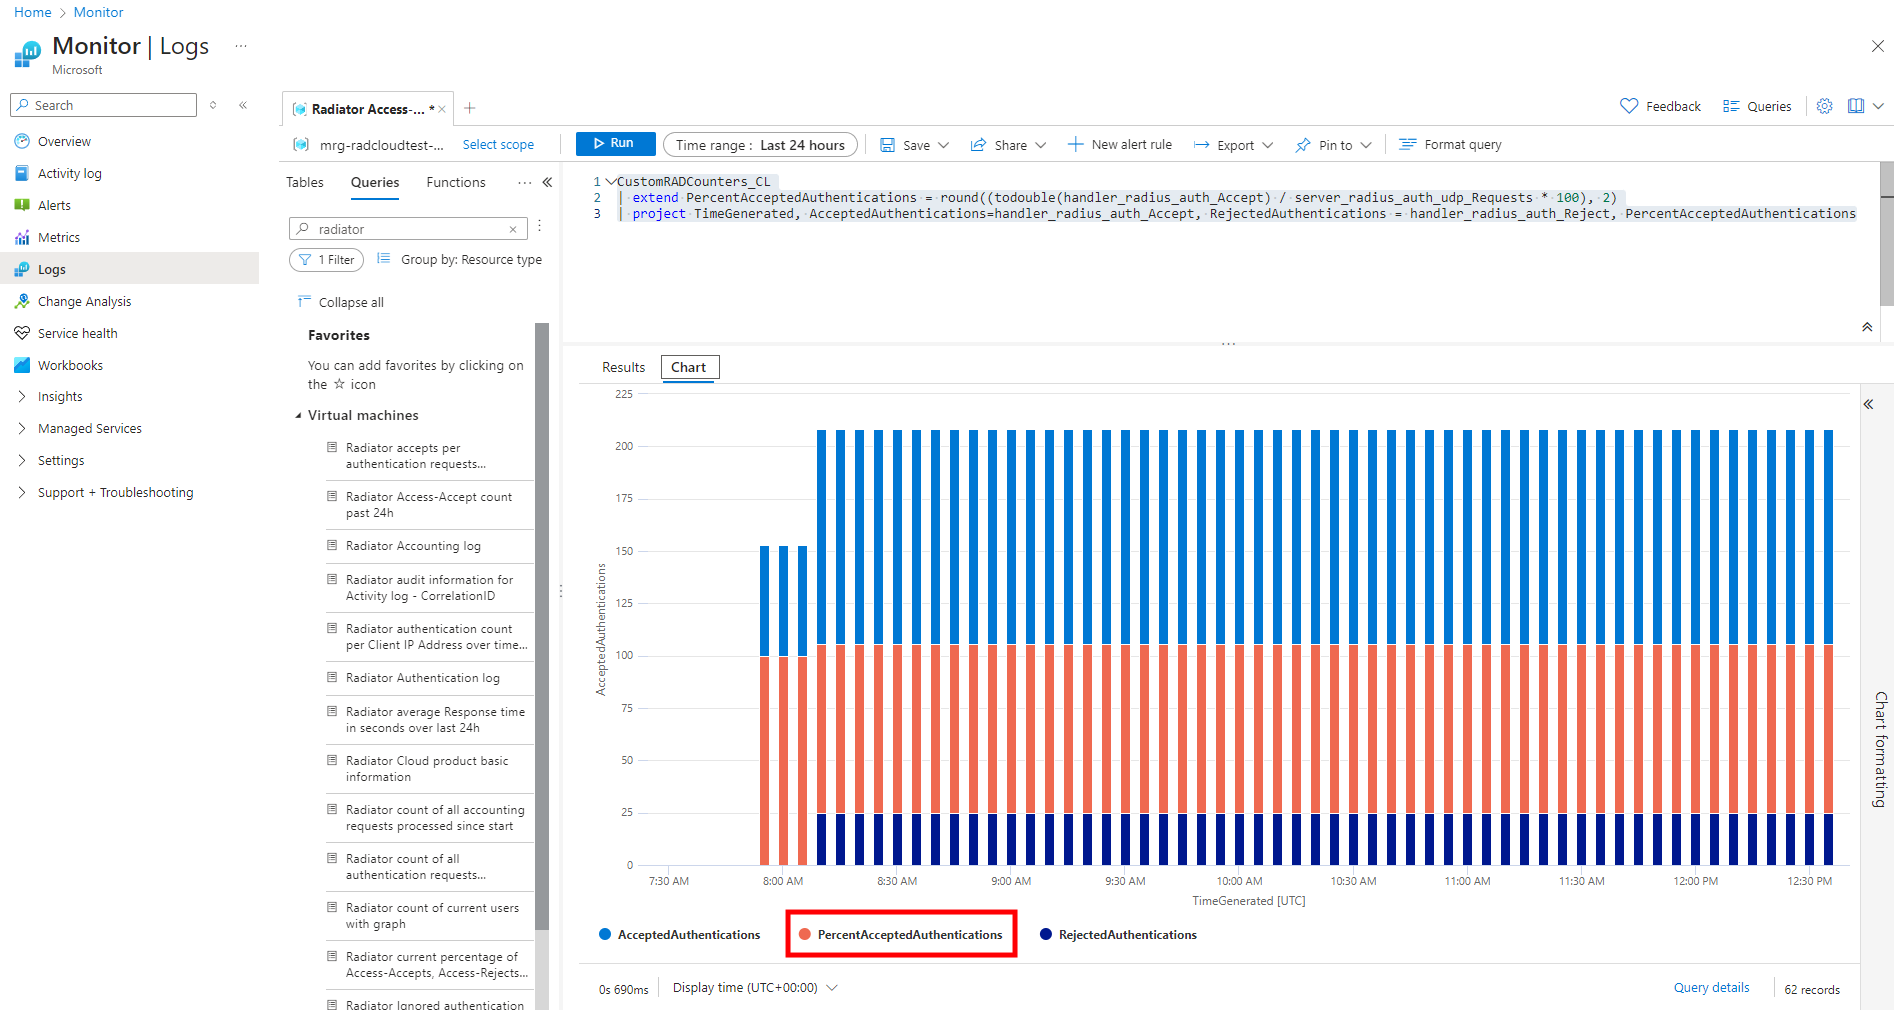
When viewing the ‘Radiator accepts per authentication requests percentage and count over time’ query chart, the graphic also includes the percentage of accepted authentications in the chart. This distorts the chart like shown above.
To fix this issue, click on the orange dot or text ‘PercentAcceptedAuthentications’.
The correct formatting for the chart should look similar to this.